
I used to be the person who cranked the burner to high, waited for the skillet to start smoking, and then tossed bacon strips straight from the fridge onto the searing surface. The result? Strips that curled up like little scrolls, burnt on the edges, chewy and gummy in the middle, with fat that never really crisped. I thought that was just what bacon did. Turns out, I was doing it wrong for years, and the fix was so simple I almost felt insulted when I learned it.
The step you should never skip: start your bacon in a cold pan. That’s it. No preheating, no waiting for the oil to shimmer, no drama. Cold bacon, cold pan, then turn on the heat. This one adjustment changes everything about how your bacon turns out, and once you try it, you’ll never go back to the old way.
Why Cold Bacon in a Hot Pan Is a Disaster
Here’s the thing most people don’t realize about bacon. It’s not one uniform ingredient. It’s two very different things layered together: lean meat and fat. And those two components behave completely differently when they hit heat. The meat is thin and cooks fast. The fat, on the other hand, retains cold much longer than the lean parts. When you throw a fridge-cold strip onto a screaming hot skillet, the meat starts searing immediately while the fat just seizes up. It gets locked inside the bacon instead of rendering out, which is exactly the opposite of what you want.
The result is that frustrating combination everyone knows: burnt spots next to rubbery, gummy patches. Some parts taste like charcoal, some parts are soggy. And those strips curl and shrink so aggressively that you can lose up to 40% of their length. When you’re paying $7 or $8 a pound for bacon, that’s real money evaporating off your pan.
The Cold Pan Method, Step by Step
The technique is dead simple, which is what makes it so great. Lay your bacon strips out in a cold skillet before you even touch the stove knob. The strips can touch, but don’t overlap them. Then turn the burner to medium-low. That’s it. Walk away for a minute, come back, and you’ll hear the bacon just starting to gently sizzle as the fat begins to melt.
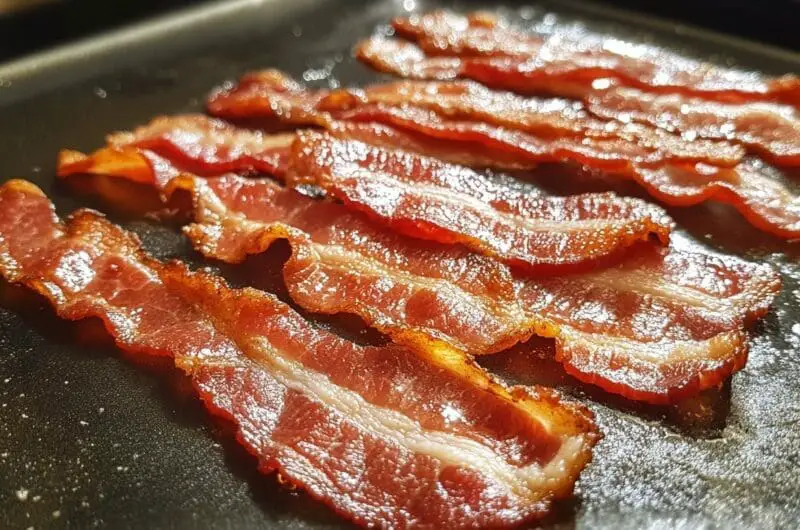
What’s happening here is beautiful in its simplicity. By starting cold, the fat and the meat warm up together at the same pace. The fat has time to slowly render out, pooling in the pan and essentially frying the bacon in its own grease. The meat doesn’t get blasted by high heat before the fat catches up. You end up with strips that are evenly golden, crisp where they should be, and still a little tender in the meaty sections.
Total cooking time on the stovetop is about 8 to 12 minutes for regular-sliced bacon. Flip the strips as needed with tongs. When they look just slightly shy of your ideal crispness, pull them. Bacon keeps cooking for about 30 seconds after you take it off the heat, so if you wait until it looks perfect in the pan, it’ll be overdone on the plate.
Let Your Bacon Warm Up First (Yes, Really)
The cold pan is the non-negotiable step, but there’s a bonus move that makes it even better. Before you start cooking, pull your bacon out of the fridge and let it sit on the counter for about 15 to 20 minutes. Think of it the same way you’d think about a steak. Room temperature bacon cooks more evenly because the fat and meat are closer to the same starting temperature when they hit the pan.
There’s also a very practical reason. Cold bacon is sticky. The fat on one strip likes to cling to the strip next to it, and when you try to separate them straight from the fridge, you end up tearing them. A few minutes on the counter loosens things up, and you get nice, intact slices instead of ragged shreds. One chef from North Country Smokehouse pointed out that while the cook time difference between cold and room-temperature bacon is minimal for thin slices, the ease of separation alone makes the wait worthwhile.
Pat It Dry Before It Hits the Pan
This is another small step that pays off big. Before you lay your strips in the skillet, give each one a quick pat with a paper towel. Use paper towels, not cloth or microfiber, because those can leave behind little lint fibers that stick to the bacon. Patting removes surface moisture and any leftover cure residue that can burn and cause bitter spots. It also cuts down on spattering, which means fewer grease burns on your arms and less mess on your stovetop.
Don’t Crowd the Pan
I know it’s tempting to cram as many strips as possible into the skillet, especially when you’re cooking for a crowd. But overcrowding is one of the fastest ways to ruin bacon. When strips overlap and pile up, they trap steam between them. Instead of frying, the bacon basically steams itself, and you end up with a tangled mess of floppy, soggy strips no matter how long you leave them on the heat.
For a standard 12-inch skillet, stick to about six strips per batch. They can sit close together since bacon shrinks as it cooks, but they should not overlap at the start. If you need more bacon than that, cook it in batches. It’s worth the extra few minutes.
The Water Trick for Even Better Results
If you want to take this cold-start method one step further, try adding a small amount of water to the pan. This technique was developed by America’s Test Kitchen and endorsed by Alton Brown, who says he’s sworn by it for years. Here’s how it works: lay your bacon in a cold skillet in a single layer, then add about a quarter cup of water. Just enough to barely cover the strips. Turn the heat to high until the water boils, then lower to medium and let the water cook off.
The water keeps the initial cooking temperature low and gentle, around 212 degrees, which gives the fat plenty of time to render without the meat tightening up and scorching. Once the water evaporates, the bacon transitions seamlessly into frying in its own rendered fat. The texture you get is something special: crisp where it should be, tender in the meaty parts, and with way fewer grease splatters during the process. It sounds counterintuitive, but it works incredibly well.
The Oven Method (Cold Start Works Here Too)
Everything I’ve said about starting cold applies to the oven, too. Line a rimmed baking sheet with parchment paper or foil, lay out your bacon in a single layer, and place the sheet in a cold oven. Then set the temperature to 400 degrees. Don’t preheat. The same principle is at work: the bacon heats up gradually with the oven, giving the fat time to render slowly from the start.
Regular bacon takes about 14 minutes; thick-cut takes around 18 minutes. Start checking at 12 minutes because every oven is different. For extra-crispy strips, set a wire rack over the lined baking sheet and lay the bacon on the rack so air circulates underneath. The oven method is perfect for big batches, and cleanup is a breeze if you used parchment.
Choose the Right Pan
Your skillet matters. A heavy-bottomed pan, especially cast iron, distributes heat more evenly than a thin, cheap skillet. Even heat means fewer hot spots, which means fewer burnt patches. If you don’t own a cast iron pan, a heavy stainless steel skillet will do fine. Just avoid those flimsy nonstick pans that warp on high heat. Medium-low heat, around 325 to 350 degrees at the pan surface, is the sweet spot for stovetop bacon. That range lets fat render slowly without burning the meat.
Save the Grease (Seriously, Don’t Throw It Away)
One last thing. That golden fat sitting in your pan after cooking? That’s liquid flavor. Don’t pour it down the drain (it’ll clog your pipes), and definitely don’t throw it away. Let it cool slightly, then pour it into a glass jar and stash it in the fridge. Use it to fry eggs, roast vegetables, cook fried chicken, make gravy, or pop popcorn. One tablespoon adds rich, smoky depth to just about anything. If you don’t plan to use it, pour it into a disposable container like an old coffee can, let it solidify, and toss it in the trash.
Perfect Stovetop Bacon (Cold Pan Method)
Course: BreakfastCuisine: American4
servings20
minutes12
minutes180
kcalThe simple cold pan trick that gives you perfectly crispy, evenly cooked bacon every single time.
Ingredients
12 ounces thick-cut or regular bacon (about 12 slices)
Paper towels for patting and draining
1/4 cup water (optional, for the water method)
Directions
- Remove the bacon from the refrigerator and let it sit on the counter for 15 to 20 minutes. This brings the fat and meat closer to the same temperature, which helps everything cook more evenly. It also makes the slices much easier to separate without tearing.
- Pat each bacon strip dry with a paper towel on both sides. This removes surface moisture and cure residue that can cause spattering and bitter burnt spots during cooking.
- Lay about 6 strips of bacon in a single layer in a cold, heavy-bottomed skillet (cast iron works best). The strips can touch but should not overlap. Do not preheat the skillet.
- If using the water method, pour about 1/4 cup of water over the bacon, just enough to barely cover the strips. Turn heat to high until the water boils, then reduce heat to medium and let the water cook off completely. If not using water, simply turn the burner to medium-low.
- Cook the bacon over medium to medium-low heat, flipping the strips with tongs every few minutes as they begin to brown. The fat will slowly render into the pan, and the bacon will gradually crisp. This takes about 8 to 12 minutes total for regular-cut, slightly longer for thick-cut.
- Remove the bacon when it looks just slightly less done than your ideal crispness. Residual heat will continue cooking it for about 30 seconds after it leaves the pan. Transfer strips to a paper-towel-lined plate to drain.
- Repeat with remaining bacon strips in a second batch if needed. The pan will already have rendered fat in it, so the second batch may cook slightly faster. Watch it closely.
- Let the bacon fat in the pan cool slightly, then pour it through a fine mesh strainer into a glass jar. Store in the refrigerator for up to 3 months and use it for frying eggs, roasting vegetables, making gravy, or popping popcorn.
Notes
- For flat bacon, use a bacon press or a second heavy skillet on top of the strips while cooking to keep them from curling.
- If you prefer the oven method, lay bacon on a parchment-lined baking sheet, place it in a cold oven, set to 400 degrees F, and bake 14 to 18 minutes depending on thickness.
- Never pour bacon grease down the drain. If you do not plan to reuse it, pour it into a disposable container, let it solidify, and throw it in the trash.
Frequently Asked Questions
Q: How long should I let bacon sit out before cooking?
A: About 15 to 20 minutes is plenty. You just want to take the chill off so the fat and meat are closer to the same temperature. This helps everything cook evenly and makes the strips easier to separate from the package without tearing them apart.
Q: Does the cold pan method work with thick-cut bacon too?
A: Absolutely. Thick-cut bacon actually benefits even more from the cold-start approach because the fat layers are thicker and need more time to render properly. Just expect to add a few extra minutes to the total cooking time compared to regular-sliced bacon.
Q: Can I use the cold pan method on an electric stove?
A: Yes, it works on any stove type. Electric burners take longer to heat up, which actually works in your favor here since the gradual temperature increase gives the fat even more time to render. Just keep it on medium-low and be patient.
Q: Why does adding water to bacon in the pan work?
A: Water boils at 212 degrees, which keeps the initial cooking temperature low and gentle. The fat renders slowly while the meat stays tender instead of seizing up. Once the water evaporates, the bacon finishes crisping in its own fat. It also produces far fewer grease splatters than the traditional dry-fry method.