
There’s a reason pot roast has been a Sunday staple in American homes since the late 1700s, when British and Irish immigrants brought the tradition with them. Families would throw a roast in the oven before heading to church, and by the time they walked back through the door, the whole house smelled like heaven and dinner was ready. The slow cooker eventually took over that role for a lot of people, but I’m going to be honest with you — there is no substitute for a pot roast done the old-fashioned way in the oven. The way Grandma actually did it.
This recipe is the kind that doesn’t need a lot of fuss. You brown a big hunk of beef, toss in some vegetables, pour in some liquid, and let your oven do the rest for a few hours while you go live your life. The result is meat so tender it practically falls apart when you look at it, vegetables that have soaked up all that beefy richness, and a thick gravy you’ll want to pour over everything on your plate. Let me walk you through exactly how to make it, plus everything I’ve learned about why it works and what can go wrong.
Why Chuck Roast Is the Only Cut You Should Buy
If you take one thing away from this whole article, let it be this: buy a boneless chuck roast. Sometimes it’s labeled as shoulder steak or chuck shoulder pot roast at the grocery store, but it’s all the same cut. Chuck has generous fat marbling throughout and a ton of connective tissue — that’s the collagen that dissolves into gelatin during hours of slow cooking. That gelatin is what makes the meat moist and gives the gravy real body, that silky quality where it coats the back of a spoon.
Can you use a bottom round roast or a rump roast? Sure. They’ll work. But those leaner cuts won’t give you the same fall-apart tenderness. You’ll get a roast that’s more sliceable — which some people prefer — but it won’t have the same richness. Brisket is another option, though it cooks a little differently. For a classic grandma-style pot roast, chuck is the one. You want a 3 to 4 pound piece for this recipe.
The Sear Matters More Than You Think
I know some recipes tell you searing is optional. And technically, you won’t ruin your dinner by skipping it. But you’ll be leaving a lot of flavor on the table. When you get that beef screaming hot in a Dutch oven with a little olive oil and let each side develop a deep brown crust, you’re creating layers of flavor that no amount of seasoning can replicate. That crust isn’t just for looks — it’s concentrated, caramelized beef flavor.
Here’s how to do it right. Pat your roast dry with paper towels first. Wet meat steams instead of sears. Season it generously — and I mean generously — with salt and pepper on all sides. Heat your Dutch oven over medium-high heat with enough olive oil to coat the bottom. When the oil shimmers, lay the roast in and don’t touch it for a solid minute. You want a real crust, not a light tan. Sear it on all sides, including the ends. Then pull it out and set it on a plate while you work on the vegetables.
Building Flavor in the Same Pot
Once the beef is out, you’ve got all those gorgeous browned bits stuck to the bottom of your Dutch oven. That’s called fond, and it’s pure gold. Drop in your chopped onions — yellow onions are traditional, though you could use sweet onions or even add some leeks if you’re feeling fancy. Add some celery too. Cook them for a few minutes, stirring so they pick up all that stuck-on flavor and don’t burn.
Now you deglaze. Pour in about a cup of dry red wine — a Cabernet Sauvignon works great, but a Merlot or Malbec is fine too. Use something you’d actually drink. Scrape the bottom of the pot with a wooden spoon to lift up all those browned bits. If you don’t cook with wine, just use an extra cup of beef broth. No judgment. Then add about a cup and a half of beef broth. You want enough liquid to come about halfway up the sides of the roast — not covering it completely. This creates a moist environment where the meat braises gently and evenly.
A tablespoon of tomato paste stirred in adds a touch of sweetness and acidity that rounds everything out. Toss in a couple sprigs of fresh thyme and rosemary if you have them. Ree Drummond swears these fresh herbs take a pot roast from good to life-changing, and honestly, I agree with her on that.
Low and Slow Is the Whole Secret
Here’s where the magic happens — and it’s the part where most people go wrong. If you cook a chuck roast too hot or too fast, it will be tough, chewy, and disappointing. The connective tissue needs time to break down into gelatin, and that only happens at lower temperatures over several hours. Think of it like this: you’re gently coaxing a cheap, tough cut of beef into becoming something incredibly tender. Rushing it defeats the whole purpose.
I cook mine at 275°F. At that temperature, plan on roughly an hour per pound of beef. A 3-pound roast takes about 3 to 3.5 hours. A 4 to 5-pound roast needs closer to 4 to 4.5 hours. Some people go with 325°F or even 350°F, which shortens the cook time but increases the chance of the meat drying out if you’re not careful. Whatever temperature you choose, put the lid on tight and walk away. This roast cooks best when you leave it alone. Don’t keep opening the lid to peek — you’re letting heat escape every time you do.
When and How to Add Vegetables
This is where people have strong opinions, and I have mine. Don’t put your vegetables in at the beginning. If your carrots and potatoes cook for 3 or 4 hours, they’ll turn to mush. Nobody wants mushy carrots swimming in gray gravy.
Add your potatoes and carrots with about 70 minutes left on the clock. Cut the carrots into thick sticks — halve them, then quarter each half — so they hold their shape. For potatoes, baby Yukon golds or red potatoes are my favorite because they don’t require peeling and they hold their shape well. Russet potatoes work too — that extra starch makes them almost creamy — but they do tend to fall apart more. Cut russets into big quarters. Some people also add turnips, rutabagas, parsnips, or even sweet potatoes, all of which are great with beef.
One tip I picked up that I now swear by: if you’re adding more vegetables than the recipe calls for, add extra beef broth or water. The vegetables absorb a lot of moisture as they cook, and you don’t want your roast drying out because your potatoes drank all the braising liquid.
Making the Gravy
When the roast is done — fork-tender, practically falling apart — pull the meat and vegetables out and set them on a platter. Put the Dutch oven on the stove over medium heat. You’ve got all those incredible pan drippings to work with.
First, skim off excess fat. You can lay a paper towel flat on the surface and pull it up quickly — the grease clings to the paper towel and the good stuff stays behind. Then, in a small bowl, whisk together 2 tablespoons of cornstarch (or all-purpose flour) with 2 tablespoons of cold water until smooth. Bring the drippings to a boil, then whisk in the slurry a little at a time until the gravy thickens to where you want it. You probably won’t need all of it — just add until it looks right. Season with salt and pepper to taste. One important note: do not use low-sodium broth for this recipe, or your gravy will taste flat no matter how much salt you add at the end.
Slow Cooker Option
Look, I’m not going to pretend the slow cooker doesn’t have its place. If you need to leave the house for 8 to 10 hours, a slow cooker pot roast is a lifesaver. Sear your beef in a Dutch oven on the stove first (please don’t skip this step even for the slow cooker version), then transfer everything to the slow cooker. Reduce the broth to 1 cup and the wine to half a cup since there’s less evaporation. Cook on LOW for 8 to 10 hours. HIGH for 4 to 6 hours works in a pinch, but LOW always gives better results.
But if it’s a Sunday and you’re home anyway? Oven all the way. The dry heat of the oven gives you something the slow cooker just can’t — a slightly different texture and deeper flavor in both the meat and the gravy. It’s the difference between good and great.
Leftovers and Storage
Pot roast keeps well in the refrigerator for about 3 to 4 days stored in an airtight container with gravy poured over the top. It also freezes beautifully — up to 2 months. Thaw it in the fridge for a full day before reheating in a pot on the stove over low heat. The leftovers are arguably better than the original, since the flavors have had time to meld together overnight.
Shred the leftover beef and pile it on crusty bread for hot beef sandwiches, or toss it with egg noodles and extra gravy for a quick weeknight dinner. There’s really no wrong way to use it.
Frequently Asked Questions
Q: How do I know when the pot roast is done?
A: It’s done when the meat shreds easily with a fork and practically falls apart when you try to lift it. If there’s any resistance or toughness, it needs more time. A 3-pound roast at 275°F usually takes about 3.5 hours, but every oven is a little different, so go by texture rather than the clock.
Q: Do I need to flip the roast while it’s cooking in the oven?
A: No. Since the roast is sitting in a good amount of liquid, it’s braising from all sides. Keeping the lid on and leaving it alone is the best thing you can do. Every time you open that lid, you lose heat and add to the cooking time.
Q: Can I make pot roast without wine?
A: Absolutely. Replace the wine with an equal amount of beef broth. The gravy won’t have quite the same depth, but it’ll still be really good. Just make sure you’re using regular beef broth, not the low-sodium kind, so the flavor holds up.
Q: Why is my pot roast tough?
A: Almost always because it was cooked too hot or not long enough. Chuck roast needs low temperatures and plenty of time for the collagen to break down into gelatin. If your roast is tough, put it back in the oven with the lid on for another 30 to 45 minutes. It’s very hard to overcook a pot roast at 275°F.
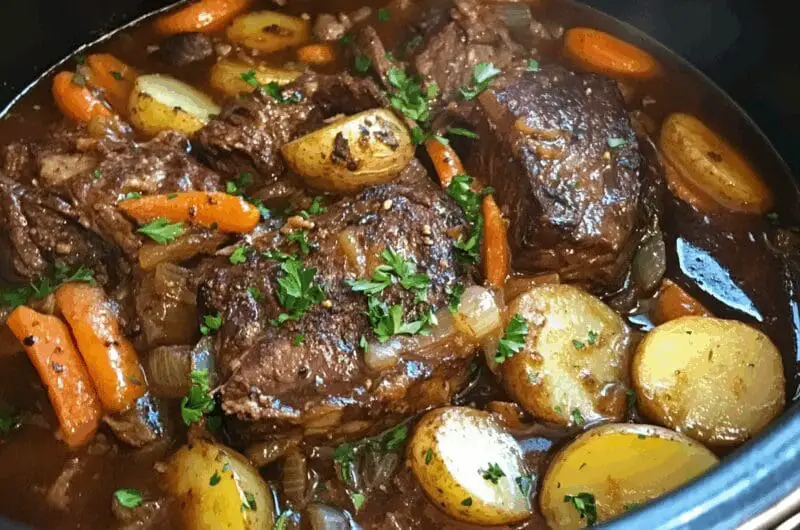
Grandma’s Juicy Oven Pot Roast
Course: DinnerCuisine: American6
servings25
minutes4
hours459
kcalFall-apart tender chuck roast braised low and slow with red wine, vegetables, and fresh herbs — just like Grandma used to make it on Sunday.
Ingredients
3-4 pound boneless beef chuck roast
2 tablespoons olive oil
1 large yellow onion, chopped
3 stalks celery, cut into 2-inch pieces
1 cup dry red wine (such as Cabernet Sauvignon)
1½ cups beef broth (not low-sodium)
1 tablespoon tomato paste
2 sprigs fresh rosemary and 3 sprigs fresh thyme
1½ pounds baby Yukon gold potatoes, halved
4 large carrots, peeled and cut into thick sticks
Salt and black pepper to taste
2 tablespoons cornstarch mixed with 2 tablespoons cold water (for gravy)
Directions
- Preheat your oven to 275°F. Pat the chuck roast completely dry with paper towels and season all sides generously with salt and black pepper. Don’t be shy — a big piece of meat needs a lot of seasoning.
- Heat olive oil in a large Dutch oven over medium-high heat until the oil shimmers. Place the roast in the pot and sear for about 1 minute per side, or until a deep brown crust forms on all sides. Remove the roast to a plate and set aside.
- Add the chopped onion and celery to the Dutch oven. Cook for about 3 minutes, stirring often to scrape up some of the browned bits from the bottom of the pot. Stir in the tomato paste and cook for another minute until it darkens slightly.
- Pour in the red wine and use a wooden spoon to scrape up all remaining browned bits from the bottom of the pot. Let the wine simmer for about 2 minutes. Then add the beef broth and stir to combine.
- Return the chuck roast to the Dutch oven. The liquid should come about halfway up the sides of the meat. Tuck the rosemary and thyme sprigs around the roast. Place the lid on tightly.
- Transfer the Dutch oven to the preheated oven and cook for about 2.5 hours without opening the lid. After 2.5 hours, add the halved potatoes and carrot sticks around and on top of the roast. Replace the lid and continue cooking for another 1 to 1.5 hours, until the meat is fork-tender and the vegetables are cooked through.
- Carefully remove the roast and vegetables from the Dutch oven and arrange on a serving platter. Discard the herb sprigs. Tent the platter loosely with foil to keep warm while you make the gravy.
- Place the Dutch oven on the stove over medium heat and bring the drippings to a boil. Skim off any excess fat from the surface. Whisk in the cornstarch slurry a little at a time until the gravy reaches your desired thickness. Season with salt and pepper to taste, then pour over the roast and vegetables or serve on the side.
Notes
- If you don’t cook with wine, replace it with an equal amount of beef broth. Make sure you use regular (not low-sodium) broth so the gravy has enough flavor.
- For the slow cooker version, reduce broth to 1 cup and wine to ½ cup. Cook on LOW for 8-10 hours or HIGH for 4-6 hours.
- Leftovers keep in the refrigerator for up to 4 days and freeze well for up to 2 months. Thaw overnight in the fridge and reheat gently in a pot on the stove over low heat.