
Former President Jimmy Carter lived to be 100 years old, and while there’s no single secret to his long life, one thing is certain—the man knew how to enjoy a good dessert. The Georgia native grew up on a peanut farm and never lost his love for the humble legume. His wife Rosalynn made him a peanut butter pie he absolutely adored, but there’s another version that became known as the Jimmy Carter dessert. This layered treat combines everything you’d want in a sweet—crunchy peanuts, creamy peanut butter, rich chocolate pudding, and fluffy whipped topping. It’s the kind of dessert that disappears at potlucks before anything else on the table.
The crust starts with peanuts and graham crackers
Most desserts start with a regular graham cracker crust, but this one takes it up a notch. You process dry-roasted peanuts with graham crackers to create a base that’s actually interesting. The combination gives you that sweet graham cracker taste with little bursts of nutty crunch throughout. You’ll need about a cup of peanuts and 12 graham cracker sheets, which you pulse together with sugar and melted butter until everything’s finely chopped and moistened. The key is not to over-process it—you want some texture left in those peanuts so every bite has something to chew on.
Once you press this mixture into a 13×9-inch baking dish, you’ll bake it for about 10 to 12 minutes at 350°F. This step is important because it sets the crust and makes it sturdy enough to hold all the layers you’re about to pile on top. A baked crust won’t get soggy sitting under all that cream and pudding. When it comes out of the oven, it should be lightly browned and smell like toasted nuts. Let it cool down before you add anything else, or your cream cheese layer will turn into a melted mess. This graham cracker foundation is what makes the whole dessert work.
The peanut butter layer is sweet and tangy
Right after your crust cools, you’ll make the peanut butter cream cheese layer. This is where the dessert gets its signature taste that connects it to President Carter’s peanut farming roots. You beat together half a cup of creamy peanut butter with 8 ounces of cream cheese, a third cup of brown sugar, and a teaspoon of vanilla extract. The cream cheese adds a slight tang that keeps the sweetness from being overwhelming, while the brown sugar brings a deeper, almost caramel-like sweetness that regular white sugar doesn’t have. Make sure both your cream cheese and peanut butter are at room temperature so they blend smoothly without lumps.
After everything’s mixed until smooth, you fold in half a container of whipped topping. This lightens up the dense peanut butter mixture and makes it spreadable instead of thick and gloppy. When you spread it over the crust, it should go on easily and create an even layer. Some people use Cool Whip for the whipped topping, which works perfectly fine and is what most home cooks have in their freezer. Others prefer making real whipped cream, but that’s extra work for a dessert that’s supposed to be simple. The peanut butter layer is the star of this whole creation—it’s what makes people ask for the recipe at every gathering.
Chocolate pudding makes the perfect middle layer
After the peanut butter layer comes chocolate pudding, because nothing goes with peanut butter quite like chocolate. You’ll use two boxes of instant chocolate pudding mix and three cups of whole milk. Don’t skimp and use skim milk—the fat in whole milk makes the pudding richer and helps it set up properly. Mix the pudding and milk together with an electric mixer on low speed for about one to two minutes until it starts to thicken. Instant pudding thickens fast, so you need to spread it over the peanut butter layer pretty quickly before it sets up completely in the bowl.
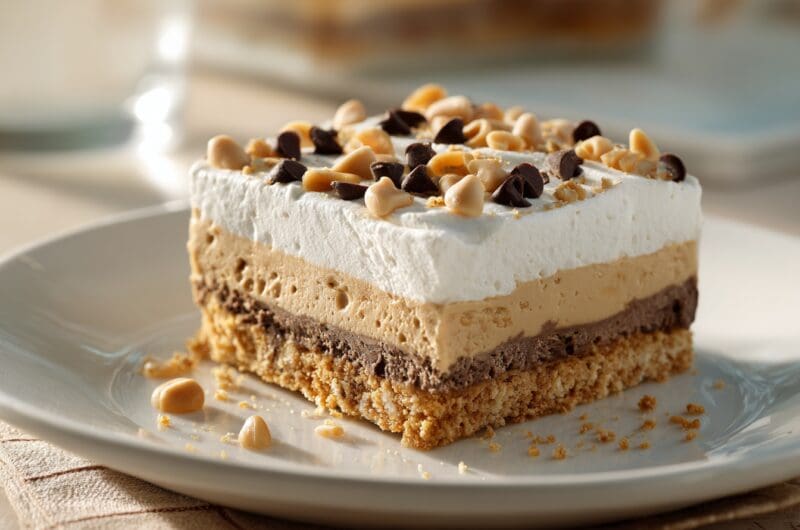
The chocolate layer adds a richness that balances out the sweet peanut butter below it. When you cut into the finished dessert, you’ll see distinct layers that look impressive even though this is one of the easier desserts you can make. Some recipes for similar layered desserts call this a “delight” or a “lush,” but adding peanuts and peanut butter to the mix is what earned it the Jimmy Carter name. The chocolate pudding layer should be spread evenly so every piece gets the same amount. Once it’s on there, you can move on to the final topping that makes this dessert look fancy without any real effort.
Whipped topping and chocolate chips finish it off
The top layer is the easiest part of the whole dessert. You spread the remaining container and a half of whipped topping over the chocolate pudding layer. This creates a fluffy white cloud that contrasts nicely with the dark chocolate below it. The whipped topping should be spread gently so you don’t disturb the pudding layer underneath. Use a spatula and smooth it out from the center toward the edges, making sure you cover every bit of chocolate. If you leave gaps, the pudding will show through and it won’t look as pretty when you serve it.
Once the whipped topping is spread out, you sprinkle the remaining chopped peanuts and half a cup of milk chocolate chips over the top. This gives people a hint of what’s inside and adds extra texture. The chocolate chips will soften slightly from sitting on the whipped topping but won’t melt completely. Some folks like to use mini chocolate chips because they distribute more evenly, while others prefer regular-sized chips for bigger bursts of chocolate. Either way works fine. After everything’s assembled, you need to cover the dish and stick it in the refrigerator for at least four hours to let all the layers set properly.
Why peanuts were such a big deal for Carter
Jimmy Carter didn’t just like peanuts—they were part of his family’s livelihood and his identity. His father started growing peanuts in Plains, Georgia, and young Jimmy sold boiled peanuts when he was only five years old. After serving in the Navy, Carter returned home to take over the family farm when his father died. He and Rosalynn worked hard to make the farm successful, growing Spanish peanuts that were commonly used in candy bars. The peanut became such a symbol of Carter’s down-to-earth personality that his presidential campaign handed out bags of peanuts with his name printed on them during the 1976 election.
When Carter became president, he was known as the peanut farmer from Georgia, which set him apart from career politicians. Even after leaving the White House, he stayed connected to his roots. He reportedly still enjoyed peanut butter ice cream well into his later years. The connection between Carter and peanuts was so strong that any dessert featuring the legume became associated with him. While we don’t have confirmation that Carter himself ate this specific layered dessert, it’s become a way for people to honor his memory and his humble beginnings. Making a Jimmy Carter dessert is like taking a little trip back to simpler times.
This dessert feeds a crowd easily
One of the best things about this dessert is that it makes 15 servings from a single 13×9-inch pan. That’s enough for a family reunion, a church potluck, or a neighborhood block party without having to double the recipe. The portions are generous too—each square is rich enough that people feel satisfied without needing a huge piece. Because it’s made in a rectangular baking dish, cutting it into even pieces is straightforward. You can cut it into three rows one way and five rows the other way to get your 15 servings, or adjust the size based on your crowd.
The dessert also travels well, which is important when you’re bringing something to a gathering. Just keep it covered and refrigerated until you’re ready to leave, then transport it in a cooler if you’ll be driving for more than a few minutes. Because there’s no gelatin or anything that needs to stay super cold to hold its shape, it can sit out at room temperature for a little while without falling apart. Just don’t leave it out in hot weather for too long, or the whipped topping will start to weep and look sad. When you serve it, have a sharp knife and a spatula ready to lift out clean pieces that show off all those pretty layers.
Make-ahead desserts save time and stress
Here’s something great about the Jimmy Carter dessert—you have to make it ahead of time. It needs at least four hours to chill and set up properly, which means you can make it the night before your event and have one less thing to worry about the day of. In fact, it’s even better if you make it a full day ahead because the layers have more time to settle and the crust softens slightly from the moisture in the other layers. This makes it easier to cut through and gives you cleaner slices. The dessert will keep in the refrigerator for up to three days if you cover it well.
Making dessert ahead of time means you can focus on other dishes or just relax instead of rushing around right before guests arrive. There’s no last-minute assembly, no worrying about whether something baked properly, and no stress about timing. You just pull it out of the fridge when you’re ready to serve. This kind of no-bake dessert is perfect for summer when you don’t want to heat up the kitchen, but it works equally well year-round. The only real work is the initial mixing and layering, which takes maybe half an hour if you’re moving at a normal pace. Everything else is just waiting for the refrigerator to do its job.
You can adjust the sweetness to your taste
Some people find layered desserts too sweet, but this recipe is pretty balanced thanks to the cream cheese and the slight saltiness from the peanuts. If you want to dial back the sweetness even more, you could reduce the brown sugar in the peanut butter layer by a tablespoon or two. You could also use sugar-free pudding mix if that’s your preference, though it will change the texture slightly. Another option is to use dark chocolate pudding instead of milk chocolate pudding for a more sophisticated, less sweet chocolate taste that appeals to adults.
On the flip side, if you have a serious sweet tooth, you could add a drizzle of chocolate syrup or caramel sauce over each piece when you serve it. Some people like to sprinkle a tiny bit of sea salt over the top along with the chocolate chips and peanuts for a sweet-and-salty combination that’s really popular right now. The basic recipe is flexible enough that you can adjust it based on what your family likes. Just don’t mess with the proportions too much or you might end up with layers that don’t set properly or a crust that falls apart when you try to serve it.
Kids and adults both love this dessert
Finding a dessert that appeals to everyone at a gathering can be tricky, but the Jimmy Carter dessert usually wins over both kids and grown-ups. Kids love the chocolate and peanut butter combination, which tastes similar to their favorite candy. The whipped topping on top is light and sweet without being too rich for young palates. Adults appreciate the more complex taste from the cream cheese and brown sugar, plus the nostalgia factor of a classic Southern layered dessert. It’s not too fancy or weird—just straightforward comfort food in dessert form.
The texture contrast is another reason people enjoy this dessert. You get the crunch from the peanut crust, the creaminess from the peanut butter and pudding layers, and the fluffiness from the whipped topping. Every bite has something different going on, which keeps it interesting from the first forkful to the last. Even people who claim they’re not big dessert fans usually go back for a small second helping of this one. It’s not heavy like a dense chocolate cake or overly rich like cheesecake. Instead, it hits that perfect spot where you feel satisfied but not stuffed after eating a piece.
The Jimmy Carter dessert represents more than just a sweet treat—it’s a connection to American history and Southern tradition. Whether you make it to honor the former president’s memory, to bring something impressive to a potluck, or simply because you love the combination of peanut butter and chocolate, this layered dessert delivers. It’s easy enough for beginners but looks fancy enough to impress guests. The make-ahead convenience means less stress when you’re entertaining, and the crowd-pleasing taste means you probably won’t have leftovers to take home. Give it a try the next time you need a dessert that’s sure to disappear quickly.
Jimmy Carter Dessert
Course: DessertCuisine: American15
servings26
minutes12
minutes385
kcalA rich layered dessert with peanut butter, chocolate pudding, and whipped topping that combines everything President Carter loved about peanuts into one irresistible treat.
Ingredients
1 cup dry-roasted peanuts
12 graham cracker sheets
1/4 cup granulated sugar
6 tablespoons unsalted butter, melted
1/2 cup creamy peanut butter
1/3 cup packed light brown sugar
1 teaspoon vanilla extract
8 ounces cream cheese, softened
2 (8-ounce) containers frozen whipped topping, thawed and divided
2 (3.9-ounce) packages instant chocolate pudding mix
3 cups whole milk
1/2 cup milk chocolate chips
Directions
- Preheat your oven to 350°F. Place the dry-roasted peanuts in a food processor and pulse 3 to 4 times until they’re coarsely chopped. Transfer the chopped peanuts to a small bowl and set aside half for topping the dessert later. Break the graham crackers into the food processor and process them until they form fine crumbs.
- Add the granulated sugar and half of the chopped peanuts to the graham cracker crumbs in the processor. Pulse 4 to 5 times until the peanuts are finely chopped and everything is mixed together. Drizzle the melted butter over the mixture and pulse 3 to 4 more times until the crumbs are evenly moistened and the mixture holds together when pressed. Pour this mixture into a 13×9-inch baking dish and press it firmly into an even layer across the bottom.
- Bake the crust at 350°F for 10 to 12 minutes until it’s lightly browned and fragrant. Remove the pan from the oven and let it cool completely on a wire rack. While the crust is cooling, make the peanut butter layer by beating together the peanut butter, brown sugar, vanilla extract, and softened cream cheese in a large bowl with an electric mixer on medium speed for about 1 minute until the mixture is completely smooth with no lumps.
- Add half of one container of the whipped topping to the peanut butter mixture and beat on low speed for about 30 seconds until just combined. The mixture should be light and fluffy. Spread this peanut butter mixture evenly over the cooled crust, making sure to reach all the edges and corners of the pan. Use a spatula to smooth the top into an even layer.
- Rinse and dry the mixing bowl thoroughly. Pour both packages of instant chocolate pudding mix and the whole milk into the clean bowl. Beat with an electric mixer on low speed for 1 to 2 minutes until the pudding is well combined and starts to thicken. Work quickly because instant pudding sets up fast. Immediately spread the pudding mixture over the peanut butter layer, again making sure to cover it completely and evenly.
- Gently spread the remaining whipped topping over the chocolate pudding layer. Use a light hand and work from the center outward to avoid disturbing the pudding underneath. Make sure the whipped topping covers all the chocolate so you have a nice white layer on top. The whipped topping should use up the rest of the first container plus the entire second container.
- Sprinkle the milk chocolate chips and the reserved chopped peanuts evenly over the whipped topping layer. This gives the dessert a finished look and hints at the peanut butter and chocolate inside. Cover the pan tightly with plastic wrap or aluminum foil, being careful not to let the covering touch the whipped topping surface.
- Refrigerate the dessert for at least 4 hours or overnight until all the layers are fully set and firm. When ready to serve, use a sharp knife to cut the dessert into 15 pieces. Wipe the knife clean between cuts for the neatest slices. Serve cold directly from the refrigerator and store any leftovers covered in the fridge for up to 3 days.
Notes
- Make sure your cream cheese is fully softened to room temperature before mixing, or you’ll end up with lumps in your peanut butter layer that won’t blend out.
- You can substitute sugar-free pudding mix and reduced-fat whipped topping if you prefer, though the texture will be slightly different.
- For easier serving, dip your knife in hot water and wipe it dry between each cut to get clean slices that show off all the layers.
- This dessert actually tastes better the next day after all the flavors have had time to blend together in the refrigerator.
Frequently asked questions about Jimmy Carter dessert
Q: Can I make this dessert without a food processor?
A: Yes, you can crush the graham crackers in a sealed plastic bag with a rolling pin and chop the peanuts by hand with a knife. It takes a bit more effort, but it works just fine. Just make sure everything is chopped to similar sizes so the crust holds together properly.
Q: How far in advance can I make this dessert?
A: You can make it up to 2 days before you need it. In fact, making it a day ahead often makes it taste even better because the layers have more time to set and the flavors blend together. Just keep it covered tightly in the refrigerator until you’re ready to serve.
Q: Can I use crunchy peanut butter instead of creamy?
A: While you can use crunchy peanut butter, creamy works better for a smooth, spreadable layer. The dessert already has plenty of crunch from the peanuts in the crust and on top, so adding more texture in the middle layer might be overkill. Stick with creamy for the best results.
Q: What can I use instead of whipped topping?
A: You can make your own whipped cream by beating heavy cream with a bit of powdered sugar until stiff peaks form. You’ll need about 4 cups of heavy cream to replace the two containers of whipped topping. Keep in mind that real whipped cream doesn’t hold up quite as long as frozen whipped topping, so make the dessert closer to when you plan to serve it.