
Nothing beats a steaming bowl of homemade chicken soup when the weather turns cold or someone in the house catches a sniffle. This recipe has been passed down through generations, and there’s a good reason why families keep making it year after year. The secret lies in taking your time and using the right combination of ingredients. Whether you’re a beginner in the kitchen or just want to recreate that nostalgic taste from childhood, this guide will walk you through everything.
Why a whole chicken makes all the difference
Most people grab a package of chicken breasts and call it a day. But here’s the thing—bones are where the magic happens. When you simmer a whole chicken in water for a couple of hours, all those nutrients and rich essences seep out into the broth. The result is a soup that tastes like it came from a restaurant instead of your own kitchen. A whole chicken also gives you both white and dark meat, which means everyone at the table gets their favorite part.
If you don’t have a whole chicken, bone-in thighs or bone-in breasts work great too. The key is keeping those bones attached because they add so much to the final broth. Some cooks even save chicken bones in their freezer until they have enough to make soup. This old-school trick stretches your grocery budget and gives you amazing results. Just avoid boneless, skinless chicken if you want that deep, satisfying taste that makes homemade soup special.
The vegetables that belong in every pot
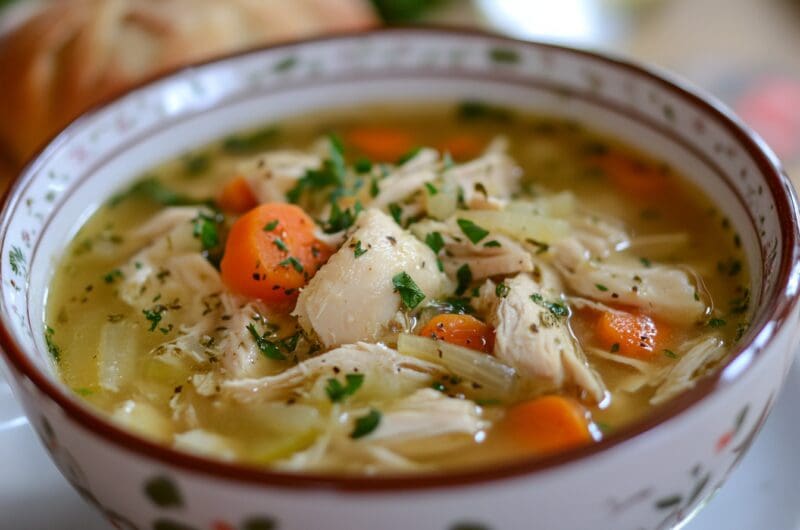
Carrots, celery, and onion form the holy trinity of chicken soup. These three vegetables show up in almost every grandma’s recipe for good reason—they create a balanced base that smells incredible while cooking. Carrots add a touch of sweetness, celery brings an earthy note, and onions round everything out with savory depth. Together, they make your kitchen smell like home. Most recipes call for chopping these into bite-sized pieces so they’re easy to eat with a spoon.
Want to get fancy? Throw in a parsnip or two. This root vegetable looks like a white carrot and adds a subtle sweetness that takes your soup up a notch. Some families also add turnips or rutabagas for extra heartiness. The beauty of homemade soup is that you can customize it based on what’s in your fridge. Just keep the basics—carrot, celery, onion—and build from there. Fresh garlic is another must-have ingredient that dried garlic powder simply cannot replace.
Fresh herbs versus dried herbs in soup
Here’s a question that comes up all the time: should you use fresh or dried herbs? The honest answer is both work well, depending on what you have on hand. Dried thyme, basil, and parsley are pantry staples that most people already own. They release their essence slowly during the long simmer, which makes them perfect for soup. A bay leaf tossed into the pot adds an extra layer of aroma that you’ll definitely notice, even if you can’t quite name it.
Fresh herbs shine as a finishing touch. A handful of chopped fresh parsley or dill sprinkled on top right before serving makes the whole bowl pop. Fresh herbs have a brighter taste that gets lost if you cook them too long. The best approach is using dried herbs during cooking and saving fresh ones for garnish. This way, you get the best of both worlds without spending extra money at the grocery store.
The surprising ingredient some grandmas add
Every family has a secret ingredient they swear by. Some add a splash of lemon juice at the end. Others stir in a tiny bit of curry powder for depth. One grandmother refused to share her secret for years—turns out it was beef bouillon mixed with the chicken broth. The combination of chicken and beef creates a richer, more complex taste that plain chicken broth alone can’t achieve. It sounds weird, but trust the process.
Another trick involves adding a beef soup bone to the pot along with your chicken. The bone minerals blend with the chicken to create something truly special. Better Than Bouillon is a popular brand that many home cooks use instead of regular broth cubes. It dissolves easily and packs more punch than cheaper alternatives. A little goes a long way, so start small and taste as you go.
How long should chicken soup actually simmer
Patience is the hardest ingredient to add to any recipe. Traditional grandmas let their soup simmer all day long, adding water as it cooked down. Most modern cooks don’t have that kind of time, so two hours is a good middle ground. The first hour gets everything cooking nicely. The second hour allows all those ingredients to meld together into something special. Rushing the process gives you soup that tastes flat and watery.
A helpful tip is to bring the pot to a boil first, then turn the heat down to let it gently bubble. Keep the lid on to trap moisture and prevent too much liquid from escaping. After about an hour, check on things and give it a stir. The chicken will be fall-off-the-bone tender after two hours of simmering. You can even make it the day before and refrigerate it overnight—the soup actually tastes better the next day.
Noodles or rice and when to add them
Wide egg noodles are the classic choice for chicken noodle soup. They’re thick enough to hold up to the hot broth without turning into mush. Some families prefer rice, which soaks up the broth and makes every spoonful extra satisfying. Matzo balls are another option, especially during holidays. The choice really comes down to what you grew up eating and what sounds good to you right now.
Here’s an important tip: cook your noodles separately from the soup. If you dump dry noodles directly into the pot, they’ll absorb all your precious broth and turn soft and mushy. Boil them in a separate pot of salted water until tender, then add them to individual bowls before ladling soup on top. This keeps leftovers from becoming a thick noodle casserole. For rice, the same rule applies—cook it separately and add it when serving.
Getting the broth just right every time
Some people like a thin, clear broth while others want something heartier. If you prefer a thicker consistency, there are a few ways to get there. A cornstarch slurry—just cornstarch mixed with cold water—thickens the soup without changing the taste. Stir it in gradually and watch the broth transform right before your eyes. This technique works especially well if your soup seems too watery after simmering.
Another method involves blending some of the cooked vegetables right in the pot with an immersion blender. This creates a naturally thick broth without adding anything extra. Set aside a few carrot pieces before blending if you want some chunks in your final bowl. For a clear, traditional broth, simply strain everything through a fine mesh strainer and skip the blending step altogether. Both versions taste amazing—it just depends on your preference.
Storing and freezing soup for later
A big batch of chicken soup rarely gets eaten in one sitting, which is actually great news. Leftovers keep well in the refrigerator for up to four days in an airtight container. You’ll notice a layer of fat on top after it chills overnight—that’s totally normal. You can skim it off with a spoon if you prefer, or stir it back in for extra richness. The soup often tastes even better after the ingredients have more time to hang out together.
Freezing works wonderfully for longer storage. Pour cooled soup into freezer-safe containers, leaving some room at the top for expansion. Souper Cubes are perfect for single servings that you can pop out whenever you need a quick meal. Frozen soup stays good for up to five months. Just thaw it in the refrigerator overnight or heat it directly from frozen on the stove. Having homemade soup in the freezer feels like money in the bank during busy weeks.
Common mistakes that ruin homemade soup
Adding salt too early is probably the biggest mistake people make. Bouillon and store-bought broth already contain salt, so you might end up with soup that’s way too salty. Wait until the very end to taste and adjust seasoning. This is especially important if you’re adding matzo balls or other ingredients that contribute their own salt. Start with less than you think you need—you can always add more later.
Another common error is boiling the soup too aggressively. A gentle simmer produces clearer broth and more tender chicken. Rapid boiling breaks down the meat into stringy bits and makes the broth cloudy. Keep the heat at medium-low once everything comes to a boil. Also, don’t forget to remove the chicken carefully when it’s done—use two spatulas or large spoons because it will be incredibly tender and might fall apart.
Making chicken soup from scratch takes a little time, but the results speak for themselves. One pot of this stuff can feed a crowd, warm up a cold evening, or help someone feel better when they’re under the weather. The best part is that every batch can be a little different based on what’s in your kitchen. Start with the basics, experiment with additions, and soon you’ll have your own version worth passing down to the next generation.
Grandma’s Famous Chicken Soup From Scratch
Course: DinnerCuisine: American12
servings15
minutes2
hours160
kcalThis comforting homemade chicken soup uses a whole chicken and fresh vegetables to create the most satisfying bowl you’ll ever taste.
Ingredients
1 whole raw chicken (about 4 pounds)
1 quart low-sodium chicken broth
4 cups water
5 large carrots, peeled and chopped
1 large onion, peeled and quartered
3 celery stalks, chopped
3 cloves garlic, minced
2 teaspoons dried thyme
2 teaspoons dried basil
2 teaspoons salt (adjust to taste)
1 teaspoon black pepper
Fresh parsley for garnish (optional)
2½ cups wide egg noodles (optional, cooked separately)
Directions
- Place the whole raw chicken in a large stockpot and add the chicken broth and water. The liquid should cover most of the chicken, so add more water if needed. Set the pot on the stove over medium-high heat.
- Add the chopped carrots, quartered onion, celery stalks, and minced garlic to the pot. Sprinkle in the dried thyme, dried basil, salt, and black pepper. Give everything a gentle stir to distribute the seasonings throughout the liquid.
- Bring the soup to a boil, which should take about 10 to 15 minutes depending on your pot. Once boiling, reduce the heat to medium and cover the pot with a lid. Let the soup cook at a gentle boil for 1 hour, stirring occasionally.
- After the first hour, turn the heat down to low and continue simmering for another hour. Check that the chicken is still covered by liquid and add more water if the level has dropped too much. The chicken will become extremely tender during this time.
- Carefully remove the whole chicken from the pot using two large spatulas or slotted spoons. Transfer it to a cutting board or large serving dish and let it cool for about 10 minutes. The chicken will be fall-apart tender, so handle it gently.
- Once the chicken is cool enough to handle, remove the meat from the bones and shred or chop it into bite-sized pieces. Discard the bones, skin, and cartilage. Add as much shredded chicken back to the soup as you like.
- If using noodles, cook them separately in a pot of boiling salted water according to package directions. Drain and rinse with cool water. Add the cooked noodles to individual bowls rather than the whole pot to prevent them from getting mushy.
- Taste the soup and adjust salt and pepper as needed. Ladle the hot soup over the noodles in each bowl and garnish with fresh parsley if desired. Serve immediately while hot and enjoy.
Notes
- For best results, use bone-in chicken pieces if you don’t have a whole chicken. Boneless chicken won’t give the broth the same rich taste.
- Cook noodles or rice separately and add to individual bowls when serving. This prevents them from absorbing all the broth during storage.
- This soup tastes even better the next day after the ingredients have had time to meld together. Store in the refrigerator for up to 4 days or freeze for up to 5 months.
- Wait until the end to add salt since broth and bouillon already contain sodium. Taste and adjust gradually.
Frequently Asked Questions
Q: Can I use boneless skinless chicken instead of a whole chicken?
A: You can, but the soup won’t have the same depth. Bones release minerals and add richness to the broth that boneless chicken simply cannot provide. If boneless is all you have, consider adding some store-bought bone broth to compensate.
Q: Why did my soup turn out cloudy?
A: Cloudy soup usually happens when the broth boils too rapidly. Keep the heat at a gentle simmer rather than a rolling boil. Skimming any foam that rises to the top during the first 30 minutes also helps keep the broth clear.
Q: How do I fix soup that tastes bland?
A: Start by adding more salt gradually and tasting as you go. A squeeze of lemon juice or a small splash of vinegar can also brighten things up. Some cooks add a pinch of curry powder for extra depth without making it taste like curry.
Q: Can I make this soup in an Instant Pot or slow cooker?
A: Absolutely. For an Instant Pot, cook on high pressure for about 30 minutes with a natural release. For a slow cooker, set it on low for 6 to 8 hours. Both methods work well, though stovetop simmering gives you more control over the final result.