Home Blog

Marry Me Chicken Noodle Casserole Will Make Everyone Ask for Seconds

0

The “Marry Me” chicken trend started because people joked this dish was so good it could lead to a proposal. Now imagine all those amazing flavors packed into a cozy casserole with tender egg noodles and a golden, bubbly top. This one-pan wonder has become a weeknight hero for busy families everywhere. It looks fancy but comes together without much fuss. The creamy sauce, sun-dried tomatoes, and Parmesan cheese create something truly special that everyone at the table will love.

What makes this casserole so irresistible

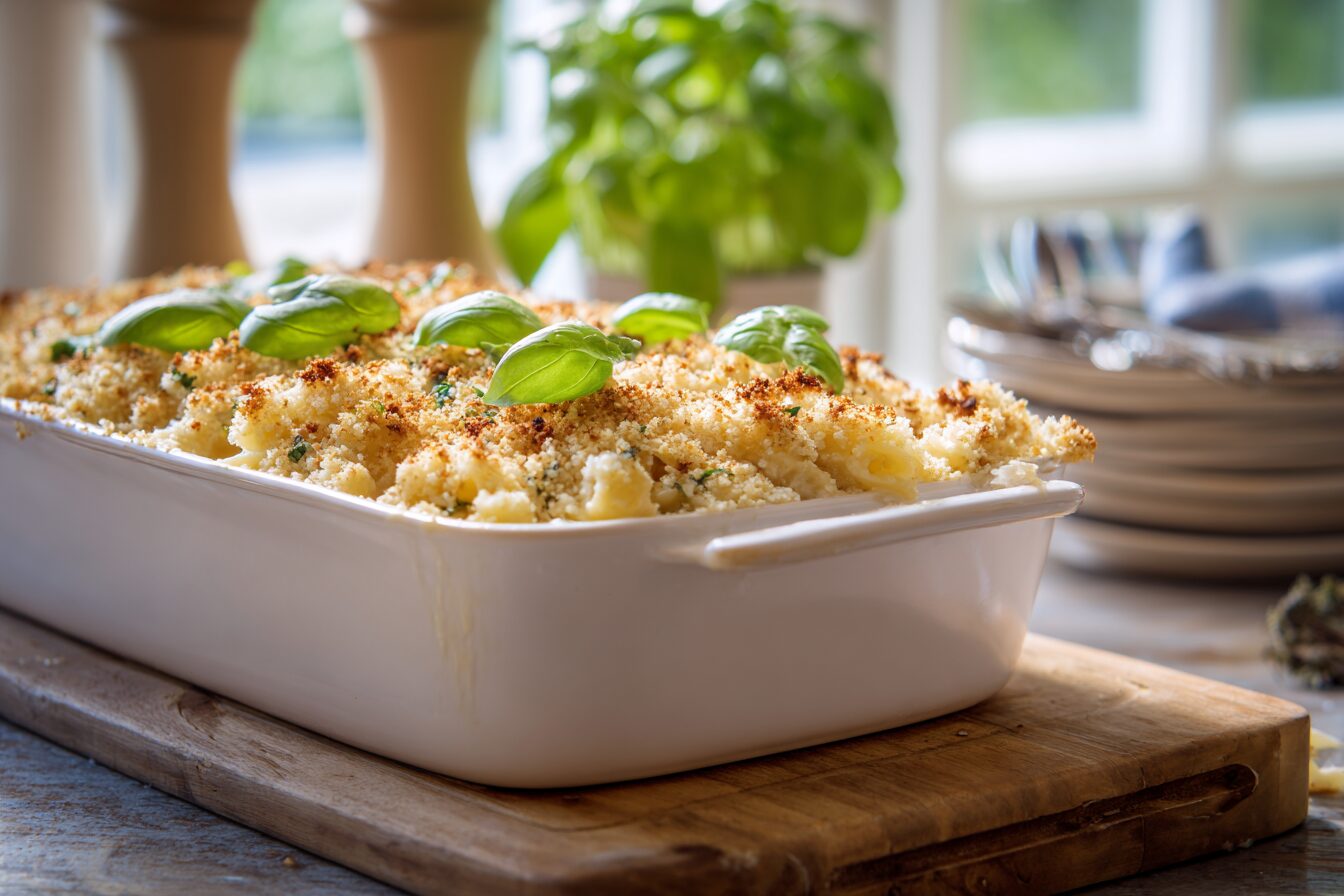
There’s something magical about the combination of ingredients in this dish. The creamy sauce wraps around every noodle while chunks of tender chicken make it hearty and filling. Sun-dried tomatoes add little bursts of tangy sweetness that cut through the richness perfectly. Fresh thyme brings an earthy note that ties everything together. When you pull this casserole from the oven, the cheese on top gets slightly crispy while the inside stays creamy and comforting. It’s the kind of meal that makes the whole house smell amazing.

The original Marry Me Chicken recipe calls for cooking chicken breasts in a skillet with a creamy sauce. This casserole version takes those same beloved flavors and turns them into something even more practical. Adding egg noodles stretches the dish further, making it perfect for feeding a hungry crowd. The panko breadcrumb topping mixed with Parmesan creates a satisfying crunch that contrasts beautifully with the creamy pasta underneath. It’s comfort food at its finest without being overly complicated.

The ingredients you need to gather first

Before starting any recipe, getting all your ingredients ready makes the cooking process so much smoother. For this casserole, you’ll need about six ounces of wide egg noodles. Grab some olive oil and butter since using both adds richness to the sauce. Shallots work better than regular onions here because they’re milder and slightly sweet. You’ll also need fresh garlic, red pepper flakes for a tiny kick, and fresh thyme. Don’t skip the sun-dried tomatoes packed in oil since they’re essential to that signature Marry Me taste.

The sauce comes together with all-purpose flour, chicken broth, whole milk, and heavy cream. A little chicken bouillon adds extra savory depth that makes everything taste better. Freshly grated Parmesan cheese is a must since it melts much smoother than the pre-shredded kind from a bag. For the topping, panko breadcrumbs give that perfect golden crunch. Finally, you’ll need about two and a half cups of cooked chicken. Rotisserie chicken works great here and saves you tons of time on a busy weeknight.

Using leftover or rotisserie chicken saves time

One of the best things about this recipe is how it turns leftover chicken into something spectacular. Did you roast a chicken on Sunday? Perfect. Got some grilled chicken from yesterday’s dinner? That works too. Even those grocery store rotisserie chickens become the star of this dish. Simply shred or chop the meat into bite-sized pieces. This shortcut cuts your prep time dramatically since you skip the whole cooking-raw-chicken step. It’s a brilliant way to use up what’s already in your fridge.

If you’re starting with raw chicken, a high-protein version of this recipe suggests cooking diced boneless chicken breasts in olive oil until just done. Don’t overcook them at this stage since they’ll continue cooking in the oven later. Brown the pieces on medium-high heat for about five to seven minutes, stirring occasionally. Once they’re no longer pink inside, set them aside while you make the sauce. This method ensures juicy, tender chicken in every bite of your finished casserole.

Building the creamy sauce step by step

The sauce is really what makes this casserole unforgettable. Start by melting butter with olive oil in a large skillet over medium heat. Once the butter stops sizzling, add your finely chopped shallots. Cook them for about two minutes until they turn soft and translucent. Then add minced garlic, a pinch of red pepper flakes, and fresh thyme. Stir for just thirty seconds to one minute until you can smell that amazing garlic aroma. Be careful not to burn the garlic since it turns bitter quickly.

Now comes the important part. Sprinkle flour over everything and stir constantly for about two minutes. This step cooks out the raw flour taste and creates the base for a thick sauce. Slowly pour in the chicken broth while whisking to prevent lumps. Add the milk and heavy cream, then stir in the chicken bouillon and chopped sun-dried tomatoes. Keep stirring until the sauce thickens enough to coat the back of a spoon. Season with salt and pepper to your liking at this point.

Cooking the noodles just right matters

Here’s a tip that makes all the difference in your final dish. Cook the egg noodles for one or two minutes less than what the package says for al dente. Why? Because the noodles will continue cooking in the oven and absorbing liquid from the sauce. If you cook them fully before baking, they’ll end up mushy and overcooked. Nobody wants soggy noodles ruining their beautiful casserole. Bring a big pot of salted water to a rolling boil and watch the clock carefully.

Once the noodles are slightly underdone, drain them immediately and rinse with cold water. This stops the cooking process right away. Drain them again thoroughly so you don’t add extra water to your sauce. Wide egg noodles work best for this recipe because the creamy sauce clings to their broad surfaces perfectly. If you can’t find wide egg noodles, fettuccine or pappardelle make good substitutes. Some people even use penne or rotini, though the traditional wide noodles give the most authentic result.

Putting everything together before baking

Now comes the fun part where everything becomes one delicious casserole. Preheat your oven to 350 degrees Fahrenheit and grease a two-quart baking dish. Add your cooked chicken and drained noodles to the skillet with the sauce. Stir in about half a cup of the grated Parmesan cheese. Mix everything together gently until the noodles and chicken are completely coated in that gorgeous creamy sauce. Pour this mixture into your prepared baking dish and spread it out evenly.

For the topping, combine the remaining Parmesan cheese with panko breadcrumbs. Sprinkle this mixture evenly over the top of the casserole. This creates that irresistible golden crust everyone fights over. Pop the dish into the center of your preheated oven and bake for about thirty minutes. You’ll know it’s done when the edges are bubbling and the top turns a beautiful golden brown. Let it rest for five to ten minutes before serving since this helps the sauce set up properly.

Ways to change up the basic recipe

Once you’ve mastered the basic version, feel free to make it your own. Add vegetables like sautéed mushrooms, bell peppers, or roasted red peppers along with the shallots. Fresh spinach stirred in at the end adds color and nutrients. Want it extra cheesy? Mix some mozzarella, Gruyère, or white cheddar with the Parmesan topping. Some families add crispy crumbled bacon or browned sausage for extra heartiness. These additions turn an already great dish into something customized for your family’s preferences.

There’s even an easy dump-and-bake version that uses cream cheese instead of making a traditional sauce. Just layer dry pasta, cooked chicken, seasonings, sun-dried tomatoes, spinach, and chicken broth in a baking dish. Place a block of cream cheese on top, cover with foil, and bake at 400 degrees for thirty minutes. Stir everything together, add mozzarella on top, and bake another ten to fifteen minutes. It’s incredibly simple for those nights when you’re short on time.

Making this casserole ahead of time

Life gets busy, and meal prepping can be a lifesaver during hectic weeks. This casserole is perfect for making ahead. Assemble everything in the baking dish, cover it tightly, and refrigerate for up to twenty-four hours. When you’re ready to eat, let the dish sit at room temperature for about twenty to thirty minutes before baking. This takes the chill off so it bakes more evenly. The casserole might need a few extra minutes in the oven since it’s starting cold.

You can also freeze the unbaked casserole for up to three months. Wrap it well in plastic wrap and then foil to prevent freezer burn. When you want to serve it, thaw overnight in the refrigerator before baking as directed. This makes it perfect for new parent meals, bringing to friends who need dinner, or just having a backup plan in the freezer. Having homemade comfort food ready to go whenever you need it is pretty amazing.

Storing and reheating your leftovers

Good news if you have leftover casserole. It actually tastes even better the next day after all the flavors have had time to meld together. Let any remaining casserole cool to room temperature before storing. Transfer it to an airtight container and keep it in the refrigerator for up to three days. You can also freeze leftovers in individual portions for quick lunches later. Just make sure everything is properly sealed to maintain freshness and prevent freezer odors from getting in.

Reheating is easy and gives you that just-baked taste again. For the best results, reheat portions in a 325-degree oven for fifteen to twenty minutes until warmed through. This method keeps the topping crispy. In a hurry? The microwave works fine for individual servings. Heat for one to two minutes, stirring halfway through. Add a splash of milk if the sauce seems too thick after reheating. Either way, you’ll have a satisfying meal that tastes almost as good as fresh from the oven.

This Marry Me Chicken Noodle Casserole brings together everything people love about comfort food in one easy dish. Whether you’re feeding your family on a Tuesday night or impressing guests at a dinner party, this recipe delivers. The combination of tender chicken, creamy sauce, tangy tomatoes, and crispy cheese topping creates something truly memorable. Make it once and it might just become your new go-to meal that everyone requests again and again.

Marry Me Chicken Noodle Casserole

Course: Main CourseCuisine: American
Servings

8

servings
Prep time

30

minutes
Cooking time

30

minutes
Calories

367

kcal

This creamy casserole combines tender chicken, egg noodles, sun-dried tomatoes, and Parmesan in a dish so good it might just inspire a proposal.

Ingredients

  • 6 ounces wide egg noodles

  • 2 tablespoons olive oil

  • 2 tablespoons unsalted butter

  • 1 cup finely chopped shallots

  • 1 tablespoon minced garlic

  • 1 pinch red pepper flakes, or to taste

  • 1 tablespoon minced fresh thyme

  • ¼ cup all-purpose flour

  • 1 (14.5 ounce) can low sodium chicken broth

  • ¾ cup whole milk

  • ½ cup heavy cream

  • ½ teaspoon chicken bouillon granules

  • ⅔ cup oil-packed sun-dried tomatoes, drained and chopped

  • Salt and freshly ground black pepper to taste

  • 2½ cups chopped cooked chicken

  • ¾ cup freshly grated Parmesan cheese, divided

  • ½ cup panko breadcrumbs

  • Fresh basil sprigs for garnish (optional)

Directions

  • Preheat your oven to 350 degrees Fahrenheit and grease a 2-quart baking dish with cooking spray or butter. Bring a large pot of salted water to a rolling boil over high heat. This prep work ensures everything is ready when you need it.
  • Cook the egg noodles in the boiling water for 1 to 2 minutes less than the package directions recommend for al dente. Drain the noodles and rinse them with cold water to stop the cooking process. Drain again thoroughly and set aside in a bowl.
  • Heat olive oil and butter in a large nonstick skillet over medium heat. When the butter stops sizzling, add the chopped shallots and cook, stirring frequently, until softened, about 2 minutes. Add the minced garlic, red pepper flakes, and fresh thyme, then cook until the garlic becomes fragrant, about 30 seconds to 1 minute.
  • Sprinkle the flour over the shallot mixture and stir constantly for about 2 minutes until the flour bubbles and turns slightly golden. This step cooks out the raw flour taste and creates the base for a smooth sauce. Keep stirring to prevent any burning.
  • Slowly pour in the chicken broth while whisking continuously to prevent lumps from forming. Add the milk, heavy cream, chicken bouillon granules, and chopped sun-dried tomatoes. Season with salt and pepper to taste. Continue cooking and stirring until the sauce thickens, about 4 to 5 minutes.
  • Add the cooked chicken, drained noodles, and ½ cup of the grated Parmesan cheese to the skillet. Stir everything together until well combined and the noodles are evenly coated with the creamy sauce. Pour this mixture into the prepared baking dish and spread it out evenly.
  • Combine the remaining ¼ cup Parmesan cheese with the panko breadcrumbs in a small bowl. Sprinkle this mixture evenly over the top of the casserole. This topping will create a golden, crispy crust as it bakes in the oven.
  • Bake the casserole in the center of the preheated oven until bubbly around the edges and lightly browned on top, about 30 minutes. Remove from the oven and let it cool for 5 to 10 minutes before serving. Garnish with fresh basil sprigs if desired and serve warm.

Notes

  • Use rotisserie chicken or any leftover cooked chicken to save time. Simply shred or chop it into bite-sized pieces.
  • Freshly grated Parmesan cheese melts much smoother than pre-shredded. It’s worth the extra effort for the best results.
  • If using dry-packed sun-dried tomatoes instead of oil-packed, soften them in warm water for 10 minutes before chopping.
  • This casserole can be assembled up to 24 hours ahead. Cover and refrigerate, then let sit at room temperature for 20-30 minutes before baking.

Frequently Asked Questions

Q: Can I use chicken thighs instead of chicken breast?
A: Absolutely! Boneless, skinless chicken thighs work great in this casserole. They’re actually more forgiving and stay juicy even if slightly overcooked. Just dice them the same way you would chicken breasts and cook until no longer pink before adding to the sauce.

Q: What can I substitute for sun-dried tomatoes?
A: While sun-dried tomatoes are key to the signature Marry Me taste, you could use roasted red peppers for a milder option. Cherry tomatoes halved and roasted until slightly shriveled also work. Just know the taste will be different from the original recipe.

Q: Can I make this casserole gluten-free?
A: Yes! Swap the egg noodles for your favorite gluten-free pasta and use gluten-free all-purpose flour to thicken the sauce. Make sure your chicken broth and bouillon are certified gluten-free since some brands contain gluten.

Q: Why did my sauce turn out lumpy?
A: Lumpy sauce usually happens when liquid is added too quickly to the flour. Next time, add the broth very slowly while whisking constantly. If lumps form, you can strain the sauce through a fine mesh sieve or blend it briefly with an immersion blender to smooth it out.

Grandpa Sam’s Secret Ingredient Makes the Moistest Carrot Cake Ever

0

A carrot cake once sold for $575 at a charity auction. That’s not a typo. The secret behind this legendary dessert wasn’t some fancy technique or expensive ingredient. It was something most people overlook when baking carrot cake. This recipe has earned over 2,800 five-star reviews, and the trick that makes it stand out is surprisingly simple. If every carrot cake you’ve made turned out dry or dense, you’re about to learn why that keeps happening.

The story behind this legendary carrot cake

Every great recipe has a story, and this one belongs to a grandfather named Sam. He wasn’t a professional baker or a chef with fancy training. He was just a grandpa who loved making carrot cake for his friends and neighbors. Whenever someone wanted one, Sam would show up with a homemade cake that people described as “moist and divine.” His grandson Brian D’Amico eventually shared the recipe online, and it became one of the most popular carrot cake recipes on the internet.

What made Sam’s carrot cake different from all the others? According to Brian, “Everyone who knew him knows of this carrot cake. We’ll miss him, but his carrot cake legacy will always live on.” That legacy comes down to one ingredient that most carrot cake recipes leave out. It’s something you might have in your fridge right now, and it changes everything about how the cake turns out.

Buttermilk is the game-changing secret

Here’s the big reveal: the secret ingredient is buttermilk. That might sound underwhelming at first, but hear this out. Most carrot cake recipes only use oil for moisture. Oil does a decent job, but it can only do so much. Buttermilk takes things to a completely different level. It makes the cake lighter, more tender, and way more flavorful than oil alone ever could. This is why Sam’s cake always came out perfect while other carrot cakes end up heavy and dry.

The buttermilk works its magic through a simple chemical reaction. When the acid in buttermilk meets the baking soda in the batter, it creates tiny bubbles of carbon dioxide. These bubbles spread throughout the cake as it bakes, making it rise beautifully and giving it that soft, tender crumb. Without buttermilk, you’re missing out on this reaction, and your cake will never reach its full potential.

Why buttermilk beats oil-only recipes

Think about the last time you made or ate a disappointing carrot cake. Chances are it was dense, maybe a little greasy, and definitely not as light as you wanted. That’s what happens when a recipe relies only on oil for moisture. Oil keeps things from drying out, but it doesn’t add any lift or lightness. The cake turns out flat and heavy, even when you follow the recipe exactly. Buttermilk solves this problem in a way that oil simply cannot.

Beyond texture, buttermilk also brings a subtle tang to the cake. This might sound weird for a dessert, but it actually makes the sweetness taste better. The slight acidity balances out the sugar from the carrots, pineapple, and raisins in the recipe. It also pairs really well with the cinnamon and other warming spices. The result is a cake that tastes complex and interesting instead of just sweet. One reviewer on the recipe site called it “over the top delicious.”

Don’t have buttermilk at home? No problem

Unless you’re making pancakes every weekend, you probably don’t keep buttermilk in your refrigerator. That’s totally normal. Most people buy it for one recipe, use half the carton, and watch the rest go bad in the back of the fridge. The good news is you can make a homemade substitute that works almost as well. All you need is regular milk and either white vinegar or lemon juice. It takes about two minutes to put together.

To make buttermilk substitute, measure one cup of milk and add one tablespoon of vinegar or lemon juice. Stir it together and let it sit for five to ten minutes. The milk will start to curdle slightly, which is exactly what you want. This creates an acidic liquid that reacts with baking soda just like real buttermilk does. Is it identical to the real thing? Not quite, but it’s close enough that your cake will still turn out amazing. Save yourself a trip to the store and use this trick instead.

Pineapple and coconut add extra moisture

Buttermilk isn’t the only moisture booster in this recipe. Sam also included crushed pineapple, which might seem like an unusual choice for carrot cake. Pineapple adds natural sweetness and a ton of moisture without making the cake taste tropical or weird. The fruit breaks down during baking and spreads its juices throughout the batter. Combined with the buttermilk, it creates a cake that stays moist for days instead of drying out overnight.

Shredded coconut is another addition that sets this recipe apart. It adds a subtle texture and helps trap moisture inside the cake. You also get walnuts for crunch and raisins for little bursts of sweetness. Some people skip the raisins because they don’t like them, and that’s fine. The recipe works without them. But if you’re going to make Grandpa Sam’s cake the way he intended, throw in all the mix-ins. They’re part of what makes this version so much better than basic carrot cake.

Two ways to bake this cake

The original recipe calls for an 8×12-inch rectangular pan, which is great if you want a simple sheet cake. You bake it for about an hour at 350 degrees, let it cool, and frost the top. Easy and straightforward. This is how Sam made it when he delivered cakes to his neighbors. Sheet cakes are casual, unfussy, and perfect for feeding a crowd. They also travel well because you don’t have to worry about layers sliding around.

Many home bakers prefer making a layered cake instead. To do this, divide the batter between two 9-inch round pans. The baking time drops to about 45 minutes since the batter is spread thinner. Once the layers cool completely, stack them with cream cheese frosting in between and on top. A layered carrot cake looks impressive for birthdays, holidays, or any time you want to show off. Both versions taste equally amazing, so pick whichever style fits your occasion.

The right way to mix the batter

Getting the mixing technique right matters more than you might think. Start by sifting together all your dry ingredients in one bowl. That means flour, baking soda, cinnamon, and salt. Sifting removes lumps and helps everything combine evenly later. In a separate bowl, whisk together the wet ingredients: sugar, eggs, oil, vanilla, and buttermilk. Sugar counts as a wet ingredient here because it dissolves into the liquid and helps create a smooth batter.

Now comes the important part. Gradually add the dry ingredients to the wet ingredients, stirring gently as you go. Don’t dump everything in at once and beat it aggressively. That develops too much gluten in the flour and makes your cake tough. Mix until everything is just combined, then fold in the carrots, pineapple, coconut, walnuts, and raisins. The batter will look thick and chunky, which is exactly right. Pour it into your prepared pan and get it in the oven quickly.

Cream cheese frosting is non-negotiable

Some cakes work with different kinds of frosting. Carrot cake is not one of them. Cream cheese frosting is the only acceptable choice here. The tangy, slightly savory flavor of cream cheese pairs perfectly with the sweet, spiced cake. Anything else would taste wrong. Good cream cheese frosting is thick, spreadable, and not too sweet. It should complement the cake without overwhelming it or making the whole dessert cloyingly sugary.

To make classic cream cheese frosting, beat softened cream cheese with butter until smooth. Add powdered sugar gradually, mixing well after each addition. A splash of vanilla rounds out the flavor. If your frosting seems too thick, add a tiny bit of milk to loosen it up. If it’s too thin, refrigerate it for fifteen minutes to firm up. Spread a generous layer over your completely cooled cake. Frosting a warm cake is a disaster waiting to happen, so be patient.

Tips for the best results every time

Shred your own carrots instead of buying pre-shredded ones from the store. Freshly grated carrots have more moisture and give the cake a better texture. Use the small holes on a box grater for fine shreds that disappear into the batter. About three large carrots will give you the two cups you need. This takes an extra five minutes but makes a noticeable difference in the final product.

Drain your crushed pineapple before adding it to the batter. If you throw in all that extra liquid, your cake might come out soggy instead of moist. Press the pineapple in a fine mesh strainer or squeeze it gently in a paper towel. Save the juice for smoothies or cocktails. Also, make sure your eggs and buttermilk are at room temperature before mixing. Cold ingredients don’t blend as smoothly and can affect how the cake rises in the oven.

Grandpa Sam knew what he was doing when he added buttermilk to his carrot cake. This simple ingredient transforms an ordinary recipe into something people remember for years. Whether you bake it as a sheet cake for a casual gathering or stack it into layers for a special celebration, the results speak for themselves. Over 2,800 five-star reviews can’t be wrong. Try this recipe once, and you’ll understand why one person paid $575 for a single cake at a charity auction.

Grandpa Sam’s Famous Buttermilk Carrot Cake

Course: DessertCuisine: American
Servings

16

servings
Prep time

25

minutes
Cooking time

1

hour 
Calories

420

kcal

This legendary carrot cake with a secret buttermilk ingredient has earned thousands of five-star reviews for its incredible moisture and rich flavor.

Ingredients

  • 2 cups all-purpose flour

  • 2 teaspoons baking soda

  • 2 teaspoons ground cinnamon

  • 1 teaspoon salt

  • 2 cups granulated sugar

  • 4 large eggs, room temperature

  • 1 1/2 cups vegetable oil

  • 1 teaspoon vanilla extract

  • 1/2 cup buttermilk, room temperature

  • 2 cups freshly shredded carrots (about 3 large)

  • 1 cup crushed pineapple, well drained

  • 1 cup shredded sweetened coconut

  • 1 cup chopped walnuts

  • 1 cup raisins

  • For frosting: 8 oz cream cheese, softened

  • For frosting: 1/2 cup butter, softened

  • For frosting: 4 cups powdered sugar

  • For frosting: 1 teaspoon vanilla extract

Directions

  • Preheat your oven to 350 degrees F (175 degrees C). Grease and flour an 8×12-inch baking pan, or two 9-inch round cake pans if making a layered cake. Tap out any excess flour and set the prepared pans aside.
  • In a large bowl, sift together the flour, baking soda, cinnamon, and salt. Sifting removes any lumps and ensures the dry ingredients are evenly distributed throughout the batter. Set this bowl aside while you prepare the wet ingredients.
  • In a separate large bowl, whisk together the sugar, eggs, vegetable oil, vanilla extract, and buttermilk until well combined. The mixture should be smooth with no visible lumps of sugar. Make sure your eggs and buttermilk are at room temperature for the best results.
  • Gradually add the sifted dry ingredients to the wet ingredients, stirring gently with a wooden spoon or spatula. Mix until just combined, being careful not to overmix as this can make the cake tough. A few small lumps are perfectly fine.
  • Fold in the shredded carrots, drained crushed pineapple, shredded coconut, chopped walnuts, and raisins until evenly distributed. The batter will be thick and chunky, which is exactly what you want. Make sure all the mix-ins are coated with batter.
  • Pour the batter into your prepared pan(s) and spread it evenly with a spatula. Bake for 1 hour for a single pan, or 45 minutes for two round pans. The cake is done when a toothpick inserted in the center comes out clean or with just a few moist crumbs.
  • Allow the cake to cool in the pan for 10 minutes, then turn it out onto a wire rack to cool completely. The cake must be completely cool before frosting, or the frosting will melt and slide off. This usually takes at least one hour.
  • Make the frosting by beating the softened cream cheese and butter together until smooth and fluffy. Gradually add the powdered sugar, mixing well after each addition, then stir in the vanilla extract. Spread generously over the cooled cake, and enjoy!

Notes

  • To make a buttermilk substitute, combine 1/2 cup milk with 1/2 tablespoon white vinegar or lemon juice. Let it sit for 5-10 minutes before using.
  • Freshly shredded carrots work much better than pre-shredded store-bought carrots because they contain more moisture.
  • Be sure to drain the crushed pineapple thoroughly by pressing it in a fine mesh strainer to prevent a soggy cake.
  • This cake stays moist for up to 5 days when stored covered in the refrigerator. Let it come to room temperature for 30 minutes before serving.

Frequently Asked Questions

Q: Can I leave out the raisins or coconut if I don’t like them?
A: Yes, you can skip the raisins, coconut, or walnuts if they’re not your thing. The cake will still turn out moist and delicious thanks to the buttermilk and pineapple. Some people also substitute pecans for walnuts or add extra carrots to make up for the missing mix-ins.

Q: How long does this carrot cake stay fresh?
A: When stored in an airtight container or covered with plastic wrap in the refrigerator, this cake stays fresh and moist for up to five days. The buttermilk and pineapple help it retain moisture longer than most carrot cakes. Let it sit at room temperature for about 30 minutes before serving for the best taste.

Q: Can I freeze this carrot cake?
A: Absolutely! Wrap the unfrosted cake layers tightly in plastic wrap and then aluminum foil. They’ll keep in the freezer for up to three months. Thaw overnight in the refrigerator before frosting. You can also freeze the frosted cake, but the texture of the cream cheese frosting may change slightly.

Q: Why is my carrot cake dense or gummy in the middle?
A: This usually happens from overmixing the batter or not baking the cake long enough. Mix the dry ingredients into the wet ingredients gently and stop as soon as everything is combined. Always test with a toothpick before removing from the oven—it should come out clean or with just a few moist crumbs attached.

Johnny Cash’s Secret Chili Recipe With the Cornmeal Trick He Never Wrote Down

0

Johnny Cash wasn’t just the Man in Black—he was also the man behind one seriously good pot of chili. The country music legend loved Southern cooking, and his slow-cooked chili became famous among family and friends. What made it special? A handful of cornmeal tossed into the pot with no measuring involved. His son still talks about watching his dad do this when he was a kid. Here’s how to make this legendary dish at home.

The man in black was serious about food

Growing up in Arkansas, Johnny Cash learned to love old-school Southern meals from his family. We’re talking pineapple pie, cornbread, and hearty stews that could warm you up on the coldest nights. Food wasn’t just fuel for Cash—it was a connection to home and the people he loved. When his family released an official cookbook in 2018, it showed just how important cooking was to the Cash household. The recipes inside weren’t fancy restaurant dishes but real comfort food passed down through generations.

His son John Carter Cash shared stories about his father’s cooking in an interview with NPR. The chili stood out as something truly special in the family’s food traditions. Cash would make his “old iron pot chili” slowly, letting it simmer for hours until everything melded together perfectly. He preferred using sirloin steak or deer meat as the base, which gave the dish a richer taste than regular ground beef. This wasn’t a quick weeknight meal—it was an event worth waiting for.

The cornmeal secret his son remembers watching

Here’s where things get interesting. The official recipe doesn’t even mention cornmeal, but John Carter Cash says his dad always added it. The catch? There was never a set amount. Cash would walk by the pot with cornmeal in his hand and toss some in—literally throw it at the pot. Some would land inside, some might not. This unpredictable method meant every batch of chili turned out a little different. The amount that made it into the pot determined how thick and hearty that particular batch would be.

“You didn’t know how much was going to get into one pot of chili to the next,” John Carter Cash told NPR. “However much it was, that was the specific texture and thickness of that chili.” This kind of cooking shows how Cash approached food—more as an art than a science. He wasn’t worried about exact measurements or following rules. The fun was in not knowing exactly what you’d get. Each pot became unique, which is pretty cool when you think about it.

The original recipe came from an unexpected place

Did you know Johnny Cash served in the Air Force? It’s true, and his chili recipe first appeared in the 1992 USO Celebrity Cookbook. The official version calls for standard chili ingredients you’d expect: chili powder, cumin, white onion, canned chiles, kidney beans, and whole tomatoes. Nothing too crazy on paper. The recipe suggests sirloin steak as the main protein, staying true to what Cash preferred. But for folks on a budget, the USO notes mention that ground beef or chicken work just fine as substitutes.

What’s missing from that printed recipe is the cornmeal trick his family knew about. Maybe Cash considered it too personal to share publicly, or maybe he thought everyone should figure out their own secret ingredient. Either way, the written recipe only tells part of the story. The real magic happened when Cash started improvising at the stove. This is a good reminder that the best family recipes often have unwritten steps that make them special. Sometimes those details only get passed down through watching and doing.

Why cornmeal actually works in chili

Adding cornmeal to chili might sound strange if you’ve never tried it, but there’s good reason it works. Cornmeal soaks up liquid like a sponge, which thickens your chili without making it gloppy or weird. It also adds a slightly sweet taste that plays nicely with the spices and tomatoes. The texture changes too—you get this subtle grittiness that makes each bite more interesting. It’s not a huge flavor change, but it rounds everything out in a way that’s hard to describe until you try it yourself.

The key is using fine or medium-grain cornmeal. Coarse cornmeal or polenta won’t work because the pieces are too big to blend in properly. Yellow or white cornmeal both do the job well. The cornmeal needs time to absorb liquid and soften, so adding it earlier in the cooking process helps. After about 30 minutes of simmering, it should be fully incorporated into your chili. If you see lumps forming, just give the pot a good stir or whisk to break them up and keep everything smooth.

Other ways to thicken your chili like a pro

Maybe you don’t have cornmeal on hand, or maybe you want to try something different. Masa harina is another great option that famous cooks like Ree Drummond use in their chili recipes. This powdery flour comes from corn that’s been treated in a special way, and it dissolves faster than regular cornmeal. You still get that corn-like taste, but the texture ends up smoother. It’s the same stuff used to make tortillas and tamales, so you might already have some in your pantry without realizing it works for chili.

Cornstarch is the simplest substitute if you just want thickness without any added taste. Mix a couple tablespoons with cold water to make a slurry, then stir it into your simmering chili. Check after ten minutes and add more if needed. The downside is that cornstarch won’t give you any extra flavor or that subtle grittiness that cornmeal provides. It’s purely about texture. For the most authentic Johnny Cash experience, though, stick with actual cornmeal and embrace the imprecise tossing method he loved.

Choosing the right meat makes a big difference

Johnny Cash preferred sirloin steak or deer meat in his chili, and there’s good reason for that choice. Sirloin has more flavor than ground beef because it’s a different cut with better marbling. When you cube it up and brown it before adding to the pot, you get these nice chunks of meat throughout your chili instead of crumbly bits. It feels more substantial and special. Deer meat, if you can get it, adds a gamey richness that makes the dish taste rustic and homemade in the best way possible.

Not everyone has access to venison or wants to splurge on sirloin for a pot of chili. That’s totally fine—the USO cookbook mentions that ground beef or chicken can stand in without ruining the recipe. Ground beef is the classic choice that most people use anyway. Chicken makes it lighter if that’s what you’re after. The point is that this chili can work with whatever protein fits your budget and preferences. Cash might have used fancy meat, but the spirit of the dish is about making something good with what you’ve got.

The slow cooking method is not optional

If there’s one thing Johnny Cash got right about chili, it’s that rushing doesn’t work. His “old iron pot chili” nickname tells you everything about his approach. He used a heavy pot and let things simmer low and slow for hours. This long cooking time allows the spices to bloom, the meat to get tender, and all the different ingredients to become one unified thing instead of separate pieces floating in sauce. Quick chili is fine in a pinch, but it won’t taste like something worth remembering.

The slow simmer also helps the liquid reduce and concentrate. As water evaporates, everything left behind gets more intense. Your chili powder tastes more like chili powder. The tomatoes become sweeter and less acidic. The meat absorbs all those good spices. Adding cornmeal during this process means it has plenty of time to do its thickening job properly. Plan to let your pot go for at least two hours, though longer is better if you have the patience. Your kitchen will smell amazing the whole time.

The basic spice lineup you need to start

Every good chili starts with the right spices, and Cash’s recipe keeps things pretty traditional. Chili powder is the main player here, giving you that familiar warmth and color. Cumin adds an earthy depth that makes chili taste like chili—without it, something just feels missing. These two work together as the foundation of your spice blend. You probably have both sitting in your cabinet right now, which is part of what makes this recipe so approachable for anyone who wants to try it.

Beyond the basics, the original recipe includes canned green chiles for a little extra kick. They’re not super spicy, but they add another layer of pepper flavor that straight chili powder can’t provide. White onion goes in for that sharp bite that mellows as it cooks. Whole canned tomatoes give you chunks of tomato plus liquid to build the sauce. Kidney beans round everything out with their creamy texture. It’s a straightforward ingredient list that doesn’t require a trip to a specialty store or any fancy shopping.

Making it your own the Johnny Cash way

The whole point of Cash’s cornmeal-throwing technique was embracing imperfection and making each batch unique. You should feel free to do the same with your version. Maybe you like more heat, so you add extra chili powder or throw in some cayenne. Perhaps you prefer black beans over kidney beans, or you want to mix both types together. Some folks add a splash of beer or coffee to deepen the richness. These variations don’t ruin the recipe—they make it yours, which is exactly what home cooking should be about.

Don’t stress about getting everything perfect the first time you make this chili. Cash himself didn’t measure his cornmeal, so why should you obsess over exact amounts? Taste as you go and adjust things based on what your mouth tells you. Too thin? Add more cornmeal and let it simmer longer. Not enough spice? Stir in more chili powder. Cooking this way feels more relaxed and fun than following strict instructions. That’s the real secret behind any great family recipe—it comes from the heart, not a rulebook.

Johnny Cash left behind incredible music, but his chili recipe might be one of his best gifts to fans who love good food. The cornmeal trick transforms ordinary chili into something with real character and substance. Whether you toss it at the pot like Cash did or carefully stir it in, you’ll notice the difference it makes. This is comfort food at its finest—simple ingredients, patience at the stove, and a willingness to make it your own. Give it a try this weekend and taste what the Man in Black was cooking.

Johnny Cash’s Old Iron Pot Chili

Course: Main CourseCuisine: American
Servings

8

servings
Prep time

20

minutes
Cooking time

2

hours 

30

minutes
Calories

385

kcal

The legendary country star’s slow-cooked chili with his secret cornmeal trick that made every batch unique.

Ingredients

  • 2 pounds sirloin steak, cut into 1/2 inch cubes (or ground beef)

  • 1 large white onion, diced

  • 3 tablespoons chili powder

  • 1 tablespoon ground cumin

  • 1 can (28 ounces) whole tomatoes, crushed by hand

  • 2 cans (15 ounces each) kidney beans, drained and rinsed

  • 1 can (4 ounces) diced green chiles

  • 2-3 tablespoons fine or medium-grain cornmeal

  • 2 tablespoons vegetable oil

  • 2 cups beef broth

  • Salt and pepper to taste

Directions

  • Heat the vegetable oil in a large heavy-bottomed pot or Dutch oven over medium-high heat. Season the cubed sirloin with salt and pepper, then add it to the pot in batches. Brown the meat on all sides for about 5 minutes per batch, then transfer to a plate and set aside. Don’t overcrowd the pot or the meat will steam instead of getting a nice crust.
  • Add the diced white onion to the same pot with the meat drippings. Cook over medium heat for about 5-7 minutes, stirring occasionally until the onion turns soft and slightly golden. This builds a flavor base that will carry through the entire dish. Scrape up any browned bits from the bottom of the pot as you stir.
  • Stir in the chili powder and ground cumin, cooking for about 1 minute until fragrant. The spices should coat the onions and release their aroma. Be careful not to burn them, as burnt spices will make your chili taste bitter. If the pot seems dry, add a splash of beef broth to prevent sticking.
  • Return the browned meat to the pot along with any juices that collected on the plate. Add the crushed tomatoes, beef broth, and diced green chiles. Stir everything together and bring to a simmer. The liquid should come about halfway up the meat and vegetables.
  • Reduce the heat to low, cover the pot with a lid slightly ajar, and let the chili simmer for about 1 hour. Stir occasionally to prevent sticking and check that it’s bubbling gently. The meat will start becoming tender and the liquid will begin reducing and thickening on its own.
  • Add the drained kidney beans and stir to combine. Toss in the cornmeal Johnny Cash-style by grabbing a handful and throwing it at the pot, or stir in 2-3 tablespoons if you prefer a more measured approach. The cornmeal will thicken the chili and add a subtle sweetness.
  • Continue simmering uncovered for another 45 minutes to 1 hour, stirring every 15 minutes. The chili should thicken as the cornmeal absorbs liquid and the excess moisture cooks off. If lumps form from the cornmeal, whisk vigorously to break them up and incorporate everything smoothly.
  • Taste the chili and adjust seasoning with salt, pepper, or additional chili powder as needed. The meat should be completely tender and the consistency should be thick but still spoonable. Serve hot in bowls with your favorite toppings like shredded cheese, sour cream, or diced onions.

Notes

  • For a more affordable version, substitute 2 pounds of ground beef for the sirloin steak and brown it the same way, breaking it into crumbles as it cooks.
  • Use fine or medium-grain cornmeal only—coarse cornmeal or polenta won’t incorporate properly and will leave gritty chunks in your chili.
  • Masa harina can be substituted for cornmeal if you prefer a smoother texture; it dissolves faster but still adds that corn taste.
  • This chili tastes even better the next day after the flavors have had time to meld together in the fridge overnight.

Frequently Asked Questions

Q: Why did Johnny Cash add cornmeal to his chili?
A: Cornmeal thickens chili and adds a mildly sweet taste that complements the spices. Cash added it in his own unpredictable way by tossing a handful at the pot, which meant each batch had slightly different thickness and character.

Q: Can I use ground beef instead of sirloin steak?
A: Yes, ground beef or even chicken can be substituted for sirloin to make the recipe more budget-friendly. The original USO cookbook notes this option, though the cubed steak gives a heartier texture that Cash preferred.

Q: What type of cornmeal works best for chili?
A: Use fine or medium-grain cornmeal, either white or yellow. Avoid coarse cornmeal or polenta because the grains are too large to incorporate properly into the chili and won’t create a smooth consistency.

Q: How long should I let the chili simmer after adding cornmeal?
A: Let the chili simmer for at least 30 minutes after adding cornmeal so it can fully absorb the liquid and thicken properly. If you add masa harina instead, it dissolves faster and needs less time to incorporate.

How Long Leftover Chicken Actually Stays Safe to Eat

0

That container of leftover chicken from Sunday dinner has been sitting in the fridge since, well, Sunday. Now it’s Thursday and you’re staring at it wondering if it’s still okay to eat. Most people have been there, and the truth is, cooked chicken doesn’t last as long as many people think. The general rule might surprise you, and knowing when to toss it could save you from a really bad stomach ache.

The magic number is three to four days

Here’s the thing about leftover chicken that catches a lot of people off guard. Whether you roasted a whole bird, fried up some tenders, or brought home a rotisserie chicken from the grocery store, the clock starts ticking the moment it comes out of the oven. That delicious meal you made on Monday needs to be eaten by Thursday at the latest. Pushing it to Friday or the weekend is playing a risky game that nobody wants to lose.

According to the USDA, cooked chicken can safely stay in the refrigerator for three to four days when stored properly. This applies to every kind of cooked chicken you can think of. Homemade, store-bought, shredded, ground, whole, or those restaurant leftovers you couldn’t finish. They all follow the same timeline. The longer chicken sits in the fridge, the more bacteria can grow, even when it’s cold.

Why five days is pushing your luck

So what happens if you keep cooked chicken for five days instead of four? The refrigerator slows down bacteria growth, but it doesn’t stop it completely. Every extra day increases the chance that harmful bacteria have multiplied to dangerous levels. You might look at that chicken and think it seems fine, but bacteria don’t always announce themselves with obvious signs. Sometimes spoiled food looks and smells perfectly normal.

People who meal prep for the entire week should keep this in mind. If you cook all your lunches on Sunday, any containers with chicken should be eaten early in the week. Save the meatless meals or other proteins for Thursday and Friday. This simple switch can help you avoid accidentally eating chicken that’s been sitting too long. When in doubt, the safest bet is to throw out any leftovers after three days if you’re not completely sure about the timing.

Different chicken products have different timelines

Not everything chicken-related follows the same three to four day rule. Chicken salad, for example, can actually last up to five days in the refrigerator. That’s good news for people who like to make a big batch at the start of the week. However, chicken salad cannot be frozen, so you’ll need to eat it within that window. Knowing these little differences can help prevent both food waste and food safety problems.

Packaged chicken products have their own rules too. Chicken lunch meat stays good for two weeks if the package is unopened, but only five days after you open it. Deli-sliced chicken from the counter lasts three to five days after purchase. Chicken hot dogs are safe for up to two weeks unopened and one week after opening. These products are processed differently, which is why their shelf lives vary so much from regular cooked chicken.

Proper storage makes all the difference

How you store cooked chicken matters just as much as when you eat it. First, let the chicken cool down completely before putting it in the fridge. Hot food can raise the temperature inside your refrigerator, which affects everything else stored in there. Once it’s cool, transfer the chicken to an airtight container. Those plastic takeout containers or glass storage containers with tight lids work great for this purpose.

Here’s a tip that can save you from guessing games later. Write the date on the container when you put it in the fridge. A piece of tape and a marker work perfectly for this. You also need to get that chicken refrigerated quickly. It should go into the fridge within two hours of cooking or sitting at room temperature. Your fridge temperature should be at or below 40°F to keep bacteria growth as slow as possible.

Freezing extends the life significantly

What if you made way too much chicken and there’s no way you’ll eat it all in four days? The freezer is your best friend in this situation. Cooked chicken can be frozen for up to four months while maintaining good quality. If you know you won’t finish the leftovers in time, don’t wait until day three to freeze them. The sooner you freeze it, the better the taste and texture will be when you thaw it out later.

The best way to freeze chicken is in a zip-top freezer bag with as much air pressed out as possible. Air is the enemy when it comes to freezer storage because it causes freezer burn. Label the bag with the date so you know how long it’s been in there. Technically, properly frozen chicken stays safe indefinitely. However, after four months, the quality starts to go downhill. The longer it sits in the freezer, the more the taste and texture suffer.

Reheating needs to hit the right temperature

Getting leftover chicken hot again isn’t just about making it taste better. It’s also about safety. The internal temperature of reheated chicken needs to reach at least 165°F to kill any bacteria that might have started growing. This applies whether you’re using a microwave, stovetop, oven, or air fryer. A cheap meat thermometer can take the guesswork out of this completely.

Different reheating methods work better for different situations. The stovetop is great for boneless pieces, shredded chicken, or anything with sauce. Cover the pan to keep moisture in and cook on medium-low heat. The oven works best for larger portions, bone-in pieces, or casseroles. Set it to 350°F and add a splash of water or broth to prevent drying out. For anything with a crispy coating like fried chicken or wings, the air fryer at 375°F for four to six minutes brings back that crunch.

Signs that chicken has gone bad

Sometimes you can tell right away that chicken is past its prime. If the color looks off, either darker than it should be or strangely faded, that’s a warning sign. Touch it with your finger. Does it feel slimy, sticky, or tacky? That’s bacteria at work and it’s time to throw it away. Your nose knows too. If it smells bad or just “off” in any way, trust your instincts and get rid of it.

The tricky part is when chicken has been marinated or covered in sauce. Those strong seasonings can mask the smell and appearance of spoiling meat. You might not notice anything wrong until you take a bite. If something tastes weird or wrong, stop eating immediately and toss the rest. When you’re unsure about any leftover chicken, the safest choice is always to throw it out. A few dollars worth of chicken isn’t worth getting sick over.

What happens if you eat spoiled chicken

Eating chicken that’s gone bad can lead to food poisoning, which is about as unpleasant as it sounds. Symptoms include nausea, chills, vomiting, diarrhea, and dehydration. These can start anywhere from a few hours to a few days after eating contaminated food. Most healthy adults recover on their own within a day or two, but it’s still a miserable experience that’s easy to avoid by following proper storage guidelines.

Some people need to be extra careful about this. Young children, elderly adults, pregnant women, and anyone with a weakened immune system are more vulnerable to serious complications from food poisoning. For these groups, it’s especially important to follow the three to four day rule strictly. If you or anyone in your household has eaten questionable chicken and shows signs of food poisoning, consider talking to a doctor, especially if symptoms are severe or don’t improve.

Raw chicken has even shorter fridge life

While we’re talking about chicken storage, raw chicken deserves a mention too. Unlike cooked chicken, which gets three to four days, raw chicken only lasts one to two days in the refrigerator. That’s not much time at all. If you buy chicken at the grocery store and don’t plan to cook it within a day or two, you should freeze it right away instead of letting it sit in the fridge.

Frozen raw chicken lasts much longer than cooked. A whole frozen chicken stays good for up to a year, while chicken parts remain safe for up to nine months. The “best by” dates on grocery store packaging are helpful for quality, but proper storage matters more for safety. When you’re ready to use frozen raw chicken, thaw it in the refrigerator overnight rather than on the counter. This keeps it at a safe temperature during the thawing process.

Keeping track of leftover chicken doesn’t have to be complicated. Remember the three to four day rule, store it properly in airtight containers, and when in doubt, throw it out. Labeling containers with dates takes two seconds and removes all the guesswork later. If you have more than you can eat in time, the freezer gives you up to four months of extra storage. A little attention now prevents a lot of regret later.

Why Your Favorite Beer and Soda Might Be Hard to Find Right Now

0

You walk into your local grocery store, head straight to the drink aisle, and find empty shelves where your favorite soda or beer should be. What’s going on? It turns out there are several surprising reasons why beverages have become harder to find in recent times. From gas prices to aluminum shortages, the story behind missing drinks is more complicated than most people realize. Here’s what you need to know about why your go-to beverages might be playing hide and seek.

Less driving means less carbon dioxide for drinks

Here’s something most people don’t think about when they skip their morning commute. When fewer cars hit the road, gas stations sell less fuel. That might sound like a good thing for the environment, but it creates a weird problem for your drinks. Ethanol is a type of fuel that gets mixed into gasoline, and when people buy less gas, companies make less ethanol. So what does fuel have to do with your can of cola? More than you’d ever guess.

When factories make ethanol, they also create carbon dioxide as a leftover product. This carbon dioxide is the same stuff that makes your soda fizzy and your beer bubbly. Without it, those drinks would be flat and pretty gross. Companies capture this CO2 and sell it to beverage makers. When ethanol production drops, there’s suddenly not enough fizz to go around. It’s like a domino effect that starts at the gas pump and ends at your refrigerator.

Most ethanol plants have cut back or stopped completely

The numbers are pretty shocking when you look at how many plants have shut down. Out of 45 ethanol plants in the United States that normally sell carbon dioxide, 34 of them stopped working or seriously cut back on production. That’s more than 75% of the facilities that usually keep our drinks bubbly. When that many plants close their doors, even temporarily, the effects ripple through the entire beverage industry fast.

Industry leaders have been sounding the alarm about this problem. Geoff Cooper, who leads the Renewable Fuels Association, told reporters that the situation is getting worse quickly. He said the supply is rapidly deteriorating and warned that things could get pretty disruptive for everyone. Without some kind of help to keep these facilities running, the carbon dioxide shortage could become even more serious. That means higher prices and fewer options on store shelves.

Prices have already gone up at the worst time

When something becomes rare, it usually becomes more expensive too. Carbon dioxide suppliers have already raised their prices by 25% because demand is higher than supply. For big companies like Coca-Cola or Budweiser, these extra costs add up fast. And guess who ends up paying for those higher costs? That’s right, regular shoppers like you and me. The price of your favorite six-pack or two-liter bottle is likely to creep up.

The timing couldn’t be worse for people watching their budgets. Grocery bills were already stretched thin for many families, and now drinks are getting more expensive on top of everything else. Some estimates suggested that CO2 supplies could fall by half within just a few weeks of the initial shortage reports. That kind of dramatic drop puts serious pressure on every company that needs carbonation to make their products.

Small breweries face the biggest struggles

If you love supporting local craft breweries, this news hits especially hard. Large companies like the ones making Bud Light or Pepsi have expensive equipment that can capture and recycle some of their own carbon dioxide. They built these systems years ago because it saves them money over time. But your neighborhood brewery? They probably don’t have a million-dollar CO2 capture machine sitting in the back room.

Craft breweries get almost half of their carbon dioxide from ethanol plants. When those plants stop production, small brewers have to scramble to find CO2 somewhere else. The machinery to capture their own carbon dioxide is way too expensive for most small operations. This means your favorite local IPA or seasonal ale might become harder to find. Some small breweries may have to slow down or even pause making beer until the supply situation improves.

Major soda brands are feeling the squeeze too

Even the biggest names in the beverage business aren’t immune to these problems. Coca-Cola, one of the largest soda companies on the planet, gets a significant amount of its carbon dioxide from overseas suppliers. When international shipping gets complicated, so does getting the ingredients they need. The company had to acknowledge that production delays were affecting their supply chain in ways they couldn’t fully control.

In official reports, Coca-Cola explained that their suppliers faced delays in production and export of key ingredients. While the company said they had short-term plans to keep products on shelves, long-term supply remained uncertain. PepsiCo has dealt with similar headaches. Both companies have said their supply chain troubles might continue well into the future. That’s not great news if Diet Coke or Mountain Dew is your daily drink of choice.

Aluminum cans have become incredibly hard to get

The carbon dioxide shortage is only part of the story. Even if beverage companies had all the fizz they needed, they’d still face another huge problem. Aluminum cans have become extremely scarce. Nearly three-quarters of all new drink products launched recently were packaged in aluminum cans. Everyone wants them, but there simply aren’t enough to go around. The demand has grown much faster than manufacturers can keep up.

According to industry reports, cans are sold out in North America for the next two to three years. Yes, you read that right. Companies looking to buy aluminum cans are being told they’ll have to wait until 2025 or 2026. That’s a long time to wait when you’re trying to run a beverage business. This shortage affects everything from energy drinks to sparkling water to your favorite craft beer.

It’s not just drinks that need carbon dioxide

Here’s where things get even more interesting. Carbon dioxide isn’t just for making drinks fizzy. The meat industry uses huge amounts of CO2 to process, package, and preserve meat products. When you buy a package of bacon or ground beef, there’s a good chance carbon dioxide helped keep it fresh during shipping. So the same shortage affecting your beer is also affecting your hamburger supplies.

Major meat companies have had to deal with this problem directly. Smithfield, one of the largest meat brands in the country, closed one of its processing plants due to related issues. The company’s CEO warned that the effects on the meat supply chain could be severe or even disastrous. Beer, soda, and bacon all competing for the same limited resource? That’s a recipe for empty shelves and frustrated shoppers across multiple aisles of the grocery store.

Trucking and shipping problems make everything worse

Even when companies manage to get the ingredients they need, getting products to stores has become its own nightmare. Trucking companies are dealing with driver shortages that make it hard to move goods across the country. Shipping containers are stuck at ports for weeks longer than normal. Weather problems have thrown additional wrenches into the system. Every link in the chain from factory to store shelf is experiencing some kind of delay.

Supply chain experts say that beverages face a 13% shortage rate compared to normal stock levels. That’s higher than the typical 5 to 10% shortage seen in other grocery categories. Waters, iced teas, soft drinks, spirits, and beers are all affected. Dr. Lisa Williams, who studies supply chains, explained that shortages in materials trickle down through the entire system until customers finally see empty spots on store shelves.

Smaller beverage companies are getting creative to survive

Not every company can absorb these kinds of hits to their supply chain. Smaller businesses have had to get creative just to keep their products available. Some have stocked up months in advance, buying as many bottles and cans as they could get their hands on. Others have switched packaging types or adjusted their production schedules. It’s survival mode for many independent beverage makers trying to stay afloat.

One small company called Casamar Club, which makes non-alcoholic drinks in Detroit, shared their experience. The owner said they bought extra supplies in early November to make sure they’d have enough for the busy holiday season. Even with that preparation, delays cost them about a month of sales, roughly 15% of what they expected to earn. Bottling delays and shipping problems ate into their profits significantly. Stories like this are playing out at small beverage companies all across the country.

The next time you find your favorite drink missing from the shelf, now you know why. A complicated web of fuel production, material shortages, and shipping delays all play a part. If you have a go-to local brewery or a beloved soda brand, it might be worth grabbing an extra pack when you see it in stock. These shortage issues have been building for a while, and they won’t disappear overnight. Being a little flexible with your drink choices might be the smartest move for now.

Things Aldi Employees Wish Customers Would Stop Doing Right Now

0

Aldi has become one of the most popular grocery stores in America for good reason. The prices are low, the checkout lines move fast, and those Aldi Finds aisles are basically treasure hunts. But here’s the thing most shoppers don’t realize. There are certain habits and tricks that drive Aldi employees absolutely crazy. Some of these come from viral social media posts that promise easy shortcuts. Others are just common mistakes people make without thinking. Either way, the workers who stock those shelves and run those registers really wish customers would knock it off.

That viral TikTok checkout hack is a bad idea

You’ve probably seen those TikTok videos promising a secret way to slow down the famous Aldi checkout speed. The idea seems simple enough. Instead of rushing to keep up with the cashier, some shoppers have tried various tricks to force a slower pace. Maybe they leave items in the cart longer or make the cashier wait while they organize their bags. It sounds like a great solution for anyone who feels stressed about the rapid-fire scanning. After all, who hasn’t felt that pressure when groceries pile up faster than you can grab them?

But Aldi employees are begging customers to stop trying this hack. The fast checkout system is actually designed to help everyone. It keeps lines short and gets people in and out quickly. When shoppers try to game the system, it backs up the whole store. The cashiers have to meet certain speed goals to keep everything running smoothly. Plus, the whole point is that you bag your own groceries at the counter behind the registers. That’s why Aldi can keep prices so low in the first place.

Asking employees to bag your groceries creates problems

This one might seem like no big deal. At other grocery stores, someone bags your items at checkout. So why not ask for the same service at Aldi? The answer comes down to how the store operates. Aldi keeps its staff numbers small on purpose. Each employee handles multiple jobs throughout their shift. There’s no dedicated bagger position because the whole model depends on customers doing that part themselves. It’s part of the trade-off that allows those super low prices.

Workers on Reddit forums have shared their frustrations about this request. Some customers get upset when told that bagging isn’t included. Others try to hold up the line until someone helps them. This creates awkward situations for everyone involved. The employee can’t abandon their register duties. Other customers get stuck waiting longer. And the whole efficient system breaks down. If you need help bagging due to a disability or injury, workers will usually assist. But for most people, just take your cart to the bagging counter and do it there.

Those specialty items might not be worth your money

Aldi is known for amazing deals, but not everything in the store is a winner. Employees who work there every day see which products fly off the shelves and which ones sit there gathering dust. They also know which items get returned most often or cause the most complaints. Some of those fancy-looking specialty products in the Aldi Finds section seem like great deals at first glance. But the quality doesn’t always match up to what you’d expect for the price tag.

Several videos have revealed items that workers personally avoid buying. These include certain seasonal products that look appealing but don’t perform well. Kitchen gadgets that seem like steals often break within weeks. Some packaged foods have shorter shelf lives than similar items at other stores. The employees aren’t saying everything is bad. They’re just pointing out that the rock-bottom prices sometimes come with rock-bottom quality on specific items. Knowing which products to skip can save you money and disappointment.

Leaving your cart in random places around the store

Here’s something that happens constantly at Aldi stores everywhere. A shopper grabs a cart, fills it up, and then abandons it in the middle of an aisle while they wander off. Or they leave it blocking the end cap while they dig through the Aldi Finds. Sometimes people just park their carts wherever and expect employees to deal with it. The aisles at Aldi are already narrower than at most grocery stores. An abandoned cart can completely block traffic and create frustrating bottlenecks.

Employees spend a surprising amount of time moving these carts out of the way. That’s time they could spend stocking shelves, helping customers find products, or keeping the checkout lines moving. The quarter deposit system was supposed to encourage people to return their carts. But it only works in the parking lot. Inside the store, some shoppers act like the cart becomes someone else’s problem the moment they’re done with it. Just keep your cart with you while shopping and return it properly when you leave. It’s basic courtesy that makes everyone’s experience better.

Opening packages to check products before buying

Would you want to buy a box of crackers that someone else already opened and pawed through? Of course not. Yet employees constantly find opened packages throughout the store. Some shoppers seem to think it’s fine to tear open a bag of chips to taste-test them. Others open boxed items to inspect what’s inside before deciding to buy. This damages products that the store then can’t sell. Employees have to write off these items as losses, which eventually affects everyone’s prices.

This problem is especially bad with the Aldi Finds merchandise. People open toy packaging, unwrap kitchen items, and even try on clothes without purchasing. If you’re unsure about a product, check the packaging carefully or ask an employee for information. Most items have pictures and descriptions that tell you exactly what’s inside. And Aldi has a generous return policy if something doesn’t work out. Just buy it, try it at home, and return it if needed. Don’t create damaged goods that nobody else can buy.

Showing up right before closing time for big shopping trips

The store closes at a specific time for a reason. Employees have lives outside of work. They need to clean up, count their registers, and complete closing duties before they can go home. When someone walks in five minutes before closing with an empty cart and a long shopping list, it throws off the entire evening. The staff has to stay late, and they often don’t get paid extra for that time. It’s not their fault you ran out of groceries at 8:55 PM.

If you absolutely must shop close to closing time, at least keep it quick. Grab the essentials you need and get to the register fast. Don’t browse the Aldi Finds section like you have all the time in the world. Employees understand that emergencies happen and sometimes people need milk right before the store closes. But making them stay an extra thirty minutes while you leisurely stroll every aisle is just rude. Plan your shopping trips better, and everyone will have a smoother experience.

Ignoring the quarter cart system on purpose

The quarter cart system is one of Aldi’s smartest features. You put a quarter in to unlock your cart. You get the quarter back when you return it. Simple, right? Yet some customers treat this like an optional suggestion. They leave carts scattered across the parking lot because they can’t be bothered to walk them back. Others wait around hoping someone else will return their cart so they can snag the quarter without doing the work. Both behaviors drive employees crazy.

When carts pile up in the lot, employees have to go collect them. This pulls them away from their other duties inside the store. Remember, Aldi runs with a small team. Every minute spent chasing down abandoned carts is a minute not spent restocking, cleaning, or helping customers. The system keeps prices low because the store doesn’t need to hire dedicated cart collectors. But it only works when customers actually participate. Return your cart, get your quarter back, and help keep Aldi running efficiently.

Putting items back in the wrong places throughout the store

Decided you don’t want that frozen pizza after all? Don’t just shove it behind the cereal boxes. This happens constantly, and it creates real problems. First, perishable items left in the wrong section have to be thrown away. That chicken breast you dumped in the bread aisle can’t be sold anymore once it’s been sitting at room temperature. Second, employees have to comb through the entire store looking for misplaced products. It’s like a frustrating scavenger hunt that nobody asked for.

If you change your mind about something, just hand it to the cashier at checkout. They have a spot for items that need to go back on the shelves. Or if you’re still shopping, ask any employee and they’ll take it off your hands. Most workers would rather you give them the item directly than discover melted ice cream behind the cat food three hours later. It takes two seconds of courtesy to save someone a lot of extra work and prevent food waste.

Getting angry about items being out of stock

Nothing makes an employee’s day worse than a customer yelling about something that’s out of stock. The person working the register didn’t personally eat all the avocados or hide the limited-edition chocolate you wanted. They have zero control over what the warehouse sends or what other shoppers bought before you got there. Aldi Finds items are especially tricky because they’re only stocked once. When they’re gone, they’re really gone. No amount of complaining will make more appear.

Workers personally avoid telling customers about popular items hitting shelves because they know the disappointment that follows. Some shoppers act like the staff is hiding products in the back. Here’s the truth about Aldi: there usually isn’t much backstock. What you see on the shelves is pretty much what’s available. If your favorite item is gone, just ask politely when the next delivery comes. The employee will help if they can, but they can’t magically produce inventory that doesn’t exist.

Shopping at Aldi comes with a certain trade-off that most customers gladly accept. The prices are incredible because the store operates differently than traditional grocery chains. Understanding how the system works makes everything smoother for shoppers and employees alike. Skip the viral hacks that don’t actually help anyone. Treat the staff with basic respect and follow the store’s simple expectations. Your wallet will thank you for shopping at Aldi, and the employees will appreciate you not making their jobs harder than necessary.

Things You Should Never Do With Ziploc Bags and Tricks You Should Try

0

Ziploc bags are probably sitting in your kitchen drawer right now. Most people use them for sandwiches or leftovers without thinking twice. But there are some things you should never do with these plastic bags that could cause real problems. On the flip side, there are also some pretty amazing tricks that can make your life easier. From safety mistakes to clever hacks, here’s everything you need to know about getting the most out of these everyday bags.

Using a hot knife without proper safety steps

You might have seen that viral hack where people cut Ziploc bags in half with a hot knife to make smaller bags. It sounds like a great idea when you need snack-sized bags but only have the big ones. The heated knife melts the plastic and seals the edges as it cuts. But here’s the thing: this trick comes with some serious safety concerns that you need to know about before trying it yourself.

When you heat plastic, it releases toxic fumes that you definitely don’t want to breathe in. If you decide to try this hack anyway, make sure you’re in a room with good airflow. Open some windows or turn on a fan. Also, don’t use your best knife for this because direct heat can damage it. And remember, if that knife is hot enough to melt plastic, it’s hot enough to burn your skin badly. Keep long sleeves and hair away from the flame too.

Storing liquids in DIY cut bags

So you successfully cut a Ziploc bag in half with a hot knife. Great! But don’t pour soup or juice into those new bags. The seal created by the hot knife isn’t perfect at all. There will be tiny holes along the melted edge that you might not even see. These little gaps are a recipe for a messy disaster waiting to happen in your lunch bag or refrigerator.

The new seal works okay for dry snacks like crackers, chips, or trail mix. But anything wet will eventually leak through those tiny holes. You also shouldn’t use these cut bags for long-term food storage because air can get in and make your food go stale faster. Stick to things you plan to eat pretty quickly. For liquids and longer storage, just use a regular bag that hasn’t been modified.

Pouring bacon grease down the drain instead

After cooking bacon, that leftover grease might look harmless enough to rinse away. But dumping it down your sink is one of the worst things you can do for your plumbing. The grease might be liquid when it’s hot, but it hardens as it cools down. This creates nasty clogs that can back up your whole drainage system and make your sink smell terrible over time.

Here’s a much smarter solution. Pour that leftover grease into a Ziploc bag while it’s still warm but not super hot. Seal it shut and let it sit until the grease hardens completely. Once it’s solid, you can just toss the whole thing in the trash without any mess. Your pipes will thank you, and you won’t have to deal with an expensive plumber visit or a stinky kitchen.

Make a quick frosting bag for decorating

Ever wanted to decorate cupcakes or cookies but didn’t have a fancy piping bag? Most of us don’t keep professional baking supplies around unless we’re really into cake decorating. Buying a whole set of piping bags and tips for one birthday party seems like overkill. But you can make something work with what’s already in your kitchen drawer.

A regular Ziploc bag makes a great substitute for a frosting bag when you’re in a pinch. Just fill the bag with frosting, push it all toward one corner, and snip a small hole in that corner. The bag isn’t quite as sturdy as the real thing, so work gently. But it gets the job done just fine for writing names on cakes or adding swirls to cupcakes. You can even use different sized cuts for different effects.

Clean your gas stove burners with ammonia

Those gross, crusty gas stove burners are one of the most annoying things to clean. You scrub and scrub but the baked-on grime just won’t budge. Most people eventually give up and just learn to live with the mess. But there’s actually a trick that does most of the hard work for you while you sleep.

Take your removable stove burners and put each one in its own Ziploc bag with about a quarter cup of ammonia. Seal the bags and leave them overnight. The fumes from the ammonia work to loosen all that stuck-on grease and food. The next morning, you should be able to wipe the grime right off without much effort at all. Just make sure to do this somewhere with good ventilation because ammonia has a strong smell.

Protect your phone at the beach or pool

Nothing ruins a fun beach day faster than getting sand or water inside your phone. Those tiny grains get into every little opening and can seriously damage the speakers and charging port. And we all know what happens when phones and water mix. Even phones that claim to be water-resistant don’t do well with sand and sunscreen goop.

Before you head to the beach, slip your phone into a Ziploc bag. The cool part is that most touchscreens still work through the plastic. You can check texts, take photos, and scroll through social media while keeping your device safe from sand, water splashes, and that oily sunscreen you just applied. This trick works great for hiking dusty trails or any outdoor activity where your electronics might be at risk.

Keep important documents safe from water

Have you ever had a water bottle leak in your bag and soak your papers? Or maybe you got caught in unexpected rain while carrying important stuff. Water damage can make documents completely unreadable, and that’s a huge problem when it’s something like your passport or insurance papers. These things are hard and expensive to replace.

Ziploc bags are clear and water-resistant, which makes them perfect for protecting documents. You can still read everything through the plastic without taking it out. Keep your passport, boarding passes, and maps in sealed bags when traveling. It’s also smart to store important papers at home this way too. You never know when a pipe might burst or a roof might leak during a storm.

Start seeds for your garden cheaply

Those fancy seed starting kits at the garden center can cost a lot of money. But you don’t need anything special to get seeds growing. Creating the right conditions for germination is actually pretty simple. All seeds need is moisture and warmth, and a Ziploc bag provides both of those things perfectly.

Put your seeds in a damp paper towel, then slide the whole thing into a Ziploc bag. The sealed bag keeps the moisture from evaporating, creating a mini greenhouse effect. Place it somewhere warm and check on it every few days. Once you see little sprouts starting to grow, you can transfer them to soil. This is a super cheap way to get a head start on your garden without buying special equipment.

Remove hard water buildup from faucets

That crusty white stuff around your faucets and showerheads is mineral buildup from hard water. It looks gross and can actually block the water flow over time. Scrubbing it with regular cleaners barely makes a dent. But white vinegar is amazing at breaking down those mineral deposits, and a Ziploc bag helps it work even better.

Fill a bag with enough white vinegar to cover the end of your faucet or showerhead. Secure the bag with a rubber band so the hardware is completely submerged in the vinegar. Leave it for a few hours or overnight for really bad buildup. The acid in the vinegar dissolves the minerals without any scrubbing from you. Just remove the bag, wipe things down, and enjoy your clean, shiny fixtures.

Ziploc bags are way more useful than most people realize. Whether you’re avoiding plumbing disasters, protecting your stuff from water damage, or trying some clever cleaning hacks, these simple bags can save the day. Just remember to use them safely and know their limits. Keep a box in your kitchen and another in your travel bag because you never know when one of these tricks might come in handy.

How To Make Bagged Salads Last Much Longer in Your Fridge

0

We’ve all been there. You buy a bag of salad greens with the best intentions. A week later, you find a sad, soggy mess hiding in your fridge. It feels like such a waste of money and good food. The truth is, those pre-packaged greens can last much longer than most people think. You just need to know a few simple tricks that make all the difference. Ready to stop throwing away wilted lettuce every single week?

Don’t open the bag until you’re ready

One popular idea floating around online suggests opening your bagged salad right away. The theory says you should mix everything around and let out any gases building up inside. It sounds smart, right? But here’s the thing. Food experts actually recommend the opposite approach. Those salad bags aren’t just random plastic packaging. Manufacturers design them specifically to help your greens stay fresh longer. Opening them early defeats the whole purpose.

The packaging on bagged salads uses special technology to control the environment inside. According to food safety experts, opening the bag too soon can actually expose your greens to bacteria and mold in your kitchen air. Your lettuce is essentially a living thing that breathes in oxygen and releases carbon dioxide. The original bag helps manage this process. So resist the urge to peek inside until you’re actually sitting down for a meal.

Ethylene gas isn’t the real problem here

You might have heard that ethylene gas makes produce go bad faster. This is true for many fruits and vegetables. Some people think opening salad bags releases this gas and helps greens last longer. But there’s a catch most folks don’t know about. Leafy greens don’t actually produce much ethylene gas at all. They’re not the source of the problem. They’re actually the victims of it. Understanding this changes how you should store your salads.

While your salad greens don’t give off much ethylene, they’re very sensitive to produce that does. Bananas, apples, tomatoes, and avocados all release this ripening gas. When you store your salad bag next to these items, your greens wilt much faster. So the real trick isn’t about opening your salad bag early. It’s about keeping your salads far away from those gas-producing fruits and vegetables in your fridge.

Keep your greens away from certain produce

Think about what’s sitting next to your bagged salad right now. Is there a bunch of bananas nearby? Maybe some apples or a ripe avocado waiting to be used? These common fridge residents could be secretly sabotaging your salad. The ethylene gas they release spreads through the air inside your refrigerator. Even a small amount can speed up the wilting process for your delicate lettuce and spinach leaves.

The solution is simple. Create some distance between your salads and ethylene-producing foods. If possible, store them in different drawers or on different shelves. Some people even keep their bananas on the counter to avoid this issue entirely. Tomatoes can also stay out of the fridge until they’re cut. Making these small changes in where you put things can add several days to your salad’s lifespan. It’s such an easy fix once you know about it.

Moisture is your salad’s worst enemy

Have you ever noticed how slimy leaves start appearing in your salad bag? That gross feeling is excess moisture doing its damage. Water droplets sitting on lettuce leaves create the perfect environment for rot and decay. This is probably the biggest reason why bagged salads go bad so quickly. The leaves get wet, then they get soft, then they turn into that brown mush nobody wants to eat.

Too much moisture causes leafy greens to turn soft and rot faster than anything else. When you first bring salad home from the store, check if there’s visible condensation inside the bag. If you see lots of water droplets, that bag might already be on its way to spoiling. Try to choose bags that look dry inside when shopping. This small step at the grocery store sets you up for success at home.

The paper towel trick actually works

Here’s one of the best-kept secrets for keeping salads fresh. Paper towels are your new best friend. Once you’ve opened your bag of greens, toss a paper towel inside before sealing it back up. The towel absorbs excess moisture that would otherwise make your leaves soggy. You can also wrap the greens loosely in paper towels before putting them in a container. This simple trick can extend freshness by several days.

When you transfer salad to a storage container, line the bottom with a paper towel first. Add your greens on top, then place another towel over them. Close the lid and store it in your fridge. Check the towels every couple of days. If they feel damp, replace them with fresh dry ones. This might seem like extra work, but it really does make a difference. Your greens stay crisp and crunchy instead of turning into a sad wet mess.

Airtight containers beat bags after opening

Once you’ve opened that original bag, everything changes. The special atmosphere inside is gone, and regular air has rushed in. At this point, you have some choices to make. You can squeeze out the extra air and clip the bag shut. Or you can transfer your greens to an airtight container. Many people find that containers work better for keeping leftover salad fresh after that first serving.

A good container does more than just seal in freshness. According to registered dietitians, containers also protect your greens from getting bumped and bruised. Heavy fruits rolling around in your crisper drawer can crush delicate lettuce leaves. That physical damage speeds up decay. A sturdy container acts as armor for your salad. Add that paper towel trick mentioned earlier, and you’ve got a winning combination for long-lasting greens.

Your crisper drawer exists for a reason

That drawer at the bottom of your fridge isn’t just for hiding vegetables you forgot about. It actually serves an important purpose. Crisper drawers are designed to maintain specific humidity levels that help produce stay fresh longer. Most fridges have a small slider or dial that lets you adjust the humidity. For leafy greens, you want high humidity. This keeps leaves from drying out while not adding too much moisture.

Experts recommend storing your leafy greens in the crisper drawer set to high humidity. But here’s another tip that makes a big difference. Try to keep your salads toward the front of the drawer, not pushed to the back. The back of your fridge tends to be colder. Sometimes it gets cold enough to actually freeze your lettuce. Frozen lettuce turns mushy when it thaws. Nobody wants icy salad leaves on their plate.

Skip washing pre-washed greens again

It might feel weird to eat salad straight from the bag without rinsing it first. But if your package says the greens are pre-washed or triple-washed, you really don’t need to wash them again. In fact, washing them again can actually hurt more than help. Remember how moisture is the enemy of fresh salads? Running water over already clean greens just adds more wetness that leads to faster spoiling.

Food experts specifically say that washing pre-washed greens is not recommended and can actually decrease shelf life. Any excess water left on the product after your extra rinse creates problems. If you absolutely must wash your salad, make sure to dry it completely afterward. A salad spinner works great for this. Or you can gently pat the leaves with paper towels. But honestly, saving that step saves time and keeps greens fresher.

Choose better bags at the store

Everything starts with what you put in your shopping cart. Taking an extra minute to examine bagged salads before buying makes a huge difference. Look through the clear plastic for any signs of trouble. Can you see slimy or discolored leaves? Are there dark spots that look suspicious? If you can easily spot rotten pieces without even opening the bag, put it back and grab a different one.

The best bags have only fresh greens visible with no obvious bad spots. Check the sell-by date too. A bag with a date several days away gives you more time to enjoy it. Also notice if there’s excessive moisture or condensation inside. Some dampness is normal, but lots of water droplets suggest the salad might already be going downhill. Being picky at the store means less waste at home.

Keeping bagged salads fresh doesn’t require any fancy equipment or complicated steps. Just remember the basics: leave the bag sealed until you eat, store away from ethylene-producing fruits, and use paper towels to manage moisture. Put your greens in the crisper drawer and skip that second wash on pre-washed varieties. These simple changes can easily double how long your salads last. That means less money in the trash and more crisp greens on your plate.

Smart Grocery Shopping: What to Stock Up On Before Prices Soar

0

Food prices have gone up every single year since 2020, and experts say they will keep climbing in 2025. Remember when a dozen eggs cost around three bucks? Earlier this year, some people paid nearly ten dollars for a carton. That kind of sticker shock hurts, especially when feeding a family. The good news is that planning ahead and buying smart can save real money. Knowing what to grab now, before prices jump even higher, makes a big difference in the monthly grocery bill.

Cooking oils are about to cost a lot more

Most kitchens go through cooking oil pretty fast. Think about it. Every time something hits a pan, oil is probably involved. Whether making scrambled eggs or roasting vegetables, that bottle gets a workout. The problem is that most healthy cooking oils come from other countries. Olive oil mainly comes from Italy and Spain. Avocado oil usually starts in Mexico. When products come from overseas, they often face extra costs that get passed along to shoppers at the register.

Stocking up on cooking oils now could mean avoiding a steep price increase later. Olive oil from European countries could see a 20% markup if certain trade changes happen. The trick is storing oil the right way. Keep bottles in a cool, dark spot like a pantry cabinet. Heat and light make oil go bad faster. Buy what can realistically be used within a year, and the savings will be worth the cabinet space.

Rice and beans belong in every pantry

Rice and beans together make one of the most affordable meals on the planet. They also happen to be perfect for storing long-term. Dry beans and lentils can sit in a pantry for years without going bad. Rice, especially white rice, has an incredibly long shelf life when kept in an airtight container. These two foods together provide protein, fiber, and plenty of energy to keep everyone full and happy.

A lot of rice sold in the United States comes from Asia. Jasmine rice from Thailand and basmati from India and Pakistan are popular choices. Trade changes could add a 36% markup on rice from Thailand alone. Buying a big bag now and storing it properly makes sense. Beans are equally smart to stock. They stretch meat in recipes, work great in soups and chilis, and cost very little per serving. Having a few different types on hand adds variety to meals.

Beef prices keep hitting record highs

Ground beef now costs over six dollars per pound on average, which is the highest price in United States history. That is not a typo. Beef has never been more expensive. A lot of the red meat eaten here actually comes from Canada. If trade costs go up with Canada, beef prices could climb even higher. Families who love burgers, tacos, and meatballs might want to think ahead about this one.

The smart move is watching for sales and buying in bulk when prices drop. Ground beef freezes really well. It stays fresh for about four months in the freezer, which gives plenty of time to use it up. Buying larger cuts of meat and portioning them at home saves even more money. A good freezer bag and a little organization go a long way toward protecting the grocery budget.

Salmon is getting harder to afford

Fish lovers have probably noticed that salmon prices keep going up. A big reason is that a lot of salmon now comes from China after Canadian imports dropped over the years. Fish is one of those foods that feels expensive already. Adding extra costs from trade changes makes it even harder to serve regularly. But salmon freezes beautifully, which opens up options for buying ahead.

Buying salmon in bulk and portioning it for the freezer is a solid plan. A vacuum sealer makes this even easier and keeps fish fresher longer. Here is a fun fact: cooking salmon straight from frozen actually works great. It does not need to thaw first. This makes meal prep simpler and means grabbing a frozen portion for a quick dinner is totally doable.

Imported cheese might get pricey fast

Real Parmigiano-Reggiano from Italy hits different than the stuff in a green can. Same goes for authentic Swiss Gruyère or a good Spanish Manchego. These cheeses have specific flavors that American versions just cannot match. The downside is that imported cheeses could face big markups. Gruyère from Switzerland might see prices jump by 31% or more. For cheese lovers, that stings.

The surprise is that hard cheeses like Parmesan and Gruyère actually freeze well. This is not common knowledge, but wrapping a wedge tightly and freezing it works great. The texture might change slightly, but for cooking and grating, nobody will notice. Buying an extra wedge or two now means enjoying real imported cheese later without paying inflated prices. Warehouse stores often have great deals on quality cheese.

Spices could see some of the biggest increases

Ever wondered where all those spices in the cabinet come from? Most of them travel from far away. India and China are the biggest spice exporters in the world. Vanilla beans often come from Madagascar. Cumin, cinnamon, black pepper, and dozens of other spices start their journey overseas before landing on grocery store shelves. All of that international travel means prices depend heavily on trade costs.

Madagascar could face a 47% markup on products like vanilla beans. India might see a 26% increase on spice exports. China already faces varying costs up to 245% on some imported products. Spices last a long time when stored in a cool, dry place. Buying favorite spices in larger containers now saves money later. For spices that do not get used as often, freezing them in sealed bags keeps them fresh for even longer.

Butter prices keep climbing year after year

Butter now averages almost five dollars per pound, and prices have been steadily rising for years. Anyone who bakes regularly knows how fast butter disappears. Cookies, cakes, pie crusts, and homemade bread all need butter. Even everyday cooking uses more butter than most people realize. A little butter in a pan makes vegetables taste amazing. Mashed potatoes without butter? Unthinkable.

The solution is simple. Butter freezes perfectly for up to six months. Watching for sales and buying extra sticks or pounds to freeze just makes sense. Holiday baking season uses a lot of butter, so stocking up beforehand prevents paying top dollar during November and December. A dedicated freezer shelf for butter sounds silly but pays off over time.

Eggs are unpredictable so grab them cheap

Eggs might be the most unpredictable food in the entire grocery store. Prices swing wildly depending on supply issues, bird flu outbreaks, and demand changes. Earlier this year, a dozen eggs cost over six dollars in some places. Prices have dropped to around $3.78 per carton more recently, but that could change again in a few months. Nobody knows for sure which direction egg prices will go next.

Eggs stay fresh in the refrigerator for three to five weeks from the pack date. That means buying a few cartons at once during a good sale makes sense. Here is something most people do not know: eggs can actually be frozen. They just cannot stay in the shell. Cracking eggs into an ice cube tray and freezing them works great for baking later. Making quiches or egg bites in bulk and freezing those is another option.

Frozen foods are smart buys especially now

Frozen foods already help stretch a grocery budget. They last much longer than fresh versions and often cost less. Frozen fruits, vegetables, fish, pizzas, and dumplings all sit in the freezer waiting patiently until needed. No rushing to use them before they go bad. No worrying about forgetting something in the back of the fridge. Frozen foods just wait until dinner needs them.

Many frozen products come from other countries, which means prices could rise with trade changes. Frozen fruits, fish, and prepared foods often start overseas before reaching American freezers. Watching for sales and filling up freezer space now locks in current prices. Anyone with extra freezer room should take advantage. These foods will not go bad, and buying at a discount today beats paying more tomorrow.

Smart grocery shopping is really about paying attention and planning ahead. Prices on many everyday foods could go up significantly in the coming months due to trade changes affecting imported goods. Stocking up on items with long shelf lives or that freeze well protects the family budget. Oils, rice, beans, meat, cheese, spices, butter, and frozen foods all make great candidates for buying ahead. Keeping an eye on sales, using store loyalty programs, and having enough storage space turns grocery shopping into a money-saving strategy that actually works.

Florida Testing Reveals Arsenic In 28 Popular Candy Brands Including Twizzlers And Snickers

0

That bag of candy sitting in the pantry might have a secret ingredient nobody wants. A recent study tested 46 popular candy brands and found that more than 60% of them contained elevated levels of arsenic. The list includes some of the most recognizable names on store shelves, from Twizzlers to Snickers to Sour Patch Kids. This news has parents and candy lovers everywhere taking a second look at their favorite treats.

Florida released a list of 28 candies with high arsenic

The Florida Department of Health didn’t hold back when they released their findings. Out of 46 different candy products tested, 28 came back with elevated arsenic levels. That’s more than half of the candies that were put under the microscope. The study was part of First Lady Casey DeSantis’s “Healthy Florida First” initiative, which aims to give families better information about what’s in their food. The goal is to let people make their own choices based on real data.

What makes this study stand out is how many well-known brands showed up on the list. These aren’t obscure candies from the back of a discount store. We’re talking about products that fill Halloween buckets and movie theater snack bars across the country. The state measured arsenic in parts per billion and calculated how much of each candy would be considered safe to eat per year. Some of those numbers are surprisingly small.

Jolly Rancher Sour Apple had the highest arsenic reading

If there’s one candy that stood out for all the wrong reasons, it was Jolly Rancher Hard Candy in Sour Apple. This popular hard candy tested at 540 parts per billion of arsenic, making it one of the highest on the list. According to the study, children should only eat about 6 pieces per year to stay within safe limits. That’s a pretty small number considering how easy it is to grab a handful from a candy dish. The strawberry version tested lower at 320 parts per billion.

Tootsie Fruit Chew Lime actually topped the entire list at 570 parts per billion. Regular Tootsie Rolls came in at 380 parts per billion, while the vanilla version hit 370. These chewy candies have been around for over a century, which makes this news even more surprising. The numbers show that not all candies from the same brand test the same way. Different ingredients and manufacturing processes can lead to different results.

Twizzlers showed up multiple times on the list

Twizzlers fans might want to sit down for this one. Three different varieties of the popular licorice-style candy made the list. Twizzlers Watermelon tested at 510 parts per billion, Twizzlers Strawberry hit 500 parts per billion, and Twizzlers Cherry came in at 350 parts per billion. The study suggests children should eat only 4 strawberry pieces per year to stay within safe levels. That’s barely a handful, and most people can eat that many during a single movie.

The study also notes that adults can handle more than kids, but not by a huge margin. For Twizzlers Strawberry, adults should limit themselves to about 9 pieces per year. When was the last time anyone ate just 9 Twizzlers in an entire year? These findings highlight the difference between how we actually eat candy and what researchers consider safe consumption. It’s worth thinking about how these treats add up over time.

Nerds and SweeTarts also appeared in the results

Those tiny, crunchy Nerds candies that come in boxes have been a favorite for decades. The testing found Nerds Gummy Cluster at 500 parts per billion, Nerds Strawberry at 450 parts per billion, and Nerds Grape at 380 parts per billion. Because Nerds are so small, the safe consumption limits might seem higher at first glance. Children could eat 96 grape or strawberry pieces per year, which sounds like a lot until you realize how fast those tiny candies disappear.

SweeTarts Original tested at 400 parts per billion, while SweeTarts Rope came in at 390. The rope version has a particularly low safe limit of just 3 ropes per year for children. That’s basically three pieces of candy spread across 365 days. SweeTarts are often found in party favor bags and trick-or-treat hauls, which means kids might hit that yearly limit in a single afternoon. These numbers really put snacking habits into perspective.

Sour Patch Kids and Swedish Fish made the list too

Sour candy lovers won’t be happy about this section. Regular Sour Patch Kids tested at 470 parts per billion, Sour Patch Kids Tropical at 420, and Sour Patch Kids Watermelon also at 420. The original version allows for 36 pieces per year for kids, while the watermelon version drops down to just 12 pieces. Swedish Fish, another gummy favorite, came in at 220 parts per billion with a safe limit of 8 pieces per year for children.

First Lady Casey DeSantis made a good point about these numbers. More than eight pieces of Swedish Fish exceed the estimated safe annual arsenic exposure level for a child. Yet a typical small bag contains anywhere from 50 to 100 pieces. That’s a big gap between what the study considers safe and what most people actually consume. A single movie snack could blow past a whole year’s recommended limit.

Some chocolate bars like Kit Kat and Snickers tested high

It’s not just fruity and sour candies on the list. Kit Kat tested at 510 parts per billion, putting it near the top of the chart. Snickers came in at 350 parts per billion, and 3 Musketeers hit 240 parts per billion. Hershey’s Cookies ‘N’ Creme bar also made the list at 280 parts per billion. These are some of the most popular chocolate bars in the country, showing up in vending machines, checkout lanes, and lunch boxes everywhere.

The safe consumption limits for these chocolate bars are pretty tight. Kit Kat’s limit sits at just 2.4 pieces per year for children, and Snickers has the same number. That means a kid eating one Snickers bar from their Halloween haul could already be pushing the annual limit according to this study. It’s a stark reminder that even occasional treats might add up faster than anyone expects. The numbers are definitely eye-opening.

Several popular candies tested clean for arsenic

Here’s some good news for candy lovers. Not everything tested positive for elevated arsenic levels. Reese’s Peanut Butter Cups came back clean, as did the classic Hershey Milk Chocolate Bar. M&M’s, Twix, Whoppers, and Milky Way all passed the test too. First Lady DeSantis pointed out that this proves contamination isn’t unavoidable. If some brands can make candy without high arsenic levels, others should be able to figure it out too.

The list of clean candies also includes some organic and specialty brands. Organic Black Forest Gummy Bears tested clean even though the regular version had elevated levels at 370 parts per billion. Laffy Taffy Cherry was fine while Laffy Taffy Banana tested at 480 parts per billion. This suggests that different ingredients or recipes within the same brand can lead to very different results. Shopping for specific varieties might actually matter.

The candy industry is pushing back against these findings

The National Confectioners Association isn’t taking this news quietly. They released a statement calling the Florida report “misguided” and accusing the state of using “scare tactics.” According to the association, chocolate and candy are safe to eat and have been enjoyed for centuries. They argue that Florida ignored the FDA’s Closer to Zero Initiative, which is working on setting arsenic limits for foods kids eat. The industry group says they follow the science.

The association also complained about a “lack of transparency” in the study. They say the report will confuse consumers and lawmakers alike. Food safety and product quality remain their highest priorities, according to the statement. On the other side, Florida officials argue they’re getting ahead of problems instead of waiting for federal agencies to react. Florida Surgeon General Joseph Ladapo said the arsenic levels in candy were 20 to 40 times higher than typical foods.

Local experts suggest moderation is still the best approach

Nurse practitioner Julie Armstrong from Pensacola offers some practical advice. She tells her clients that having a piece of candy here and there probably won’t cause harm. The concern comes from eating these products repeatedly over time. Armstrong also points out a bigger issue: healthier snack options are often more expensive. Shopping the outside of the grocery store for fresh foods costs more than grabbing a bag of candy from the middle aisles.

The study didn’t explain where the testing was done or whether multiple tests were performed. It also didn’t specify what type of arsenic was found. Arsenic naturally exists in many foods, but inorganic arsenic is considered worse than organic arsenic. Without this detail, it’s harder to know exactly how concerned people should be. Still, the numbers provide useful information for anyone wanting to think more carefully about their snacking choices.

This study adds to a growing conversation about what’s really in our food. Whether the candy industry admits there’s a problem or not, the data is out there now. Families can use this information however they see fit. Some might cut back on certain candies while others might not change anything at all. Either way, knowing what’s in the snacks we eat gives everyone the power to make their own decisions about what goes into their bodies.