
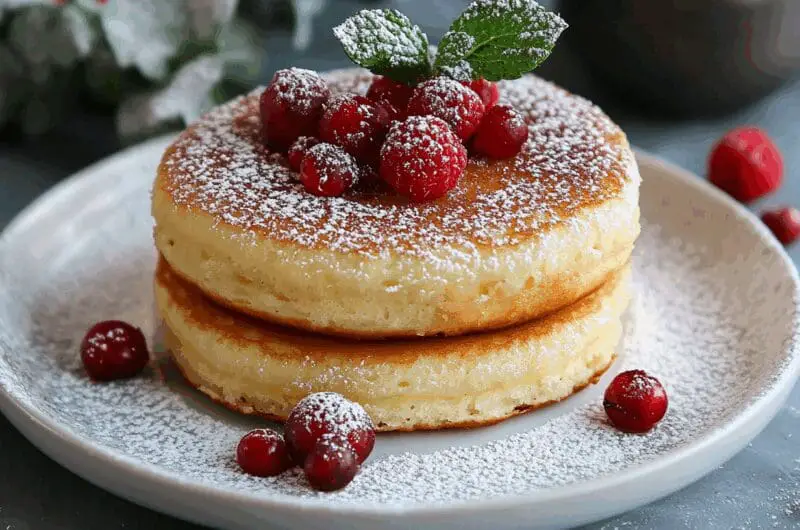
Making pancakes seems straightforward until you’re faced with a griddle of mismatched shapes and sizes. For years, I’ve been pouring batter directly onto the pan, hoping for those picture-perfect rounds, only to end up with pancakes resembling abstract art. Then I discovered a trick so simple, I couldn’t believe I hadn’t tried it sooner. Using mason jar lids to shape pancakes creates perfectly uniform circles every time. This morning hack has completely transformed my breakfast routine, and I’m betting it will do the same for yours.
Why mason jar lids make perfect pancake molds
Mason jar lids are the ideal pancake molds because they’re perfectly round, heat-resistant, and most households already have them on hand. The two-piece design of these lids – with the flat metal disk and the outer screw band – makes them particularly suitable for this purpose. When separated, the outer rings create perfect circles for your pancake batter while conducting heat well, helping to create that beautiful golden edge that defines a great pancake.
The beauty of using mason jar lids is that they come in different sizes, allowing you to make pancakes of varying diameters. Regular mouth lids measure about 2.75 inches across, while wide-mouth lids are approximately 3.5 inches in diameter. This means you can make standard-sized pancakes or adorable silver dollar pancakes using the same technique.
Another advantage is their height. The raised edge creates a perfect barrier that contains the batter as it begins to cook and rise. This is particularly helpful for thicker batters, as the contained space ensures the pancake cooks evenly throughout. Don’t have mason jar lids? Metal cookie cutters or biscuit cutters can work as alternatives, though they typically don’t have the same height as jar rings.
What makes this trick truly exceptional is its simplicity. No special equipment to purchase, no complicated techniques to master – just a creative use of something many of us already have in our kitchen drawers. The results, however, are anything but ordinary.
Setting up your mason jar lid pancake station
Setting up your pancake station requires minimal preparation. First, gather all the lids you plan to use. Separate the rings from the flat discs – you’ll only need the rings for this trick. Wash them thoroughly if they’ve been sitting in storage, ensuring no dust or residue remains. Having multiple rings ready allows you to cook several pancakes simultaneously.
Before placing the rings on your cooking surface, you’ll need to properly grease them to prevent sticking. Using a paper towel, apply a thin layer of oil or melted butter to the inside of each ring. Pay special attention to the bottom edge where it makes contact with the griddle or pan. This step is crucial – without proper greasing, your pancakes might stick to the rings when you try to remove them.
Position the greased rings on your preheated griddle or pan, allowing them to heat up for about 30 seconds before adding the batter. This pre-heating helps create that initial sear on the pancake bottom that prevents sticking. For best results, maintain a medium-low heat – too high and the outsides will burn before the centers cook through.
When everything is set up, carefully pour your batter into each ring, filling them about halfway. Don’t overfill, as the pancakes will rise as they cook. If you’re making multiple batches, you might need to re-grease the rings between uses, especially if you notice any sticking.
The perfect pour technique
Achieving the perfect pour is essential when using mason jar lid molds. The key is consistency – you want to add the same amount of batter to each ring to ensure uniform cooking times and thickness. A small ladle or measuring cup works wonderfully for this purpose. For regular-mouth mason jar lids, about 3 tablespoons of batter is typically ideal, while wide-mouth lids might need closer to 4 tablespoons.
Another helpful tool for perfect pouring is a clean squeeze bottle. Some breakfast enthusiasts repurpose empty ketchup or syrup bottles for this task. Simply fill the bottle with your prepared pancake batter, secure the cap, and you have a precision pouring device that eliminates drips and spills. This method gives you remarkable control over where and how much batter goes into each ring.
When pouring, aim for the center of the ring and allow the batter to spread naturally toward the edges. If needed, use the back of a spoon to gently guide the batter to fill any empty spaces. For those who enjoy pancakes with mix-ins like blueberries or chocolate chips, add these after pouring the batter into the rings. Sprinkle them evenly across the surface and use a toothpick to gently push them just beneath the surface of the batter.
The contained environment of the ring actually makes it easier to manage add-ins that might otherwise roll around on a flat griddle. Blueberries stay put, chocolate chips don’t migrate to the edges, and everything cooks more evenly within the defined space.
When and how to remove the rings
Timing is everything when removing the mason jar rings. The ideal moment occurs when the edges of the pancake have set and bubbles have formed across the surface – particularly when those bubbles begin to pop and stay open. This usually takes about 2-3 minutes on medium-low heat. At this point, the pancake has enough structural integrity to hold its shape without the support of the ring.
To remove the ring without damaging the pancake, use tongs or the tip of a butter knife to gently lift it straight up. Don’t twist or drag the ring, as this might tear the pancake. If you encounter resistance, run a thin spatula or knife around the inside edge of the ring to loosen any stuck areas. The pancake should remain perfectly round on the cooking surface, ready for flipping.
After removing the ring, allow the pancake to cook for another 30-60 seconds before flipping. This additional time ensures the exposed edge (which was previously against the ring) has a chance to set completely. When flipping, use a wide spatula that can support the entire pancake, and do it with confidence – hesitant flips often result in folded or torn pancakes. Once flipped, the second side typically needs only 1-2 minutes to finish cooking.
Be aware that the mason jar rings will be hot after contact with the cooking surface. Have a heat-resistant surface nearby where you can place them after removal. If you’re making multiple batches, you might want to have two sets of rings so you can prepare the next batch while the first is cooking.
Creating the perfect batter for molded pancakes
The consistency of your pancake batter plays a crucial role when using mason jar lid molds. Ideally, you want a batter that’s pourable but not runny – similar to the consistency of honey or thick cream. This allows it to spread evenly within the confines of the ring without being so thick that it doesn’t reach the edges or so thin that it seeps under the ring.
For the leavening agents, baking powder is preferred over baking soda when using this method. Baking powder creates a more stable rise that holds up well within the confined space of the ring. About 1 tablespoon of baking powder per cup of flour provides enough lift without causing the batter to overflow the rings during cooking.
When combining wet and dry ingredients, use a gentle hand. Mix just until incorporated, leaving some small lumps in the batter. Overmixing develops gluten, resulting in tough pancakes rather than light, fluffy ones. After mixing, allow the batter to rest for 10-15 minutes before cooking. This resting period gives the flour time to fully hydrate and the leavening agents time to activate, resulting in fluffier pancakes.
If your batter appears too thick after resting, add milk one tablespoon at a time until you reach the desired consistency. When using mason jar rings as molds, err on the side of slightly thicker batter rather than thinner – it’s easier to spread thick batter within the ring than to contain thin batter that wants to escape underneath.
Tips for perfect flipping with the ring method
Flipping pancakes becomes much easier with the ring method. The primary advantage is that once the ring is removed, you have a perfectly formed pancake with clearly defined edges, making it easier to get your spatula underneath. The challenge comes in timing – removing the ring too early can result in a pancake that loses its shape, while waiting too long might cause sticking.
The key indicator that your pancake is ready to flip is the appearance of bubbles across the surface that pop and remain open rather than filling back in with batter. The edges should appear set and slightly dry. At this point, remove the mason jar ring as described earlier, wait another 30 seconds, and then position your spatula for flipping.
Slide a wide, thin spatula completely under the pancake before attempting to flip – partial coverage often leads to folded or torn pancakes. When executing the flip, commit to the motion with confidence. Hesitation midway through often results in pancake mishaps. Lift the pancake completely off the cooking surface, move it slightly to ensure you’re placing it on a fresh, hot section of the griddle, and then flip with a quick wrist motion.
If you’re making multiple pancakes, develop a system to keep track of their cooking progress. Work in a consistent direction across your cooking surface – for example, filling rings from left to right, then removing rings and flipping in the same order. This prevents any pancake from overcooking while you’re attending to others.
This mason jar lid pancake trick is truly a game-changer for anyone who loves a perfect breakfast. With minimal effort and equipment you already have, you can transform ordinary pancakes into picture-perfect rounds worthy of a magazine cover. The consistent size and shape make cooking more predictable, serving more elegant, and eating more enjoyable. Try it once, and you’ll wonder how you ever made pancakes any other way.
Perfect Mason Jar Lid Pancakes
Course: BreakfastCuisine: American4
servings15
minutes20
minutes280
kcalThese fool-proof, perfectly round pancakes use a simple kitchen hack that will transform your breakfast routine forever.
Ingredients
1½ cups all-purpose flour
1 tablespoon baking powder
¼ teaspoon salt
2 tablespoons granulated sugar
2 large eggs
1¼ cups milk
3 tablespoons melted butter, plus extra for greasing
1 teaspoon vanilla extract
4-6 mason jar rings (regular or wide-mouth)
Directions
- In a large bowl, whisk together the flour, baking powder, salt, and sugar until well combined. Make a well in the center of the dry ingredients to add the wet ingredients later. This mixing method helps prevent overmixing, which can lead to tough pancakes.
- In a separate bowl, whisk the eggs until frothy, then add the milk, melted butter, and vanilla extract. Whisk until thoroughly combined, making sure the melted butter is fully incorporated and not separated. The frothy eggs will help create air pockets for fluffier pancakes.
- Pour the wet mixture into the well of dry ingredients. Gently fold the ingredients together using a spatula or wooden spoon, mixing just until combined. Stop mixing when you still see small lumps in the batter – these will cook out and help create a tender texture.
- Allow the batter to rest for 10-15 minutes while you prepare the mason jar rings. This resting period gives the flour time to fully hydrate and allows the leavening agents to activate, resulting in fluffier pancakes with a better texture.
- Separate the mason jar lids, keeping only the rings (not the flat disc portion). Using a paper towel, thoroughly coat the inside of each ring with melted butter or oil, paying special attention to the bottom edge where it will contact the cooking surface.
- Heat a large non-stick skillet or griddle over medium-low heat. Place the greased rings on the preheated surface and allow them to heat for 30 seconds. Pour approximately 3 tablespoons of batter (for regular-mouth rings) or 4 tablespoons (for wide-mouth rings) into each ring, filling them about halfway.
- Cook the pancakes until bubbles form on the surface and begin to pop, approximately 2-3 minutes. Once the edges appear set, carefully lift the rings straight up using tongs or the tip of a butter knife. Allow the exposed edge to cook for an additional 30 seconds before flipping.
- Using a wide spatula, carefully flip each pancake and cook for an additional 1-2 minutes until golden brown on the second side. Transfer to a warm plate and repeat the process with the remaining batter, re-greasing the rings between batches if necessary. Serve immediately with your favorite toppings.
Notes
- If the batter seems too thick after resting, add milk one tablespoon at a time until you reach a pourable but not runny consistency.
- For best results, maintain a medium-low heat. If your pancakes are browning too quickly, reduce the heat slightly.
- Leftover pancakes can be stored in an airtight container in the refrigerator for up to 3 days or frozen for up to 2 months. To reheat, place in a 350°F oven for 5-10 minutes or toast on a low setting.
- For flavor variations, add mix-ins like blueberries, chocolate chips, or banana slices after pouring the batter into the rings. Press them slightly into the batter with a toothpick.
- If you don’t have mason jar rings, metal cookie cutters or biscuit cutters can work as alternatives, though they may not have the same height as jar rings.
Frequently Asked Questions
Q: Can I make these pancakes ahead of time?
A: Absolutely! These mason jar lid pancakes freeze beautifully because of their uniform shape and thickness. After cooking, allow them to cool completely on a wire rack. Place in a single layer on a parchment-lined baking sheet and freeze until solid (about 1-2 hours). Then transfer to a freezer-safe bag with parchment paper between layers. They’ll keep for up to 3 months. To reheat, avoid microwaving (which can make them rubbery). Instead, place them in a 350°F oven for 5-10 minutes or pop them in a toaster on a low setting.
Q: Why are my pancakes sticking to the mason jar rings?
A: The most common reason is insufficient greasing. Make sure to thoroughly coat the inside of each ring, especially the bottom edge where it contacts the cooking surface. Also, timing is crucial when removing the rings – if you try to remove them too early, the batter may still be too wet and will stick. Wait until bubbles form on the surface and the edges appear set. If sticking persists, try running a thin spatula or knife around the inside edge before lifting the ring.
Q: Can I use this technique with any pancake recipe or mix?
A: Yes, this mason jar lid technique works with virtually any pancake recipe or boxed mix. However, the consistency of your batter is important. It should be pourable but not runny – similar to thick cream. If your batter is too thin, it might seep under the rings; if too thick, it won’t spread properly within the rings. For boxed mixes, follow the package directions but be prepared to adjust the liquid slightly to achieve the ideal consistency for ring molding.
Q: What’s the best way to flip these pancakes without breaking them?
A: The key to perfect flipping is patience and technique. After removing the ring, wait an additional 30 seconds to allow the newly exposed edge to set. Use a wide, thin spatula that can support the entire pancake. Slide it completely under the pancake, lift it completely off the cooking surface, and flip with a confident, swift motion. Hesitation often leads to folded or torn pancakes. If you’re new to this technique, practice with smaller pancakes first until you build confidence.