
Are you ready to take your milkshake game to the next level? Prepare to be amazed by a milkshake recipe that will truly rock your world. Gone are the days of simple vanilla or chocolate shakes – we’re about to embark on a journey of flavors and textures that will redefine your idea of what a milkshake can be. This recipe combines the nostalgia of a classic milkshake with the excitement of modern culinary trends, resulting in a dessert that’s not just a drink, but an experience. So, grab your blender and get ready to create a milkshake masterpiece that will have everyone begging for seconds!
The Foundation of a Mind-Blowing Milkshake
To create a milkshake that truly stands out, we need to start with a solid foundation. The key to an exceptional milkshake lies in the quality of its base ingredients. Premium ice cream is non-negotiable – opt for a high-quality vanilla that’s rich in flavor and creamy in texture. This will serve as the canvas for our masterpiece, allowing other flavors to shine while providing that luxurious mouthfeel we all crave.
Next, let’s talk about milk. While traditional recipes call for regular milk, we’re going to elevate our shake by using a combination of whole milk and a splash of heavy cream. This blend will give our milkshake an extra layer of richness that sets it apart from the average shake. For those who prefer a non-dairy option, a high-quality oat milk can provide a similar creamy texture without compromising on taste.
But what truly makes this milkshake recipe mind-blowing is the addition of unexpected elements. We’re going to incorporate homemade butterscotch sauce for a deep, caramel-like sweetness that complements the vanilla base perfectly. This isn’t your average syrup – it’s a luxurious sauce that will ribbon through the milkshake, creating pockets of intense flavor with every sip.
Tip: To achieve the perfect milkshake consistency, invest in a high-powered blender. It will ensure a smooth, well-incorporated shake without any icy chunks.
To add a delightful crunch and extra indulgence, we’ll be folding in crushed Oreo cookies. The contrast between the creamy shake and the crunchy cookie bits creates a textural experience that will keep you coming back for more. Remember, we’re not just making a milkshake – we’re crafting a dessert that can rival any gourmet creation.
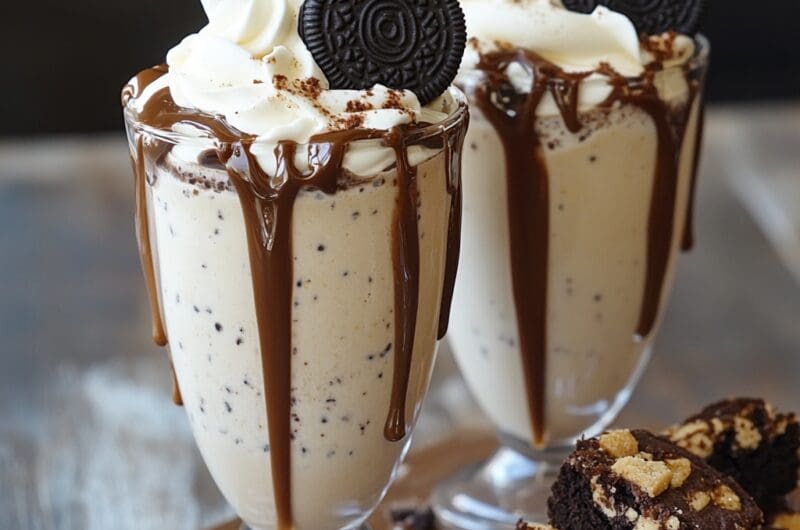
Lastly, no mind-blowing milkshake is complete without a show-stopping presentation. We’ll be rimming our glasses with a layer of Nutella and crushed Oreos, creating a visually stunning and delicious edge that elevates the entire experience. This attention to detail is what transforms a good milkshake into an unforgettable one.
Elevating Your Milkshake with Gourmet Toppings
Now that we have our base perfected, it’s time to talk toppings. This is where our milkshake truly becomes a work of art. We’re going beyond the traditional whipped cream and cherry – though those will make an appearance too. The star of our topping show will be a homemade brownie, baked to perfection with a slightly crisp edge and a fudgy center.
But we’re not stopping there. Nestled alongside our brownie will be a chocolate chip cookie ice cream sandwich. Yes, you read that right – we’re combining two beloved desserts into one epic topping. The contrast of the cold ice cream with the freshly baked cookie creates a temperature and texture sensation that perfectly complements our creamy milkshake base.
To add a touch of whimsy and additional texture, we’ll be sprinkling crushed candy bars over the top. Think Butterfinger or Heath bars for a toffee crunch that plays well with our butterscotch sauce. This medley of toppings not only looks impressive but also allows each sip and bite to be a new flavor adventure.
Tip: Prepare your toppings in advance and store them properly. This allows for easy assembly when you’re ready to serve your mind-blowing milkshakes.
To balance out the richness, consider adding a few fresh berries to the top. Strawberries or raspberries can provide a burst of freshness and acidity that cuts through the sweetness, making the overall experience more balanced and enjoyable. Plus, they add a pop of color that makes your milkshake even more Instagram-worthy.
The Secret to a Perfectly Blended Milkshake
Creating the perfect milkshake isn’t just about the ingredients – it’s also about technique. The key to achieving that ideal consistency lies in the blending process. Start by adding your milk and cream to the blender first, followed by the ice cream. This order helps the blades move more freely, resulting in a smoother blend.
When it comes to blending, less is more. Overblending can lead to a thin, runny shake, which is not what we’re aiming for. Pulse the mixture in short bursts, stopping to scrape down the sides of the blender as needed. The goal is to achieve a thick, creamy consistency that’s just pourable – remember, we want to be able to enjoy this with a straw and a spoon!
Temperature control is crucial for the perfect milkshake. Ensure your ice cream is slightly softened before blending – this allows for easier incorporation and prevents over-blending. If you find your shake is too thick, resist the urge to add more milk right away. Instead, let it sit at room temperature for a few minutes and then blend again. This patience will pay off in the form of a perfectly creamy consistency.
Tip: For an extra-thick shake, freeze your serving glasses for about 15 minutes before pouring in your milkshake. This will help keep your creation cold and thick from the first sip to the last.
When incorporating mix-ins like our crushed Oreos, avoid blending them completely. Instead, use a spoon to gently fold them in after the initial blend. This preserves their texture and ensures that every sip has that delightful crunch we’re looking for. The same goes for our butterscotch sauce – drizzle it in and give it just a quick swirl for beautiful ribbons of flavor throughout the shake.
Finally, don’t forget the importance of serving temperature. A milkshake should be enjoyed immediately after preparation for the best texture and flavor. If you need to make them in advance, under-blend slightly and store in the freezer, giving a quick blend just before serving to restore that perfect consistency.
With these techniques mastered, you’re well on your way to creating milkshakes that will truly rock your world. This isn’t just a recipe – it’s a blueprint for milkshake perfection that you can customize and make your own. Whether you’re serving these at a summer barbecue, a birthday party, or just treating yourself on a quiet night in, these milkshakes are sure to impress. So go ahead, indulge in this over-the-top creation, and prepare for a flavor explosion that will redefine your dessert expectations. After all, life is too short for ordinary milkshakes – it’s time to shake things up!
Mind-Blowing Ultimate Milkshake
Course: DessertCuisine: American2
servings30
minutes15
minutes850
kcal45
minutesIndulge in a milkshake experience that will redefine your dessert expectations. This over-the-top creation combines rich ice cream, homemade butterscotch sauce, and decadent toppings for a truly unforgettable treat.
Ingredients
4 scoops premium vanilla ice cream
1/2 cup whole milk
2 tablespoons heavy cream
1/4 cup homemade butterscotch sauce
6 Oreo cookies, crushed
2 tablespoons Nutella
1 homemade brownie
1 chocolate chip cookie ice cream sandwich
Whipped cream, for topping
Directions
- Begin by preparing your serving glasses. Spread a thin layer of Nutella around the rim of each glass. Crush 2 Oreo cookies and press the crumbs onto the Nutella-coated rim. Place the glasses in the freezer to chill while you prepare the milkshake.
- In a blender, combine the vanilla ice cream, whole milk, and heavy cream. Pulse in short bursts until the mixture is just combined but still thick. Be careful not to overblend, as this can result in a thin milkshake.
- Crush the remaining 4 Oreo cookies and gently fold them into the milkshake mixture using a spoon. This will preserve their texture and ensure a delightful crunch in every sip.
- Drizzle half of the butterscotch sauce along the inside of each chilled glass, creating a beautiful swirl pattern. Carefully pour the milkshake mixture into the glasses, leaving some room at the top for toppings.
- Now it’s time for the show-stopping toppings. Place half a homemade brownie on top of each milkshake. Next to it, balance half of the chocolate chip cookie ice cream sandwich. The contrast between the warm brownie and cold ice cream sandwich creates an exciting temperature variation.
- Generously pipe or spoon whipped cream on top of the milkshake, creating a fluffy cloud. Drizzle the remaining butterscotch sauce over the whipped cream and toppings for an extra layer of indulgence.
- For a final touch, sprinkle any remaining Oreo crumbs over the top of the whipped cream. This adds a beautiful visual contrast and reinforces the cookies and cream flavor throughout the milkshake.
- Serve immediately with both a straw and a long spoon. Encourage your guests to mix the toppings into the milkshake as they enjoy it, creating new flavor combinations with each bite and sip. This mind-blowing milkshake is best enjoyed fresh while the ice cream is still perfectly cold and the brownie is warm.
Notes
- For the best texture, make sure your ice cream is slightly softened before blending. This will help achieve a smoother consistency without overblending.
- If you prefer a thicker milkshake, use less milk or add more ice cream. For a thinner consistency, gradually add small amounts of milk until you reach your desired thickness.
- Feel free to customize the toppings based on your preferences. Try adding fresh berries, crushed candy bars, or a drizzle of caramel sauce for different flavor variations.
insert 4 frequently asked questions
Q: Can I make this milkshake dairy-free or vegan?
A: Absolutely! You can adapt this recipe to be dairy-free or vegan by using high-quality non-dairy ice cream and milk alternatives like oat milk or almond milk. For the toppings, use vegan brownies and cookies, and substitute the Nutella with a vegan chocolate hazelnut spread. The key is to choose ingredients that have a rich, creamy texture to maintain that indulgent milkshake experience.
Q: How can I make the homemade butterscotch sauce?
A: To make homemade butterscotch sauce, combine 1 cup brown sugar, 1/2 cup heavy cream, 4 tablespoons unsalted butter, and 1/2 teaspoon salt in a saucepan. Bring to a boil over medium heat, stirring constantly. Reduce heat and simmer for about 5 minutes until thickened. Remove from heat and stir in 1 tablespoon vanilla extract. Let it cool before using in your milkshake. This sauce can be made ahead and stored in the refrigerator for up to two weeks.
Q: Can I prepare components of this milkshake in advance?
A: Yes, you can prepare several components in advance to make assembly quicker when you’re ready to serve. The butterscotch sauce, brownies, and cookie ice cream sandwiches can all be made ahead of time. You can also pre-rim and chill your glasses. However, for the best texture and taste, blend the milkshake base and assemble the final product just before serving to ensure the ice cream doesn’t melt and the toppings stay fresh.
Q: Is there a way to make a lighter version of this milkshake?
A: While this milkshake is designed to be an indulgent treat, you can make a lighter version by making a few substitutions. Use low-fat ice cream or frozen yogurt as the base. Replace whole milk with skim milk or a low-calorie plant-based milk. For toppings, opt for fresh fruits instead of brownies and cookies, and use a light whipped cream or skip it altogether. Remember, these changes will alter the taste and texture, but you’ll still have a delicious, more health-conscious milkshake.