
Ah, the humble grilled cheese sandwich. It’s a comfort food staple that has warmed our hearts and filled our bellies for generations. But what if we told you that you’ve been making grilled cheese all wrong? That’s right, your go-to quick meal could be so much more than just bread and melted cheese. It’s time to elevate your grilled cheese game and transform this simple sandwich into a gourmet masterpiece. In this article, we’ll explore the secrets to crafting the perfect grilled cheese, from choosing the right ingredients to mastering the cooking technique. Get ready to revolutionize your sandwich-making skills and impress your taste buds like never before!
The Foundation: Choosing the Right Bread
Let’s start with the backbone of any great grilled cheese: the bread. While you might be tempted to grab any old loaf from your pantry, the type of bread you choose can make or break your sandwich. For the ultimate grilled cheese experience, opt for bread that’s no more than 1/2 inch thick. This ensures that your cheese melts perfectly before the bread burns.
Sourdough is a popular choice among grilled cheese aficionados, thanks to its tangy flavor and sturdy texture. However, don’t feel limited to just one type of bread. Experiment with different varieties like brioche for a buttery richness, or ciabatta for a crispy exterior. The key is to choose a bread that can stand up to the heat and hold its shape while delivering a satisfying crunch.
For those who prefer a classic approach, good old-fashioned white sandwich bread works wonders too. Its soft texture allows for even browning and a nostalgic flavor that takes you right back to childhood. Whatever bread you choose, make sure it’s fresh for the best results.
Tip: Try using a high-quality bread knife to slice your bread evenly for consistent cooking.
Now, here’s where things get interesting. Instead of just buttering the outside of your bread, try spreading a thin layer of mayonnaise on the exterior. This might sound unconventional, but trust us, it’s a game-changer. The mayo helps achieve that perfect golden-brown crust while adding a subtle tangy flavor. Don’t worry, you won’t taste the mayo itself – it’s all about the texture.
If you’re feeling adventurous, consider adding a sprinkle of grated Parmesan cheese to the buttered (or mayo-ed) side of the bread before cooking. This creates a crispy, cheesy crust that will take your grilled cheese to the next level. Just be careful not to overdo it, as too much cheese on the outside can lead to burning.
Cheese Please: Selecting the Perfect Melting Varieties
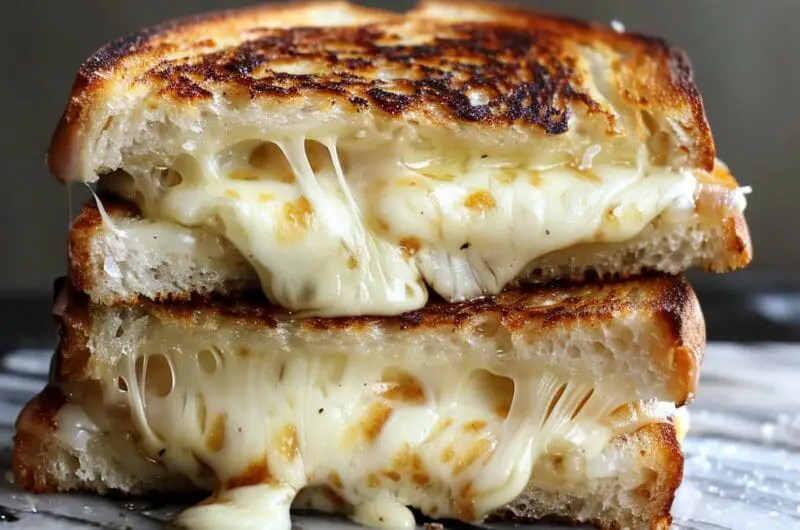
Now, let’s talk about the star of the show: the cheese. While a single slice of processed cheese might have been your go-to in the past, it’s time to expand your horizons. The secret to an extraordinary grilled cheese lies in using a combination of cheeses that melt beautifully and offer complex flavors.
A winning combination is a mix of sharp cheddar and either Gruyère or raclette. The cheddar provides that classic tangy flavor we all love, while Gruyère or raclette adds a nutty depth and superior melting quality. Don’t be afraid to experiment with other varieties like fontina, gouda, or even a touch of creamy brie for added luxury.
Here’s a pro tip that will change your grilled cheese game forever: grate your cheese instead of using slices. This might seem like extra work, but it’s worth it. Grated cheese melts more evenly and faster, ensuring that every bite is perfectly gooey. Plus, it allows you to create a custom blend of cheeses with ease.
Tip: Invest in a quality box grater to make quick work of shredding your cheeses.
When it comes to the amount of cheese, moderation is key. You might be tempted to pile it on, but too much cheese can lead to a greasy sandwich that’s difficult to eat. Aim for about 1-2 ounces of cheese per sandwich, depending on the size of your bread. This ensures a perfect cheese-to-bread ratio and allows the flavors to shine without overwhelming the palate.
For those looking to add an extra flavor kick, consider incorporating a spread like Dijon mustard or a dollop of chutney on the inside of your sandwich. These additions can complement the cheese beautifully and elevate your grilled cheese from good to gourmet.
Mastering the Technique: Cooking Your Grilled Cheese to Perfection
Now that we’ve covered the essential ingredients, let’s dive into the cooking technique that will elevate your grilled cheese to new heights. The key to achieving that perfect golden-brown exterior and gooey interior lies in the cooking method and temperature control.
Start by heating your pan over medium-low heat. This might seem too low, but patience is crucial here. A lower temperature allows the cheese to melt evenly without burning the bread. If you’re using a cast-iron skillet, even better – it provides excellent heat distribution for that perfect crust.
Place your prepared sandwich in the pan and cover it with a lid. This traps the heat and steam, helping the cheese melt more quickly and evenly. Cook for about 2-3 minutes on each side, adjusting the heat as needed to prevent burning. The key is to achieve a slow, steady cook that allows the flavors to develop and the textures to reach perfection.
Tip: Use a kitchen timer to ensure consistent cooking times and avoid burning your sandwich.
For an even more ingenious approach, try cooking the bread slices separately at first. Place both slices in the pan, one with the cheese on top, and cook until the cheese starts to melt. Then, flip the plain slice onto the cheesy slice. This method gives the cheese a head start on melting and ensures both sides of the bread are evenly toasted.
As you cook, gently press down on the sandwich with a spatula. This helps create more contact between the bread and the pan, resulting in that coveted crispy texture. Just be careful not to press too hard, or you’ll squeeze out all that precious melted cheese.
If you find that your bread is browning too quickly before the cheese fully melts, here’s a pro tip: lower the heat and add a splash of water to the pan, then quickly cover it. The steam created will help melt the cheese without further browning the bread. It’s a little trick that can save your sandwich from disaster!
As we wrap up our journey to grilled cheese perfection, remember that practice makes perfect. Don’t be afraid to experiment with different combinations of bread, cheese, and cooking techniques. The beauty of the grilled cheese sandwich lies in its simplicity and versatility. Whether you’re whipping up a quick lunch or impressing guests with a gourmet twist on a classic, these tips and tricks will ensure your grilled cheese game is always on point. So fire up that skillet, grab your favorite cheeses, and get ready to savor the melty, crispy, utterly delicious results of your newfound grilled cheese mastery. Your taste buds will thank you!
The Ultimate Gourmet Grilled Cheese Sandwich
Course: Main CourseCuisine: American4
servings30
minutes40
minutes300
kcalElevate your grilled cheese game with this gourmet twist on a classic comfort food. Crispy on the outside, gooey on the inside, and bursting with complex flavors.
Ingredients
4 slices sourdough bread (1/2 inch thick)
2 oz sharp cheddar cheese, grated
2 oz Gruyère cheese, grated
2 tablespoons mayonnaise
2 tablespoons unsalted butter, softened
1 tablespoon Dijon mustard
1 teaspoon grated Parmesan cheese (optional)
Directions
- Prepare the bread by spreading a thin layer of mayonnaise on one side of each slice. This will create a crispy, golden exterior when cooked. On the other side of two slices, spread a thin layer of Dijon mustard for added flavor.
- In a bowl, mix the grated cheddar and Gruyère cheeses. Dividing the mixture evenly, sprinkle the cheese over the two slices of bread with mustard, ensuring it’s spread to the edges. If using, sprinkle a small amount of grated Parmesan on top of the cheese for extra flavor.
- Heat a large, heavy-bottomed skillet or cast-iron pan over medium-low heat. Add a small amount of butter to the pan and let it melt, spreading it evenly across the surface. This will add extra flavor and help with browning.
- Place the two cheese-topped bread slices in the pan, mayonnaise-side down. Cover the pan with a lid to trap the heat and help the cheese start melting. Cook for about 2-3 minutes, or until the bottom is golden brown and crispy.
- Remove the lid and place the remaining bread slices on top of the melting cheese, mayonnaise-side up. Press down gently with a spatula to ensure good contact between the cheese and the top slice of bread.
- Cook for another 2-3 minutes, then carefully flip the sandwiches. Add a little more butter to the pan if needed. Cook for an additional 2-3 minutes, or until the second side is golden brown and the cheese is fully melted.
- Remove the sandwiches from the pan and let them rest on a cutting board for a minute. This allows the cheese to set slightly, making the sandwich easier to cut and eat. Slice diagonally and serve immediately while hot and gooey.
Notes
- For extra crispiness, sprinkle a small amount of grated Parmesan cheese on the outside of the bread before cooking.
- Experiment with different cheese combinations like fontina, gouda, or a touch of blue cheese for variety.
- Add thin slices of apple, tomato, or caramelized onions for extra flavor and texture.
- Serve with a side of tomato soup for the ultimate comfort food experience.
Frequently Asked Questions
Q: Can I use pre-sliced cheese instead of grating my own?
A: While pre-sliced cheese can work, grating your own cheese is recommended for better melting and a more even distribution throughout the sandwich. Grated cheese also allows you to create custom blends more easily.
Q: Why use mayonnaise on the outside of the bread?
A: Mayonnaise helps achieve a perfectly crispy, golden-brown exterior on your grilled cheese. It spreads more easily than butter and has a higher smoke point, allowing for more even browning without burning.
Q: How can I prevent my grilled cheese from burning before the cheese melts?
A: The key is to cook your grilled cheese over medium-low heat. This slower cooking process allows the cheese to melt fully before the bread burns. Covering the pan with a lid for the first few minutes also helps melt the cheese faster.
Q: What’s the best bread to use for grilled cheese?
A: While personal preference plays a role, a sturdy bread like sourdough, brioche, or a hearty white bread works best. These breads can stand up to the heat and cheese without falling apart, and they develop a nice crispy exterior when cooked.