
Most home cooks skip the searing step when making pork tenderloin, going straight from seasoning to oven. This shortcut might save a few minutes, but it costs you the most important thing: that golden-brown crust that locks in all the juices and creates incredible depth of taste. When done right, searing transforms ordinary pork tenderloin into restaurant-quality meat that’s tender, juicy, and bursting with rich caramelized notes that make all the difference.
Why searing makes all the difference
Picture pulling a gray, bland-looking piece of pork out of the oven versus one with a beautiful golden-brown exterior. The difference isn’t just visual – that browning creates what’s called the Maillard reaction, where proteins and sugars interact under high heat to develop complex, savory notes. Without this step, pork tenderloin can taste flat and one-dimensional, no matter how many spices you pile on top.
The searing process also creates a protective barrier that helps seal in the meat’s natural juices during baking. While the old “sealing in juices” theory has been debated, there’s no arguing that properly seared pork develops better texture and moisture retention. Those few extra minutes in a hot pan mean the difference between dry, disappointing meat and pork so tender it practically falls apart with a fork.
Getting the perfect sear every single time
The secret to excellent searing starts with completely dry meat. Pat those tenderloins with paper towels like your dinner depends on it – because it does. Any surface moisture will create steam instead of that gorgeous browning we’re after. Season the meat generously with salt, pepper, and your favorite spice blend at least 15 minutes before cooking, allowing the seasonings to penetrate the surface.
Heat your pan until a drop of water sizzles and evaporates immediately – that’s when you know it’s ready. Use a heavy-bottomed skillet, preferably cast iron or stainless steel, and add just enough oil to coat the bottom. Place the tenderloin in the pan and resist the urge to move it around. Let it sit undisturbed for about 5 minutes per side, creating that beautiful crust we’re chasing.
Common searing mistakes that ruin everything
The biggest mistake people make is moving the meat too soon. That gorgeous brown crust needs time to develop, and constantly flipping or adjusting the pork will prevent proper browning. Another common error is overcrowding the pan – if you’re cooking multiple tenderloins, work in batches rather than cramming everything together. Crowded meat steams instead of sears, leaving you with gray, unappetizing results.
Temperature control is equally crucial. Too low, and the meat will cook through before developing color. Too high, and the outside burns while the inside stays raw. Medium-high heat works best for most stovetops, but adjust based on how your particular pan responds. Don’t forget to add a splash more oil between batches if needed – burnt bits from the first round will make your second batch taste bitter and look unappealing.
The foil pouch method for maximum juiciness
After searing, many recipes call for finishing the pork in an open pan, but wrapping it in foil creates a steam environment that keeps everything incredibly moist. This technique combines the best of both worlds: the rich, caramelized exterior from searing and the tender, juicy interior from gentle steaming. The foil traps moisture and allows the meat to finish cooking in its own juices.
Before wrapping, add pats of butter, fresh herbs, and a splash of wine or broth to the baking dish. This combination creates an amazing sauce as the pork bakes, infusing every bite with extra moisture and taste. Seal the foil tightly to prevent steam from escaping, then bake at 350°F until the internal temperature reaches 145°F – usually about 25 minutes for a 2-pound tenderloin.
Temperature is everything when cooking pork
Gone are the days when pork had to be cooked until it resembled shoe leather. The USDA now recommends cooking pork to 145°F, which might leave a slight pink tinge in the center – and that’s perfectly safe and desirable. This temperature ensures the meat stays juicy and tender while eliminating any food safety concerns. Overcooking pork is the fastest way to turn expensive tenderloin into expensive disappointment.
Invest in a good instant-read thermometer and use it religiously. Insert it into the thickest part of the tenderloin, making sure not to touch the pan or baking dish. Remove the pork when it hits 140°F – the temperature will continue rising to 145°F as it rests. This carryover cooking prevents overcooking while ensuring food safety standards are met.
Resting time prevents all your hard work from escaping
After all that careful searing and precise temperature control, don’t blow it by cutting into the meat immediately. Hot pork needs at least 5-10 minutes to rest under a loose foil tent. During this time, the muscle fibers relax and reabsorb the juices that were pushed toward the center during cooking. Skip this step, and all those precious juices will run out onto your cutting board instead of staying in the meat.
Use this resting time to prepare your sides or make a quick pan sauce from the drippings. The wait might feel excruciating when everyone’s hungry, but those few extra minutes mean the difference between good pork and absolutely incredible pork. When you finally slice into the rested tenderloin, each piece should be moist and succulent, with just a hint of pink in the center and that gorgeous golden crust on the outside.
Building incredible sauce from pan drippings
Don’t throw away that beautiful fond (those brown bits) left in your searing pan – it’s liquid gold for making sauce. After transferring the pork to your baking dish, deglaze the pan with wine, broth, or even water, scraping up all those caramelized bits with a wooden spoon. This creates the foundation for a rich, complex sauce that tastes like it took hours to develop.
Add a splash of apple cider vinegar for brightness, a knob of butter for richness, and any herbs you have on hand. Let this mixture simmer and reduce while the pork finishes in the oven. The result is a glossy, restaurant-quality sauce that perfectly complements the meat’s rich, seared exterior and tender interior. Pour it over the sliced pork just before serving for an impressive presentation.
Spice combinations that complement seared pork
While salt and pepper work fine, why settle for fine when you can have fantastic? A blend of paprika, garlic powder, onion powder, oregano, and thyme creates depth without overpowering the meat’s natural taste. Paprika adds subtle sweetness and helps with browning, while dried herbs provide aromatic complexity that develops beautifully during the searing process.
For something different, try herbes de Provence for a French-inspired approach, or go bold with a coffee-based rub that includes brown sugar, chili powder, and ground coffee beans. The key is applying your chosen seasonings generously and letting them sit on the meat for at least 15 minutes before searing. This gives the spices time to adhere properly and penetrate the surface, creating more complex taste throughout each bite.
Troubleshooting when things go wrong
What happens if your pork turns out dry despite following all the steps? First, check your oven’s accuracy with an oven thermometer – many home ovens run hot, causing faster cooking than expected. If the meat is slightly overcooked, slice it thin and serve with extra pan sauce or a creamy mushroom sauce to add back moisture. Thin slices also help disguise any texture issues from overcooking.
If your sear didn’t develop properly, the pan probably wasn’t hot enough, or the meat was too wet. Next time, ensure the pan is smoking slightly before adding the pork, and pat the meat completely dry with paper towels. Remember, you can’t rush good browning – patience during the searing step pays off with dramatically better results in the final dish.
Taking that extra step to sear your pork tenderloin properly transforms an ordinary weeknight dinner into something special. The combination of proper browning, careful temperature control, and adequate resting time creates meat that’s tender, juicy, and packed with rich, complex taste that makes everyone ask for seconds.
Perfect Seared and Baked Pork Tenderloin
Course: Main CourseCuisine: American6
servings15
minutes35
minutes280
kcalThis foolproof method creates incredibly juicy pork tenderloin with a gorgeous golden crust that locks in all the natural juices.
Ingredients
2 pork tenderloins (about 1 lb each)
1 1/2 teaspoons salt
1 teaspoon freshly ground black pepper
1 tablespoon sweet paprika
2 teaspoons garlic powder
2 teaspoons onion powder
1 teaspoon dried oregano
4 tablespoons olive oil, divided
1/2 cup beef broth
1 tablespoon apple cider vinegar
3 tablespoons butter
Fresh parsley for garnish
Directions
- Preheat oven to 350°F and line a baking dish with aluminum foil. Pat the pork tenderloins completely dry with paper towels, removing any excess moisture that could prevent proper browning. In a small bowl, combine salt, pepper, paprika, garlic powder, onion powder, and oregano to create your spice rub.
- Generously season all sides of the pork tenderloins with the spice mixture, pressing gently to help it adhere. Let the seasoned meat sit at room temperature for 15 minutes, allowing the spices to penetrate the surface. This resting time helps develop better taste and improves the searing process.
- Heat 2 tablespoons olive oil in a large, heavy-bottomed skillet (preferably cast iron or stainless steel) over medium-high heat until the oil shimmers. The pan should be hot enough that a drop of water sizzles and evaporates immediately. Add the pork tenderloins and sear without moving them for 5 minutes, allowing a golden-brown crust to develop.
- Flip the tenderloins and sear the other side for 3-4 minutes until golden brown all over. If your pan isn’t large enough for both tenderloins without touching, work in batches, adding a bit more oil for the second batch. Transfer the seared pork to your prepared baking dish.
- Return the skillet to medium heat and add the beef broth, scraping up any browned bits from the bottom of the pan with a wooden spoon. Let this mixture simmer for 1 minute until slightly reduced, then stir in the apple cider vinegar. This deglazing process creates the base for your pan sauce.
- Pour the pan sauce over the seared pork in the baking dish, then dot the tops of the tenderloins with butter pieces. Cover tightly with aluminum foil to create a steam environment that will keep the meat incredibly moist during baking. Make sure the foil is sealed well around the edges.
- Bake in the preheated oven for 20-25 minutes, or until an instant-read thermometer inserted into the thickest part reads 145°F. Remove from oven when the internal temperature reaches 140°F, as the temperature will continue to rise during resting. Cooking times may vary depending on the size of your tenderloins.
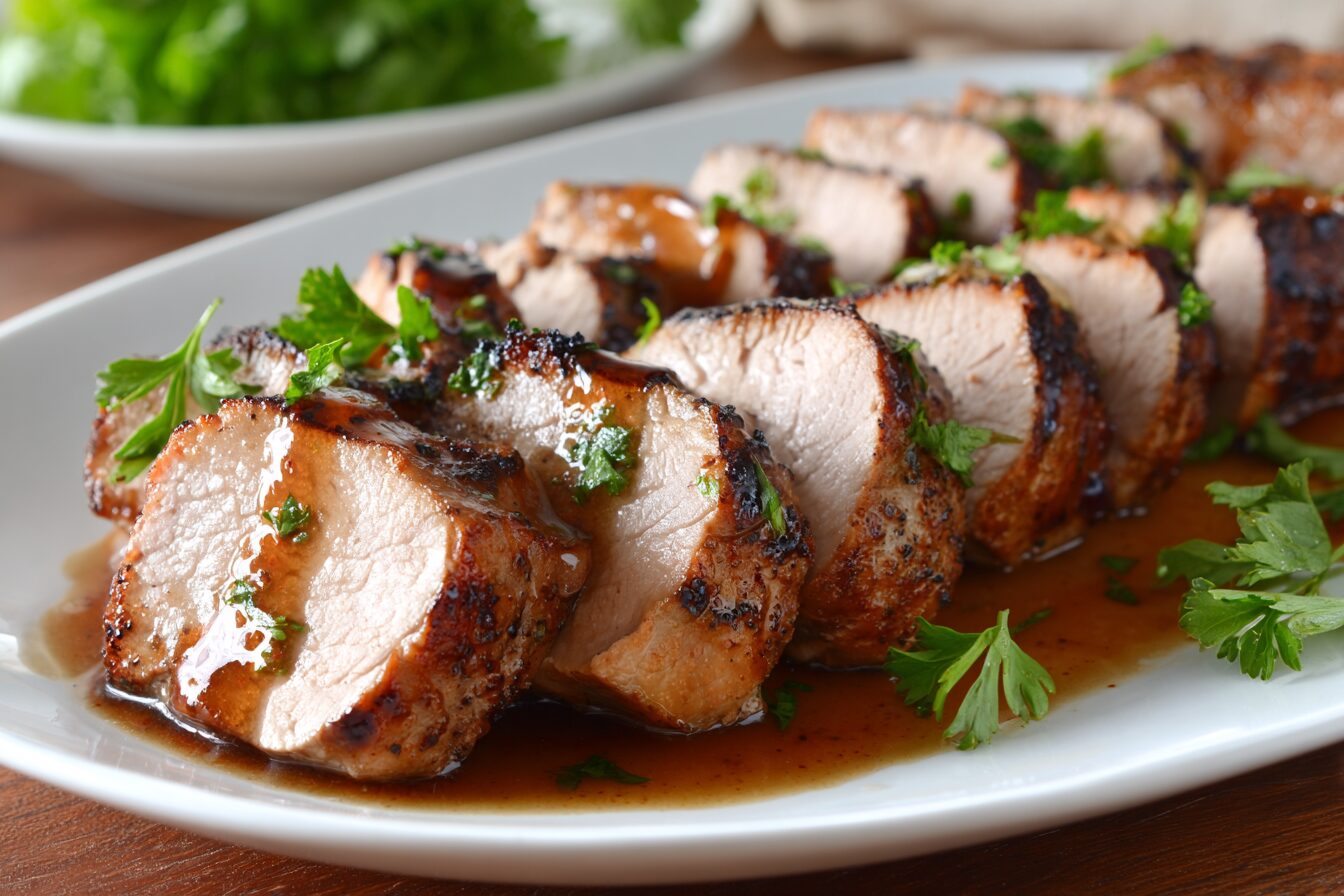
- Allow the pork to rest under the foil tent for 5-10 minutes before slicing to let the juices redistribute throughout the meat. Slice into 1/4-inch thick rounds and arrange on a serving platter, then pour the pan juices over the sliced meat and garnish with fresh chopped parsley before serving.
Notes
- Use an instant-read thermometer for best results – pork is safe to eat at 145°F and will be slightly pink in the center
- Don’t skip the searing step as it creates the caramelized crust that locks in juices and adds incredible depth of taste
- If your tenderloins are larger than 1 pound each, increase cooking time by 5-10 minutes and check temperature frequently
- Leftovers can be stored in the refrigerator for up to 3 days and make excellent sandwiches or salad toppings
- For a wine pairing, try a light red like Pinot Noir or a crisp white wine like Sauvignon Blanc
Frequently asked questions
Q: Can I skip the searing step if I’m in a hurry?
A: While you can skip searing, you’ll miss out on the caramelized crust and deeper taste that makes this recipe special. The searing only takes about 10 minutes but adds tremendous value to the final dish. If you’re truly pressed for time, at least pat the meat dry and season it well before baking.
Q: What if my pork tenderloin is still pink after reaching 145°F?
A: Pink pork is perfectly safe to eat when it reaches 145°F internal temperature. The old days of cooking pork until gray and dry are gone – modern pork is much safer and the USDA guidelines reflect this. A slight pink tinge actually indicates properly cooked, juicy meat.
Q: Can I use this method with pork loin instead of tenderloin?
A: Yes, but you’ll need to adjust the cooking time significantly. Pork loin is much larger and thicker, so plan on an additional 20-30 minutes in the oven. Always use a meat thermometer rather than relying on time alone, as loin size can vary considerably.
Q: How do I prevent the spices from burning during searing?
A: If your spice rub starts to blacken, lower the heat slightly and work more quickly. You can also wipe away any burnt spices from the pan before deglazing. Using medium-high rather than high heat helps prevent burning while still achieving good browning.