
Most people think making crispy onion rings means dealing with complicated batters and mysterious frying techniques. The truth is, achieving that perfect golden crunch comes down to just a few simple steps that anyone can master in their own kitchen. Restaurant-quality onion rings aren’t the result of professional equipment or secret ingredients – they’re about understanding three basic principles that most home cooks accidentally ignore.
Sweet onions work better than yellow ones
The onion variety makes a bigger difference than most people realize. Sweet onions like Vidalia or Walla Walla contain less sulfur, which means they won’t overpower the batter with harsh bite. Yellow onions can turn bitter when fried, especially if they’re older or have been stored improperly. Sweet onions also hold their shape better during the frying process, preventing that disappointing moment when the onion slides out of its crispy coating.
Size matters just as much as variety. Look for onions that are about three to four inches in diameter – large enough to create substantial rings but not so massive that they become unwieldy. Onion storage affects the final result too. Fresh onions with tight, papery skins produce better rings than those that have started to soften or show green shoots.
Double coating creates the perfect crunch
The secret to restaurant-style crispiness lies in a two-step coating process that most home cooks skip. Start with a simple flour dredge seasoned with salt and pepper, then dip each ring in buttermilk before moving to the final coating. This creates multiple layers that crisp up at different rates, resulting in that satisfying crunch that lasts even after the rings cool down slightly.
For the outer coating, combine equal parts flour and cornmeal with a pinch of paprika and garlic powder. The cornmeal adds texture that plain flour can’t achieve, while the spices provide depth without overwhelming the onion’s natural sweetness. Professional techniques often include a small amount of baking powder in this mixture, which creates tiny air pockets that make the coating even crispier.
Oil temperature determines success or failure
Most home cooks either fry too hot or too cold, both of which ruin the final product. The ideal temperature sits at exactly 375°F – hot enough to create immediate sizzling but not so hot that the coating burns before the onion cooks through. Oil that’s too cool results in greasy, soggy rings that absorb oil like a sponge. Oil that’s too hot creates a dark, bitter coating around raw onion centers.
A reliable thermometer eliminates guesswork, but there’s also a simple test using a small piece of bread. Drop it in the oil – it should turn golden brown in exactly 60 seconds at the right temperature. Proper frying technique requires maintaining this temperature throughout cooking, which means adjusting the heat as needed and not overcrowding the pot.
Thickness affects both texture and cooking time
Cutting rings too thick creates an unpleasant contrast between crispy exterior and undercooked interior. The sweet spot for onion ring thickness is about half an inch – thick enough to provide substance but thin enough to cook evenly. Thinner rings might seem easier, but they often fall apart during coating or frying, leaving behind sad, broken pieces instead of perfect circles.
Separate the rings gently after cutting to avoid breaking them. The outer rings work best for frying, while the tiny inner rings can be saved for other cooking projects. Proper cutting technique involves slicing straight down rather than at an angle, which helps maintain the ring’s structural integrity during the coating and frying process.
Soaking prevents coating from sliding off
Raw onion rings often shed their coating during frying because the natural moisture creates a slippery surface. Soaking cut rings in cold water for 30 minutes removes excess sulfur compounds and surface moisture, creating better adhesion between onion and coating. This step also mellows any harsh onion bite, making the final product more balanced and pleasant to eat.
After soaking, pat the rings completely dry with paper towels before beginning the coating process. Any remaining moisture will cause the flour mixture to clump and create uneven coverage. Restaurant preparation often includes this soaking step, which explains why commercial onion rings tend to have such consistent coating coverage.
Batch size impacts oil temperature
Adding too many rings at once drops the oil temperature dramatically, resulting in greasy, pale results instead of golden crispiness. Fry only four to six rings at a time, depending on pot size, and wait for the oil to return to 375°F between batches. This patience pays off with consistently crispy results rather than a mixed bag of perfect and soggy rings.
Each batch takes about three to four minutes to reach perfect golden brown color. Resist the urge to flip them constantly – let one side develop color before turning once. Professional frying relies on this restraint, allowing the coating to set properly before disturbing it with premature flipping or poking.
Proper draining keeps them crispy longer
Paper towels seem like the obvious choice for draining, but they actually trap steam against the coating, making it soggy. Instead, use a wire cooling rack set over a baking sheet, which allows air to circulate around each ring. This setup keeps the bottom from getting soggy while excess oil drips away cleanly.
Season the rings immediately after draining while they’re still hot – this helps salt and other seasonings stick better than adding them later. A light sprinkle of salt brings out the onion’s natural sweetness and enhances the coating’s crispiness. Professional kitchens use this rack method for all fried foods because it maintains texture better than any alternative.
Timing makes them taste restaurant-fresh
Onion rings taste best within 10 minutes of frying, but they can stay reasonably crispy for up to 30 minutes if handled properly. Keep finished rings in a 200°F oven on that wire rack setup while finishing additional batches. This gentle heat prevents them from cooling completely while avoiding overcooking that would make them tough and dry.
For parties or meal prep, cook rings completely and reheat them in a 400°F oven for three to four minutes rather than trying to keep them warm for extended periods. Reheating techniques that use dry heat work much better than microwaving, which makes the coating chewy and unpleasant. Fresh is always best, but proper reheating comes surprisingly close.
Making exceptional onion rings doesn’t require professional training or expensive equipment – just attention to these simple details that make the difference between mediocre and memorable. Sweet onions, proper coating technique, correct oil temperature, and smart draining transform basic ingredients into something special that rivals any restaurant version.
Perfect Homemade Onion Rings
Course: AppetizerCuisine: American4
servings45
minutes20
minutes285
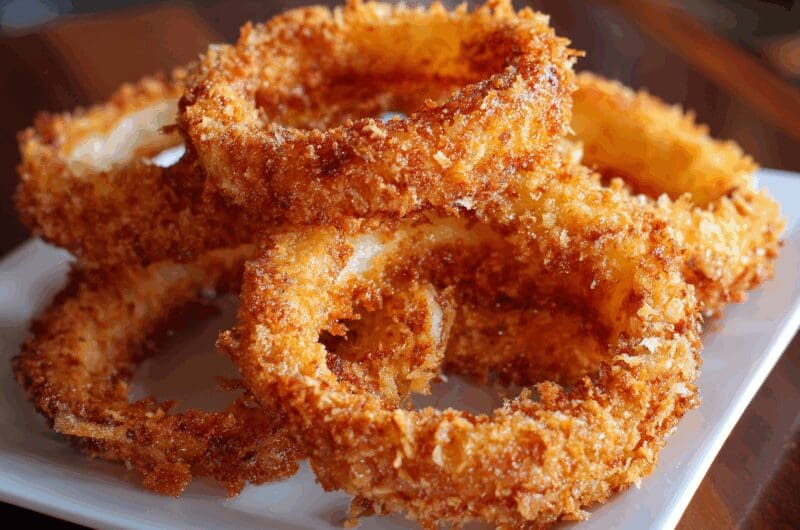
kcalCrispy, golden onion rings with a secret double-coating technique that beats any restaurant version.
Ingredients
2 large sweet onions (Vidalia or Walla Walla), about 3-4 inches diameter
1 cup all-purpose flour, divided
1 cup cornmeal
1 cup buttermilk
1 teaspoon salt, divided
1/2 teaspoon black pepper
1/2 teaspoon paprika
1/4 teaspoon garlic powder
6 cups vegetable oil for frying
Directions
- Peel onions and slice into 1/2-inch thick rings, separating them carefully to avoid breaking. Use only the larger outer rings for frying, saving smaller inner rings for other recipes. Place rings in a large bowl and cover with cold water, then let soak for 30 minutes to remove excess sulfur compounds and surface moisture.
- Heat oil in a heavy-bottomed pot or deep fryer to exactly 375°F, using a reliable thermometer for accuracy. Maintain this temperature throughout cooking by adjusting heat as needed. Set up a wire cooling rack over a baking sheet near the stove for proper draining.
- Create the first coating by mixing 1/2 cup flour with 1/2 teaspoon salt and black pepper in a shallow dish. For the final coating, combine remaining 1/2 cup flour, cornmeal, paprika, garlic powder, and remaining 1/2 teaspoon salt in another shallow dish. Pour buttermilk into a third dish for the middle step.
- Drain onion rings and pat completely dry with paper towels, removing all surface moisture for better coating adhesion. Dredge each ring first in seasoned flour, then dip in buttermilk, and finally coat thoroughly in the cornmeal mixture. Press coating gently to help it adhere properly.
- Fry onion rings in small batches of 4-6 rings to avoid overcrowding and temperature drops. Cook for 3-4 minutes total, flipping once halfway through when the first side reaches golden brown. Don’t flip too early or too frequently as this can cause coating to fall off.
- Remove rings with a slotted spoon when golden brown and crispy, transferring immediately to the wire cooling rack. Season with a light sprinkle of salt while still hot for best flavor and coating adhesion. Allow oil to return to 375°F between batches for consistent results.
- Keep finished rings warm in a 200°F oven on the wire rack while completing remaining batches. This gentle heat prevents cooling without overcooking or making them tough. Serve within 10 minutes of finishing for optimal crispiness and temperature.
- For any leftover rings, reheat in a 400°F oven for 3-4 minutes rather than microwaving, which makes coating chewy. Store coating ingredients separately if preparing ahead, then coat and fry just before serving for best results.
Notes
- Sweet onions like Vidalia or Walla Walla work much better than yellow onions and won’t become bitter when fried.
- Oil temperature is critical – use a thermometer and maintain 375°F for golden, non-greasy results.
- The double coating method creates restaurant-quality crispiness that lasts longer than single coating.
- Don’t skip the soaking step as it improves both coating adhesion and final taste.
- Use a wire rack for draining instead of paper towels to prevent soggy bottoms.
Frequently Asked Questions
Q: Can I use regular yellow onions instead of sweet onions?
A: While you can use yellow onions, sweet varieties like Vidalia or Walla Walla produce much better results. Yellow onions contain more sulfur compounds that can create a harsh, bitter taste when fried, especially if they’re older or have been stored for a while. Sweet onions also hold their shape better during the coating and frying process.
Q: Why do my onion rings always turn out soggy instead of crispy?
A: Soggy onion rings usually result from three common mistakes: oil temperature that’s too low (under 350°F), overcrowding the pot which drops the temperature, or using paper towels for draining which traps steam. Make sure your oil reaches exactly 375°F, fry only 4-6 rings at a time, and use a wire cooling rack for draining to maintain crispiness.
Q: How do I prevent the coating from sliding off during frying?
A: Coating adhesion problems come from skipping the soaking step or not drying the onions properly. Soak cut rings in cold water for 30 minutes to remove surface moisture and sulfur compounds, then pat them completely dry with paper towels. The double coating method with flour, buttermilk, and cornmeal mixture also helps create better adhesion than single coating methods.
Q: Can I make onion rings ahead of time for a party?
A: For best results, coat and fry onion rings just before serving. However, you can prepare the coating mixtures and cut the onions up to a day ahead, storing them separately in the refrigerator. If you must reheat cooked rings, use a 400°F oven for 3-4 minutes rather than microwaving, which makes the coating chewy and unpleasant.