
The smell of fresh biscuits baking in the oven can turn any ordinary morning into something special. Most people think making buttermilk biscuits from scratch is too complicated or time-consuming, but the truth is that with the right technique, anyone can master this classic comfort food in just about 35 minutes with only 7 simple ingredients.
Why cold butter makes all the difference
Walking into the kitchen on a Saturday morning, many home bakers wonder why their biscuits turn out flat and dense instead of tall and flaky. The secret lies in keeping the butter as cold as possible throughout the entire process. When cold butter hits the hot oven, it creates steam pockets that give biscuits those beautiful, flaky layers that separate so easily.
The best approach is to cube the butter and keep it in the freezer until the very last moment. Some bakers even grate frozen butter directly into the flour mixture using a box grater. This technique ensures the butter stays solid while mixing, which is crucial for creating those coveted layers that make biscuits irresistible.
The folding technique that creates flaky layers
Anyone who has ever wondered how bakeries get those perfectly layered biscuits will be surprised to learn it’s all about the folding method. After mixing the dough just until it comes together, the magic happens when you turn it onto a floured surface and start the folding process. This isn’t kneading like bread dough – it’s a gentle process of flattening and folding that builds layers.
The process involves folding the dough in half, then flattening it back out, repeating this process about 3-8 times depending on the recipe. Each fold creates additional layers, and when the biscuits bake, these layers separate to create that perfect flaky texture. The key is working quickly and not overworking the dough, which can make biscuits tough.
Why buttermilk beats regular milk every time
Regular milk might seem like an obvious substitute, but buttermilk brings something special to biscuit recipes that can’t be replicated. The acidity in buttermilk reacts with baking soda to create extra lift, resulting in taller, more tender biscuits. Plus, buttermilk adds a subtle tangy taste that balances out the richness of the butter and makes each bite more interesting.
When combined with both baking powder and baking soda, buttermilk creates better browning and helps prevent that bitter chemical aftertaste that sometimes happens with too much baking powder. The result is biscuits that have better color, superior texture, and more complex taste than those made with regular milk. Even the small addition of honey helps balance the acidity perfectly.
The cutting technique that prevents flat biscuits
Nothing is more disappointing than spending time making biscuit dough only to have them come out of the oven looking more like hockey pucks than fluffy biscuits. The problem often lies in how the dough is cut. Many people make the mistake of twisting their biscuit cutter or knife when cutting through the dough, which seals the edges and prevents proper rising.
The correct method is to press straight down with a sharp biscuit cutter and lift straight up without any twisting motion. This keeps the edges free to expand upward during baking. If you don’t have a round biscuit cutter, a sharp knife works perfectly fine – just cut straight down into squares rather than trying to make circles.
Baking temperature and timing secrets
The oven temperature makes a huge difference in how biscuits turn out, and most home bakers don’t realize that a hot oven is absolutely essential. Baking at 425-450°F ensures that the outside gets golden brown and slightly crispy while the inside stays tender and fluffy. Lower temperatures result in pale, dense biscuits that lack that perfect contrast between crispy exterior and soft interior.
Timing is equally important – biscuits typically need 15-20 minutes in a properly preheated oven. They’re done when the tops are golden brown and the biscuits have risen significantly. Brushing the tops with buttermilk before baking helps achieve that beautiful golden color and adds an extra layer of tangy taste that complements the butter perfectly.
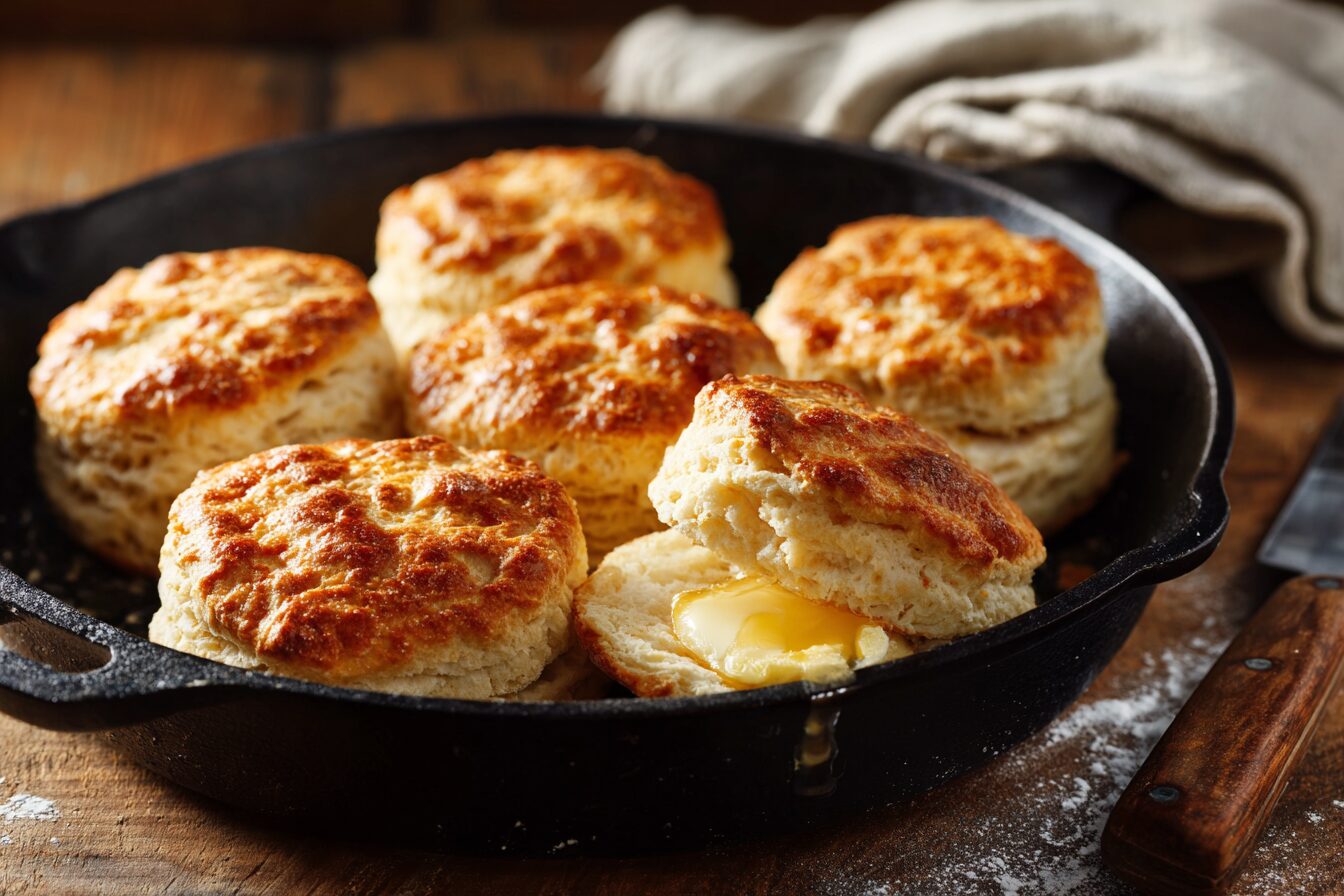
Why biscuits need to touch while baking
This might sound strange, but biscuits actually bake better when they’re placed close together, almost touching each other in the pan. When biscuits are isolated with space between them, they tend to spread outward instead of rising upward. But when they’re snuggled together, they support each other and compete for space by growing taller rather than wider.
A cast iron skillet is the perfect vessel for this technique because it holds heat evenly and creates crispy edges on the biscuits. The heavy metal conducts heat better than regular baking sheets, resulting in more even browning. If you don’t have a cast iron skillet, a regular baking sheet works fine – just make sure to place the biscuits close enough that they’ll touch as they rise.
Common mistakes that ruin homemade biscuits
Overworking the dough is probably the most common mistake home bakers make when attempting biscuits. Unlike bread, which benefits from kneading, biscuit dough should be handled as little as possible. Mixing until ingredients are just barely combined is the goal – the dough will look shaggy and rough, but that’s exactly what you want for tender results.
Another frequent error is using warm ingredients or working in a hot kitchen. Cold buttermilk and frozen butter are essential because warm ingredients will melt the butter before it has a chance to create steam in the oven. Even flour can be chilled beforehand on particularly hot days to help keep everything at the right temperature throughout the mixing process.
What to serve with fresh buttermilk biscuits
Fresh biscuits straight from the oven are delicious on their own, but they really shine when paired with the right accompaniments. Classic options include honey butter, which can be made by simply mixing softened butter with honey, or homemade jam and preserves. For a heartier option, biscuits and gravy is a Southern favorite that turns biscuits into a complete meal.
These versatile baked goods also make excellent breakfast sandwiches with eggs, bacon, or sausage tucked inside the fluffy layers. For dinner, they’re perfect alongside fried chicken, roasts, or hearty stews where they can soak up all the delicious juices. Split and toasted, they even work as a base for strawberry shortcake when you want to turn them into dessert.
Storage and reheating tips for leftover biscuits
While fresh biscuits are always best, properly stored leftovers can still be quite good the next day. Room temperature storage in an airtight container works for up to 2-3 days, though they’ll gradually lose their crispy exterior. For longer storage, biscuits freeze beautifully – just wrap them individually and freeze for up to 3 months.
Reheating frozen biscuits is simple and doesn’t require thawing first. Pop them straight from freezer to a 350°F oven for about 15-20 minutes until warmed through. For day-old biscuits, a quick toast in the toaster oven or a few minutes in a regular oven will crisp up the outside and warm the inside perfectly. Split them open first for even heating and to create more surface area for butter or jam.
Making perfect buttermilk biscuits isn’t about complicated techniques or expensive ingredients – it’s about understanding a few key principles and practicing them consistently. With cold ingredients, gentle handling, proper folding, and the right baking temperature, anyone can create bakery-quality biscuits at home that will have family and friends asking for the recipe every single time.
Perfect Buttermilk Biscuits
Course: BreakfastCuisine: American8
biscuits15
minutes20
minutes280
kcalIncredibly flaky and tender buttermilk biscuits that rise tall and golden with dozens of buttery layers.
Ingredients
2 1/2 cups all-purpose flour, plus more for dusting
1 tablespoon baking powder
1/2 teaspoon baking soda
1 teaspoon salt
1/2 cup unsalted butter, very cold and cubed
1 cup cold buttermilk, plus 2 tablespoons for brushing
2 teaspoons honey
2 tablespoons melted butter (optional topping)
1 tablespoon honey (optional topping)
Directions
- Preheat your oven to 425°F (218°C). Line a baking sheet with parchment paper or lightly grease a 10-inch cast iron skillet. Make sure your oven is fully preheated before baking for the best rise.
- In a large bowl, whisk together flour, baking powder, baking soda, and salt until well combined. Add the cold, cubed butter to the flour mixture and use a pastry cutter or your fingers to cut the butter into the flour until the mixture resembles coarse crumbs with some larger butter pieces remaining.
- Make a well in the center of the flour mixture and pour in 1 cup of cold buttermilk and honey. Using a large spoon or spatula, gently stir just until the ingredients come together into a shaggy, slightly sticky dough. Don’t overmix – the dough should look rough and have some dry spots.
- Turn the dough out onto a lightly floured surface and gently bring it together with floured hands. Pat the dough into a 3/4-inch thick rectangle, then fold one side into the center, then fold the other side over it. Turn the dough 90 degrees and repeat this folding process 2-3 more times to create layers.
- After the final fold, gently pat the dough into a 3/4-inch thick rectangle. Using a 2.5 or 3-inch round biscuit cutter, press straight down through the dough without twisting – this ensures the biscuits will rise properly. Re-roll scraps only once to cut additional biscuits.
- Place biscuits on the prepared baking sheet or cast iron skillet so they’re just touching each other – this helps them rise taller. Brush the tops with the remaining 2 tablespoons of buttermilk for better browning. This step is important for achieving golden-brown tops.
- Bake for 18-20 minutes, or until the tops are golden brown and the biscuits have risen significantly. They should sound hollow when lightly tapped on the bottom. Don’t open the oven door during the first 15 minutes of baking.
- If using the optional honey butter topping, mix the melted butter and honey while biscuits are still warm. Brush this mixture over the tops of the hot biscuits for extra richness and shine. Serve immediately while warm for the best texture and taste.
Notes
- For best results, keep butter and buttermilk as cold as possible throughout the process – even chill your flour on hot days
- Don’t twist the biscuit cutter when cutting as this seals the edges and prevents proper rising
- Biscuits freeze well for up to 3 months – reheat from frozen at 350°F for 15-20 minutes
Frequently asked questions about buttermilk biscuits
Q: Can I substitute regular milk for buttermilk in biscuit recipes?
A: While you can substitute regular milk, buttermilk provides superior results due to its acidity which reacts with baking soda for better rise and adds a subtle tangy taste. If you must substitute, add 1 tablespoon of lemon juice or vinegar to regular milk and let it sit for 5 minutes.
Q: Why do my biscuits turn out flat instead of tall and fluffy?
A: Flat biscuits usually result from warm butter, overworking the dough, or twisting the biscuit cutter when cutting. Make sure your butter is very cold, handle the dough minimally, and press straight down with your cutter without twisting to allow proper rising.
Q: How do I know when my biscuits are done baking?
A: Properly baked biscuits will be golden brown on top, significantly risen from their original height, and sound hollow when lightly tapped on the bottom. This typically takes 18-20 minutes at 425°F, but oven temperatures can vary.
Q: Can I make biscuit dough ahead of time and bake later?
A: Yes, you can cut the biscuits and freeze them on a baking sheet, then transfer to a freezer bag once solid. Bake directly from frozen, adding 2-3 extra minutes to the baking time. For best results, don’t refrigerate unbaked dough for more than a few hours.