
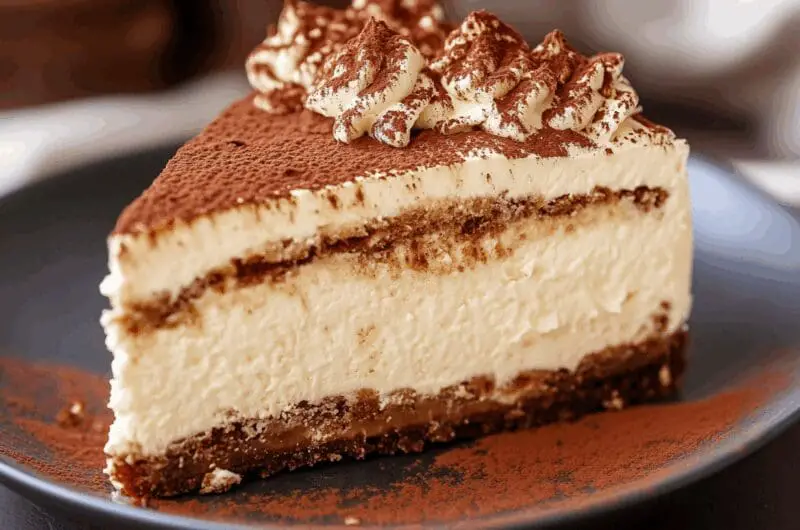
Most people think combining tiramisu and cheesecake sounds complicated, but this hybrid dessert actually simplifies both classics into one spectacular creation. The secret lies in understanding that tiramisu cheesecake isn’t just throwing two recipes together – it’s about balancing the tangy richness of cream cheese with the coffee-soaked sophistication that makes tiramisu legendary. When done right, each forkful delivers that signature tiramisu coffee punch followed by the smooth, dense satisfaction of premium cheesecake.
Most people ruin their crust completely
The biggest mistake home bakers make is treating this like a regular cheesecake crust. Traditional graham cracker crusts become soggy disasters when coffee gets involved. Instead, use ladyfinger cookies crushed with butter and a touch of sugar. This creates a base that actually complements the coffee elements rather than fighting them. The ladyfingers absorb just enough moisture to stay tender while maintaining structure.
Press the ladyfinger mixture firmly into your springform pan, making sure it goes up the sides about an inch. Pre-bake this crust for exactly eight minutes at 350°F – any longer and it becomes too hard, any shorter and it won’t hold up. Some bakers skip this step entirely, which leads to a mushy bottom layer that ruins the entire dessert experience.
Cold cream cheese creates lumpy nightmares
Room temperature cream cheese isn’t just a suggestion – it’s absolutely critical for smooth results. Cold cream cheese creates lumps that no amount of mixing can eliminate, leaving your finished cheesecake with an unpleasant grainy texture. Take your cream cheese out of the refrigerator at least two hours before you plan to start mixing. The packages should give slightly when pressed but not feel warm or soft.
Test the temperature by pressing your finger into the package – it should leave a slight indent without feeling cold. If you’re in a hurry, cut the cream cheese into chunks and let it sit at room temperature for 30 minutes. Never microwave cream cheese to soften it, as this creates hot spots that will scramble your eggs when you add them later.
Getting the mascarpone ratio completely wrong
Many recipes call for equal parts cream cheese and mascarpone, but this creates an overly rich result that masks the coffee essence. The ideal ratio is three parts cream cheese to one part mascarpone. This gives you the tangy backbone of classic cheesecake while adding just enough of mascarpone’s buttery richness to evoke tiramisu. Quality mascarpone makes a noticeable difference – cheaper versions often contain stabilizers that affect the final texture.
Mascarpone should be at the same temperature as your cream cheese before mixing. Since mascarpone is more delicate than cream cheese, it comes to room temperature faster – usually within an hour. If your mascarpone looks separated or grainy, it’s been stored too cold or too warm. Fresh mascarpone should be smooth and slightly sweet with no sour notes.
Weak coffee ruins the entire point
The coffee component can’t be an afterthought – it needs to pack enough punch to stand up to rich cheese and cream. Regular brewed coffee won’t cut it here. You need either strong espresso or instant espresso powder dissolved in a small amount of hot water. The coffee should taste almost too strong on its own because it will mellow considerably when mixed with the cheese filling.
For each 24-ounce package of cream cheese, use about three tablespoons of instant espresso powder dissolved in two tablespoons of hot water. Let this mixture cool completely before adding it to your cheese mixture. Adding hot coffee will melt your carefully prepared ingredients and potentially scramble the eggs, creating an irreversible texture disaster.
Soaking ladyfingers turns them to mush
Traditional tiramisu calls for coffee-soaked ladyfingers, but cheesecake assembly requires a different approach. Instead of soaking ladyfingers until they’re saturated, give them just a quick dip – literally one second per side. The goal is to add coffee without compromising their structural integrity. Ladyfinger cookies should still hold their shape after dipping but taste noticeably of coffee.
Arrange the lightly dipped ladyfingers in a single layer over your partially filled cheesecake before adding the final layer of filling. This creates distinct layers while preventing the cookies from dissolving completely. If your ladyfingers fall apart during dipping, your coffee mixture is too hot or you’re leaving them in too long.
Rushing the chilling process backfires
Tiramisu cheesecake needs a minimum of six hours in the refrigerator, but overnight is better. This isn’t just about setting – it’s about allowing the coffee to permeate the entire dessert and the mascarpone to develop its full richness. Trying to serve this dessert too early results in a loose, messy slice that doesn’t hold together properly. The cheese needs time to firm up while maintaining its creamy texture.
Cover your cheesecake with plastic wrap, making sure the wrap doesn’t touch the surface. This prevents a skin from forming while allowing proper air circulation. Some bakers place their cheesecake in the freezer for the first hour to speed initial setting, then transfer to the refrigerator. This technique works well but requires careful timing to avoid over-firming.
Assembly order mistakes create messy disasters
The order of assembly matters more than most people realize. Start with your pre-baked crust, add half the cheesecake filling, then your coffee-dipped ladyfingers, followed by the remaining filling. This sandwich approach ensures even distribution while preventing the ladyfingers from floating to the top or sinking to the bottom. Each layer should be spread gently to avoid disturbing the layer beneath.
Use an offset spatula to spread each layer smoothly, working from the center outward. Tap the pan gently on the counter after each layer to release air bubbles that could create holes in your finished cheesecake. The final layer should be completely smooth – any imperfections will be magnified once you add the cocoa powder dusting.
Presentation details make all the difference
The final dusting of cocoa powder isn’t just decoration – it’s essential for authentic tiramisu character. Use a fine-mesh sieve to dust the entire surface evenly just before serving. Some bakers create patterns using stencils or doilies, but a simple, even coating looks most professional. The cocoa should be unsweetened and high-quality since it’s the first thing people taste.
Slice your cheesecake with a warm, dry knife, cleaning it between each cut for neat edges. A thin metal spatula helps transfer slices cleanly to serving plates. Garnish individual slices with a few whole coffee beans or a small dollop of whipped cream if desired, but the dessert is perfect on its own when executed properly.
This tiramisu cheesecake bridges two beloved desserts into something entirely new yet familiar. The key lies in respecting both traditions while understanding how they complement each other. When every element works together – from the sturdy ladyfinger crust to the perfectly balanced filling – each bite delivers that promised moment of pure dessert bliss that makes all the careful preparation worthwhile.
Tiramisu Cheesecake
Course: DessertCuisine: Italian-American12
servings45
minutes55
minutes485
kcalThis show-stopping fusion dessert combines rich New York cheesecake with coffee-kissed tiramisu in one irresistible slice.
Ingredients
24 ladyfinger cookies, divided
4 tablespoons unsalted butter, melted
2 tablespoons granulated sugar
24 oz cream cheese, room temperature
8 oz mascarpone cheese, room temperature
3 large eggs, room temperature
3/4 cup granulated sugar
3 tablespoons instant espresso powder
2 tablespoons hot water
1 teaspoon vanilla extract
1/4 cup strong brewed coffee, cooled
Unsweetened cocoa powder for dusting
Directions
- Preheat oven to 350°F and grease a 9-inch springform pan. Crush 12 ladyfinger cookies into fine crumbs using a food processor or rolling pin. Mix the cookie crumbs with melted butter and 2 tablespoons sugar until well combined, then press firmly into the bottom and 1 inch up the sides of the prepared pan.
- Bake the crust for exactly 8 minutes until lightly set but not browned. Remove from oven and let cool while preparing the filling. Lower oven temperature to 325°F for the cheesecake baking.
- Dissolve instant espresso powder in hot water and let cool completely. In a large bowl, beat cream cheese and mascarpone with an electric mixer until completely smooth and no lumps remain, about 3-4 minutes. Gradually add 3/4 cup sugar and beat until fluffy.
- Add eggs one at a time, beating well after each addition. Mix in the cooled espresso mixture and vanilla extract until just combined. Be careful not to overmix as this can cause cracks during baking.
- Pour half of the cheesecake filling over the prepared crust. Quickly dip the remaining 12 ladyfingers in the cooled coffee for exactly 1 second per side – they should taste of coffee but still hold their shape. Arrange the dipped ladyfingers in a single layer over the filling.
- Gently spread the remaining cheesecake filling over the ladyfingers using an offset spatula, working from center outward. Tap the pan gently on the counter to release air bubbles and smooth the top surface completely.
- Bake for 50-55 minutes until the center is almost set but still slightly jiggly. The edges should be firm and lightly golden. Turn off oven, crack the door open, and let cool in oven for 1 hour to prevent cracking.
- Remove from oven and cool completely at room temperature, then refrigerate for at least 6 hours or overnight. Before serving, run a knife around edges to loosen, remove springform ring, and dust the top evenly with cocoa powder using a fine-mesh sieve.
Notes
- All ingredients must be at room temperature for smooth mixing – take cream cheese and mascarpone out 2 hours before starting
- Don’t oversoak the ladyfingers or they’ll dissolve completely in the cheesecake
- This cheesecake actually tastes better the second day as the coffee flavor has more time to develop
- Use a warm, clean knife between each slice for clean cuts when serving
- Store covered in refrigerator for up to 5 days
Frequently Asked Questions
Q: Can I make this tiramisu cheesecake ahead of time?
A: Absolutely! This dessert actually improves with time. You can make it up to 3 days ahead and store it covered in the refrigerator. The coffee and cheese components meld together beautifully, creating an even richer taste. Just wait to dust with cocoa powder until right before serving to maintain the best appearance.
Q: What can I substitute if I can’t find mascarpone cheese?
A: While mascarpone gives the authentic tiramisu character, you can substitute it with an equal amount of cream cheese mixed with 2 tablespoons of heavy cream and 1 tablespoon of powdered sugar. The texture will be slightly different but still delicious. Some stores carry mascarpone in the specialty cheese section if you can’t find it with regular cream cheese.
Q: Can I use regular coffee instead of espresso powder?
A: Regular coffee won’t provide the intense flavor needed for this recipe. If you don’t have instant espresso powder, brew very strong coffee (about 3 times your normal strength) and use 3 tablespoons of it instead. You can also substitute with 2 tablespoons of very finely ground espresso beans mixed directly into the batter, though the texture will be slightly different.
Q: How do I know when the cheesecake is properly baked?
A: The cheesecake is done when the edges are set and lightly golden, but the center still has a slight jiggle when you gently shake the pan. It should not look wet or liquidy in the center. The internal temperature should reach 150°F if you have a thermometer. Remember that it will continue to cook slightly as it cools, so don’t overbake.