
Some family recipes get passed down with solemn ceremony, but the really special ones? Those are the recipes that grandkids frame and hang in their kitchens. This strawberry cake has been making birthdays unforgettable for over 60 years, and it starts with two ingredients most people wouldn’t expect: a box of cake mix and strawberry Jell-O. Before anyone starts thinking this is just another basic boxed cake, the secret is in how those simple shortcuts combine with frozen strawberries to create something that tastes like it took hours to make from scratch.
Why cake mix and Jell-O make this recipe special
Most people spend hours trying to perfect a cake from scratch, measuring out ten different ingredients and hoping the chemistry works out right. This recipe takes a different approach that actually makes sense when it comes to getting consistent results every time. The white cake mix provides the structure and base, while the strawberry Jell-O adds an extra punch of strawberry taste that fresh berries alone can’t match. That little box of gelatin mix does double duty by adding both sweetness and a fluffy texture that makes each slice feel lighter than air.
The beauty of using these pantry staples is that they’re available year-round, which means this cake isn’t limited to strawberry season. No need to wait until June to make someone’s birthday special or to recreate that nostalgic taste from childhood celebrations. The Jell-O dissolves right into the batter and distributes that strawberry essence evenly throughout every bite. It’s the kind of smart shortcut that grandmothers figured out decades ago, back when they were feeding large families without spending all day in the kitchen.
Frozen strawberries work better than fresh ones
Walk past the fresh berry section at the grocery store for this recipe because frozen strawberries are actually the better choice here. Fresh strawberries might look prettier sitting in that green plastic container, but they don’t have enough juice to properly moisten the cake. Frozen berries come packed with extra liquid that develops during the freezing process, and that juice is what makes this cake incredibly moist. When those berries thaw out, all that strawberry-infused liquid becomes part of the batter, adding natural sweetness and keeping the cake from drying out.
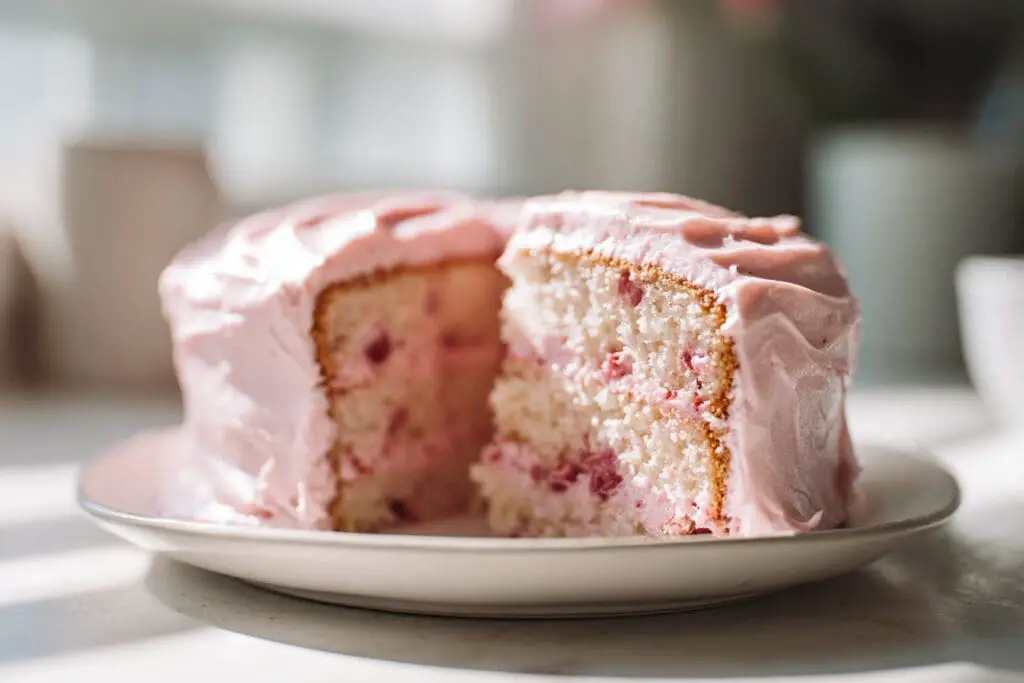
The recipe calls for one cup of frozen strawberries with all their juice mixed right into the batter, and another half cup gets beaten into the frosting. That means every component of this cake gets real strawberry flavor, not just artificial coloring or extract. The thawed berries also break down more easily when mixed, distributing little bits of fruit throughout the cake without creating big chunks that might make layers uneven. A 10-ounce bag of frozen strawberries costs about two dollars and works perfectly for both the cake and frosting.
The frosting uses a whole box of powdered sugar
Some people get nervous when they see that this frosting recipe calls for an entire 16-ounce box of confectioners’ sugar, but that’s exactly what makes it perfectly sweet without being grainy. One stick of butter gets beaten together with all that powdered sugar and half a cup of those frozen strawberries until everything turns into a smooth, spreadable frosting. The butter needs to be at room temperature so it whips up light and fluffy instead of leaving hard little chunks throughout the frosting.
The natural moisture from the strawberries means no milk or cream is needed in this frosting, which keeps the strawberry taste front and center. Some recipes try to get by with less sugar, but then the frosting ends up too soft or doesn’t have enough structure to stay put on the cake layers. This version firms up nicely in the refrigerator while still remaining easy to spread when the cake is first assembled. The pale pink color comes entirely from the real strawberries, giving it that nostalgic look of birthday cakes from decades past.
How the layers come together without falling apart
Anyone who has watched a cake layer slide off during frosting knows the frustration of trying to fix a lopsided mess. The trick is making sure those layers cool completely on a wire rack before attempting to frost anything. The recipe suggests lining two 9-inch round pans with wax paper before pouring in the batter, which makes getting those baked layers out of the pans so much easier. After about 15 to 20 minutes in a 350-degree oven, a toothpick should come out clean when poked into the center.
Once the layers come out of the oven, they need to sit in their pans for a few minutes before being turned out onto cooling racks. Running a table knife around the edges helps loosen any spots that might want to stick. Some bakers like to refrigerate their layers for an hour before frosting because cold cake is sturdier and produces fewer crumbs. The first layer goes on the serving plate, gets spread with about a third of the frosting, then the second layer goes on top before the remaining frosting covers the top and sides.
Why this recipe became a birthday tradition
Birthday cakes in most families follow a pattern where everyone just accepts whatever the birthday person wants, but this strawberry cake became non-negotiable for certain family members. The story goes that MeeMee started making this cake for her daughter’s birthdays, and when those birthdays fell just after Valentine’s Day, she’d bake two cakes in heart-shaped pans. That kind of extra effort turns a simple dessert into a memory that lasts decades. Eventually, her granddaughter Sarah spent an afternoon learning to make the cake herself, and now that handwritten recipe hangs framed in Sarah’s kitchen.
There’s something about watching a grandmother teach her granddaughter to bake that goes beyond just following measurements and oven temperatures. Those afternoons in the kitchen create connections between generations that last long after the cake gets eaten. Now Sarah makes this same cake for her own family celebrations, keeping that tradition alive with the exact same recipe her grandmother used. The framed recipe includes notes in MeeMee’s handwriting, the kind of personal touch that makes it more valuable than any store-bought card or gift.
What makes this different from fancy bakery cakes
Bakery cakes look impressive with their perfect frosting swirls and decorated edges, but they often taste like they’ve been sitting in a refrigerator case for days. This homemade version comes together in less than an hour of actual work, and it tastes like someone cared enough to make something special. The texture stays moist for days because of all that strawberry juice mixed into the batter, unlike those dry bakery cakes that need to be eaten the same day or they turn into cardboard.
Bakeries charge anywhere from thirty to sixty dollars for a decorated layer cake, but this recipe costs maybe ten dollars to make at home with ingredients from any regular grocery store. The cake mix runs about two dollars, the Jell-O is less than a dollar, and the rest of the ingredients are basic baking staples most people already have in their pantries. The frozen strawberries cost less than fresh ones and work better anyway. Making this cake at home means controlling exactly how sweet the frosting is and how much strawberry flavor goes into each layer.
The smart way to prep ahead for parties
Nobody wants to spend the morning of a birthday party frantically baking and frosting a cake while trying to decorate and get everything else ready. The smart move is baking these layers the night before and letting them cool completely in the refrigerator overnight. Wrap each layer individually in plastic wrap once they’re completely cool, and they’ll stay fresh until frosting time the next day. Cold layers are actually easier to work with because they’re firmer and produce fewer crumbs when the frosting gets spread on.
The frosting can also be made a day ahead and kept in the refrigerator in a covered container. Just let it sit at room temperature for about twenty minutes before using it so it softens up enough to spread easily. Some people like to do a thin “crumb coat” of frosting first, refrigerate the whole cake for thirty minutes, then add the final layer of frosting for a cleaner look. The assembled cake needs to be refrigerated anyway because of the butter in the frosting, so making it ahead actually works out perfectly for both convenience and food safety.
How long this cake stays fresh after baking
Most homemade cakes start going downhill after a couple days, but this strawberry cake actually stays moist and delicious for nearly a week when stored properly. The key is keeping it covered in the refrigerator so the frosting doesn’t dry out and the cake doesn’t absorb other food smells. A cake dome works great if someone has one, but a large mixing bowl turned upside down over the cake plate does the same job. The strawberry juice in both the cake and frosting acts as a natural preservative that keeps everything tasting fresh.
Some families never have to worry about storage because the cake disappears within a day or two of being made. Leftover slices can be wrapped individually in plastic wrap and frozen for up to three months, which means making an extra cake to have on hand for unexpected celebrations or late-night dessert cravings. The individual slices thaw in about thirty minutes at room temperature, or they can be eaten semi-frozen for a different texture that’s almost like ice cream cake. Each slice holds its shape well even after freezing because the cake itself is sturdy without being dense.
Simple ways to dress up the finished cake
The pink frosting looks pretty on its own, but adding a few fresh strawberries on top turns this into something that looks like it came from a fancy bakery. Slice a few berries in half and arrange them around the top edge of the cake, or place one whole berry right in the center. Some people like to press sliced almonds around the sides of the cake while the frosting is still soft, adding a nice crunch and a more finished look. Chocolate shavings also work well if someone wants to add a contrast to all that pink.
For kids’ parties, adding rainbow sprinkles or edible glitter makes the cake feel more festive without requiring any special decorating skills. Writing a message with store-bought decorating gel takes about two minutes and personalizes the cake for whoever’s celebrating. The simple presentation is part of what makes this cake special though, so there’s no need to go overboard with decorations. The homemade quality speaks for itself, and sometimes that’s more meaningful than trying to recreate what professional bakers do with their fancy tools and techniques.
Making a cake that someone wants to frame in their kitchen says everything about how special this recipe really is. It’s not complicated or fussy, doesn’t require special equipment or hard-to-find ingredients, and still manages to create memories that last for decades. The combination of convenience and genuine strawberry taste makes this the kind of recipe that gets pulled out year after year, becoming part of family history one birthday at a time.
MeeMee’s Legendary Strawberry Cake
Course: DessertCuisine: American12
servings15
minutes20
minutes425
kcalThis 60-year-old family recipe combines cake mix and real strawberries for the moistest birthday cake that’s been making memories for three generations.
Ingredients
1 box white cake mix
1 (3-ounce) box strawberry Jell-O
⅔ cup vegetable oil
4 large eggs, beaten
1 cup frozen strawberries, thawed with juice
1 (16-ounce) box confectioners’ sugar
1 stick (8 tablespoons) butter, softened
½ cup frozen strawberries for frosting
Directions
- Preheat your oven to 350 degrees F and line two 9-inch round cake pans with wax paper. Grease the wax paper and sides of the pans with butter or cooking spray to ensure the layers release easily after baking. Set the prepared pans aside while mixing the batter.
- In a large mixing bowl, combine the white cake mix and the entire box of strawberry Jell-O powder. Stir these dry ingredients together with a whisk to make sure they’re evenly distributed throughout the mixture. This combination gives the cake both structure and that signature strawberry essence.
- Add the vegetable oil, beaten eggs, and the cup of thawed frozen strawberries with all their juice to the dry mixture. Use an electric mixer on medium speed to beat everything together for about 2 minutes until the batter is smooth and well combined. The batter will be a pretty pale pink color with small bits of strawberry throughout.
- Divide the batter evenly between your two prepared cake pans, using a spatula to scrape all the batter from the bowl. Tap each pan gently on the counter a couple times to release any air bubbles that might create holes in the finished cake. Bake for 15 to 20 minutes until a toothpick inserted in the center comes out clean.
- Remove the cake pans from the oven and let them cool in the pans for about 10 minutes on a wire rack. Run a table knife around the edges of each pan to loosen any spots that might stick. Carefully invert the pans onto the wire rack and remove the wax paper, then let the layers cool completely before frosting.
- While the cake layers cool, make the frosting by beating together the entire box of confectioners’ sugar, the softened stick of butter, and the half cup of frozen strawberries. Use an electric mixer on low speed at first to avoid a sugar cloud, then increase to medium-high speed. Beat for 3 to 4 minutes until the frosting is smooth, creamy, and light pink.
- Place the first cake layer on your serving plate and spread about one-third of the frosting evenly across the top, going all the way to the edges. Position the second layer on top, making sure it sits level and centered. Spread the remaining frosting over the top and sides of the cake, using a spatula or butter knife to create swirls if desired.
- Refrigerate the finished cake for at least one hour before serving to let the frosting firm up and the layers settle. The cake can be decorated with fresh strawberries, sprinkles, or left plain before serving. Store any leftover cake covered in the refrigerator for up to five days.
Notes
- Thaw the frozen strawberries completely at room temperature or in the microwave, and make sure to use all the juice that collects because it adds essential moisture to both the cake and frosting.
- The butter for the frosting needs to be truly softened to room temperature, not melted, so it whips up light and fluffy rather than making the frosting greasy.
- For easier layer removal, some bakers prefer to refrigerate the layers for 30 minutes before attempting to frost them, as cold cake produces fewer crumbs and is sturdier to work with.
- This recipe can also be baked in three 8-inch pans for a taller layer cake, just reduce the baking time by a few minutes and check for doneness with a toothpick.
Frequently asked questions about this strawberry cake
Q: Can I use fresh strawberries instead of frozen ones?
A: Fresh strawberries don’t have enough juice to properly moisten the cake and frosting. Frozen strawberries release more liquid when they thaw, which is essential for getting that signature moist texture. If using fresh berries, they would need to be pureed and the recipe adjusted to add extra liquid.
Q: Does this cake need to be refrigerated?
A: Yes, this cake should be stored in the refrigerator because the butter-based frosting can spoil at room temperature. The cake will stay fresh for up to five days when covered and refrigerated. Let slices sit at room temperature for about 10 minutes before serving for the best texture.
Q: Can I make this cake ahead and freeze it?
A: The unfrosted cake layers can be wrapped tightly in plastic wrap and frozen for up to three months. Thaw them in the refrigerator overnight before frosting. Individual frosted slices can also be frozen, though the frosting texture may change slightly after thawing.
Q: What can I substitute for the strawberry Jell-O?
A: The Jell-O is what gives this cake its distinctive strawberry taste and fluffy texture, so substituting it will change the recipe significantly. Other flavored gelatin mixes could work for different cake variations, but plain gelatin won’t provide the same results. The Jell-O is a key ingredient that shouldn’t be skipped.