
Bacon is a breakfast staple that many of us struggle to cook perfectly. The stovetop method often leaves us with unevenly cooked strips, grease splatters everywhere, and the constant need to watch and flip. But there’s a better way: start with a cold oven. This simple technique transforms your bacon experience with consistent results and virtually no mess.
Why the cold oven method works so well
Starting bacon in a cold oven isn’t just convenient—it’s scientifically sound. When bacon begins cooking at room temperature and gradually heats up, the fat has time to render slowly and evenly. This slow rendering is the key to perfectly crispy bacon without burning. In contrast, putting bacon directly into a hot oven causes the meat to seize quickly while the fat hasn’t had enough time to properly render.
The gradual temperature increase allows the bacon to cook thoroughly from all sides. As the oven warms up to around 400°F, the bacon undergoes a transformation from flabby to firm to crispy. This method essentially mimics the low-and-slow approach that professional chefs use for many types of meat.
Temperature control is another benefit of the cold oven method. When you place bacon in a preheated oven, the outer edges often cook faster than the middle. The cold start eliminates this problem by heating the bacon strips gradually and evenly from all sides, ensuring that every bite has the same perfect texture.
Essential equipment for perfect oven bacon
Before jumping into the cold oven method, having the right equipment will set you up for success. First and foremost, you need a rimmed baking sheet. This is non-negotiable, as the rimmed edges prevent bacon grease from spilling into your oven. Standard cookie sheets without rims simply won’t work safely.
Lining your baking sheet with parchment paper or aluminum foil makes cleanup drastically easier. If using foil, make sure it completely covers the pan and comes up the sides to contain all the rendered bacon fat.
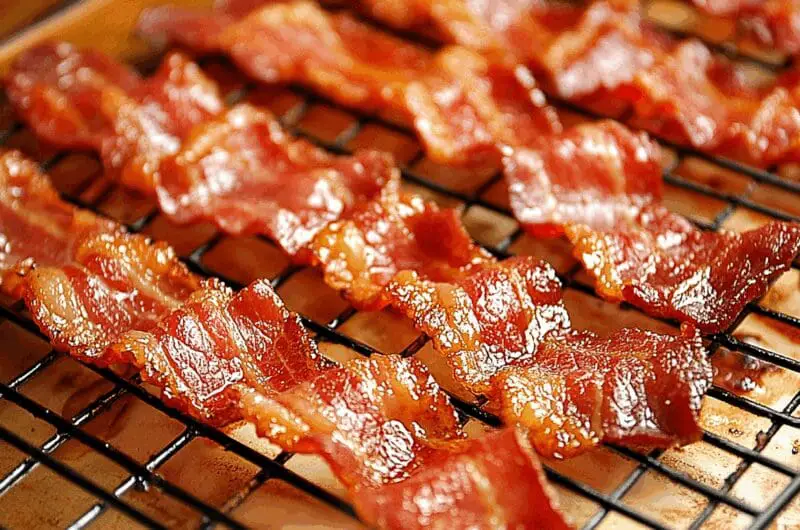
For the crispiest bacon possible, a wire cooling rack that fits inside your baking sheet is worth the investment. This elevates the bacon strips, allowing hot air to circulate all around them and letting the rendered fat drip away. The result is bacon that’s uniformly crisp on all sides without sitting in its own grease.
Step by step cold oven bacon method
The beauty of the cold oven bacon method lies in its simplicity. Start by lining your rimmed baking sheet with aluminum foil or parchment paper, making sure to cover the entire surface and extending up the sides. If you’re using a wire rack, place it on the baking sheet now.
Arrange the bacon slices in a single layer on the prepared baking sheet or wire rack. It’s okay if they touch slightly, as the bacon will shrink during cooking, but avoid overlapping the slices. Depending on how you like your bacon, you can place the strips close together or with space between them.
Place the baking sheet with bacon in your cold, unheated oven. Set the temperature to 400°F and close the door. As the oven gradually heats up to the target temperature, the bacon fat renders slowly, resulting in perfectly crisp bacon.
The bacon will typically need 17-20 minutes total cooking time from a cold start, but begin checking at around 15 minutes as oven temperatures vary. Look for a deep golden-brown color and a level of crispness that matches your preference. Once done, transfer the bacon to a paper towel-lined plate to drain excess grease.
How to adjust cooking time for different bacon types
Regular, thin-cut bacon typically cooks fastest, usually reaching ideal crispness in 15-18 minutes using the cold oven method. Thick-cut bacon requires more time, approximately 20-25 minutes from a cold start. Thick-cut bacon benefits tremendously from the cold oven method, as the slow rendering helps prevent burnt exteriors with undercooked middles.
Center-cut bacon, which comes from the middle of the pork belly and has a more uniform thickness, typically cooks very evenly using this method. It usually requires about the same time as regular bacon (15-18 minutes) but yields more consistent results from strip to strip.
Flavored varieties like maple or pepper bacon need careful monitoring. The sugars in maple bacon can burn more easily, so you might want to reduce the temperature to 375°F and extend the cooking time slightly.
Common mistakes that ruin oven bacon
Even with the foolproof cold oven method, there are several pitfalls that can compromise your results. The most common mistake is overcrowding the baking sheet. When bacon strips are overlapping or packed too tightly, they steam rather than roast, resulting in flabby, unevenly cooked bacon.
Another frequent error is using the wrong type of baking sheet. Thin, flimsy baking sheets can warp at high temperatures and cook unevenly. Always use a sturdy, heavy-gauge rimmed baking sheet for best results.
Neglecting to line your baking sheet properly creates unnecessary cleanup headaches. Always line your baking sheet completely with parchment paper or heavy-duty aluminum foil, making sure the lining extends up and over all edges of the pan.
Walking away and forgetting about your bacon is perhaps the most heartbreaking mistake. While oven bacon requires less attention than stovetop methods, it still needs monitoring, especially in the final minutes. Set a timer for 2-3 minutes less than the expected cooking time so you can check and remove the bacon at exactly the right moment.
Tips for reducing bacon splatter
Oven bacon already produces less splatter than stovetop methods, but you can reduce mess even further. One effective approach is to use higher-rimmed baking dishes like a casserole dish or roasting pan instead of a standard baking sheet. The taller sides help contain spatters that might otherwise hit oven walls.
Consider covering your bacon with a sheet of parchment paper for the first half of cooking. This creates a temporary lid that allows the fat to render while containing most splatter. After about 10 minutes, remove the parchment to let the bacon crisp up properly. Some cooks alternatively use a loose tent of aluminum foil over the bacon.
The temperature at which you cook bacon significantly impacts splatter levels. While 400°F is standard for the cold oven method, reducing to 375°F can help minimize splatter without significantly affecting results.
Saving and using rendered bacon fat
One of the wonderful bonuses of cooking bacon in the oven is the clean, pure bacon fat you can easily collect afterward. Once your bacon is cooked and removed from the sheet, give the rendered fat a few minutes to cool slightly but not solidify. Then carefully pour it through a fine-mesh strainer or a paper towel-lined funnel into a heat-resistant container, like a mason jar.
Properly strained and stored bacon fat can be kept at room temperature for about a month if you use it regularly. For longer storage, refrigeration is recommended, where it can last for up to six months. Some cooks even freeze bacon fat in ice cube trays for portion-controlled cooking fat that lasts nearly indefinitely.
Bacon fat adds incredible flavor to many dishes. Use it to fry eggs, sauté vegetables, or make a roux for gravies and sauces. Even a teaspoon can transform ordinary cornbread or biscuits into something special.
How to store and reheat leftover bacon
Cooking bacon in larger batches using the cold oven method is efficient, but requires proper storage techniques. For short-term storage (3-4 days), place cooled bacon strips in an airtight container with paper towels between layers to absorb any excess grease. Keep refrigerated and use within 4-5 days.
For longer-term storage, freezing cooked bacon is remarkably effective. Lay cooled bacon strips flat on a parchment-lined baking sheet and freeze until solid (about 1-2 hours). Then transfer the frozen strips to a freezer-safe bag or container, separating layers with parchment paper. Properly frozen bacon can last up to three months without significant quality loss.
When it’s time to reheat bacon, several methods work well. For crispy bacon, place the strips on a baking sheet in a 350°F oven for 5-10 minutes. For single portions, a skillet over low heat for 1-2 minutes per side works well. Microwave reheating works in a pinch—place bacon strips between paper towels on a microwave-safe plate and heat in 10-second intervals until just warm.
The cold oven method for bacon has changed how countless home cooks approach this breakfast staple. By allowing the bacon to gradually heat along with the oven, the fat renders perfectly while the meat cooks evenly, creating that ideal balance of crispness and tenderness. The benefits extend beyond just texture and flavor—the hands-off nature of oven cooking, the ability to make large batches at once, and the dramatically simplified cleanup process make this method superior to traditional stovetop techniques. Once you’ve experienced the difference, you’ll never want to cook bacon any other way.
Perfect Oven-Baked Bacon
Course: BreakfastCuisine: American4
servings5
minutes20
minutes150
kcalAchieve crispy, evenly cooked bacon every time with this foolproof cold oven method that minimizes mess and maximizes flavor.
Ingredients
1 pound regular cut bacon
Parchment paper or aluminum foil (for lining)
Optional: black pepper
Optional: brown sugar
Optional: maple syrup
Directions
- Line a rimmed baking sheet completely with parchment paper or heavy-duty aluminum foil, ensuring it extends up and over all edges to contain the bacon grease. If using a wire cooling rack for extra-crispy bacon, place it on the baking sheet now.
- Arrange the bacon slices in a single layer on the prepared baking sheet or wire rack. The slices can touch slightly (they’ll shrink during cooking) but should not overlap. For crispier bacon, leave a little space between slices; for chewier bacon, place them closer together.
- If adding any optional flavor enhancements, sprinkle them evenly over the bacon now. For sweet and savory bacon, try a light dusting of black pepper and brown sugar, or a thin brushing of real maple syrup.
- Place the baking sheet with bacon in a cold, unheated oven. Set the temperature to 400°F and close the door. Allow the oven to heat gradually with the bacon inside – this slow heating process is the key to perfectly rendered, evenly cooked bacon.
- Let the bacon cook for about 17-20 minutes total from a cold start. Begin checking at around 15 minutes as oven temperatures vary. For thick-cut bacon, plan on 20-25 minutes total cooking time.
- Look for bacon that’s deep golden-brown with a level of crispness that matches your preference. Remember that the bacon will continue to crisp slightly as it cools, so it’s better to remove it just before it reaches your ideal texture.
- Once done, use tongs to transfer the bacon to a paper towel-lined plate to drain excess grease. Allow it to cool slightly before serving for maximum crispness.
- Optional: Save the rendered bacon fat by allowing it to cool slightly, then straining it through a fine-mesh sieve or paper towel into a heat-resistant container. Store in the refrigerator for future cooking needs.
Notes
- Never preheat the oven before adding the bacon – starting with a cold oven is the essential trick for this method.
- Use a heavy-gauge, sturdy rimmed baking sheet to prevent warping and ensure even cooking.
- For maple-flavored bacon, reduce the oven temperature to 375°F and extend cooking time by 2-3 minutes to prevent burning.
- Leftover bacon can be refrigerated for up to 5 days or frozen for up to 3 months. Reheat in a 350°F oven for 5-10 minutes or in a skillet over low heat.
- To reduce splatter, you can cover the bacon with parchment paper for the first half of cooking, then remove it to allow the bacon to crisp.
Frequently Asked Questions About Oven Bacon
Q: Why is starting with a cold oven better than preheating first?
A: Starting with a cold oven allows the bacon fat to render slowly and evenly as the oven gradually heats up. This slow rendering process is key to achieving perfectly crispy bacon without burning. When bacon is placed in a preheated oven, the meat can seize quickly while the fat hasn’t had enough time to properly render, resulting in unevenly cooked bacon with parts that may be burnt on the edges and undercooked in the middle. The cold start method ensures every strip cooks evenly from edge to edge.
Q: How do I know when my oven bacon is done?
A: Look for bacon that’s deep golden-brown with your preferred level of crispness. Regular cut bacon typically takes 17-20 minutes total from a cold start, but begin checking at around 15 minutes as oven temperatures vary. Thick-cut bacon usually needs 20-25 minutes. Remember that bacon will continue to crisp slightly as it cools, so it’s better to remove it just before it reaches your ideal texture rather than risk overcooking. The color should be consistent across the strips, and the fat should be rendered and translucent rather than white and opaque.
Q: Is a wire rack necessary or can I cook the bacon directly on the baking sheet?
A: A wire rack is optional but recommended for maximum crispiness. When bacon is elevated on a rack, hot air can circulate around the entire strip, and the rendered fat drips away, resulting in bacon that’s uniformly crisp on all sides. If you don’t have a rack, you can absolutely cook bacon directly on the lined baking sheet – it will still turn out delicious, though possibly slightly less crisp on the underside where it contacts the sheet. If cooking directly on the sheet, you may want to blot the bacon with paper towels after cooking to remove excess grease.
Q: How do I store leftover oven-baked bacon and how long does it last?
A: For short-term storage (3-4 days), place cooled bacon strips in an airtight container with paper towels between layers to absorb any excess grease. Keep refrigerated and use within 4-5 days. For longer-term storage, freeze the cooked bacon: lay cooled strips flat on a parchment-lined baking sheet, freeze until solid (about 1-2 hours), then transfer to a freezer-safe bag or container with parchment paper between layers. Frozen bacon can last up to three months. To reheat, place bacon on a baking sheet in a 350°F oven for 5-10 minutes, use a skillet over low heat for 1-2 minutes per side, or microwave between paper towels in 10-second intervals until just warm.