
Standing at the stove stirring risotto for 20 minutes straight sounds like torture, especially after a long day. What if someone told you that creamy, restaurant-quality risotto could come out of your microwave in about half that time with barely any stirring? Making risotto in the microwave isn’t just possible, it’s actually easier and more forgiving than the traditional stovetop method. The microwave approach gives you all that velvety texture and rich taste without the constant babysitting, and honestly, nobody at your dinner table will know the difference.
Why microwave risotto actually works better for busy people
Traditional risotto requires standing over a hot stove, adding broth one ladle at a time while stirring constantly. The microwave method tosses that whole routine out the window. Instead of hovering over your pot, you can prep other parts of dinner, help with homework, or just sit down for a few minutes. The rice cooks evenly in the microwave, and the steam stays trapped in the dish, which actually helps create that signature creamy texture. The best part is that if you forget about it for an extra 10 or 15 minutes after it’s done cooking, nothing bad happens. With stovetop risotto, walking away for even five minutes can mean a scorched, stuck-on mess at the bottom of your pan.
The forgiving nature of microwave risotto makes it perfect for weeknight dinners when things get chaotic. Unlike the stovetop version where timing is everything, the microwave gives you some breathing room. The rice absorbs the liquid at a steady pace without needing constant attention, and the covered dish creates a mini steam environment that keeps everything moist. Even if your microwave is a little weaker or stronger than average, you can easily adjust by adding a minute or two to the cooking time. This flexibility means less stress and more time to actually enjoy cooking dinner instead of feeling chained to the kitchen.
Getting your ingredients and tools ready
Before starting, you’ll need a large microwave-safe dish, ideally around three quarts or bigger. Don’t use something too small because the liquid will bubble up and potentially overflow, creating a real mess inside your microwave. A glass or ceramic casserole dish with a lid works perfectly. For the rice, you absolutely must use Arborio rice, which is a short-grain Italian rice variety that releases starch as it cooks. This starch is what creates that signature creamy texture, so regular long-grain rice just won’t cut it here. Most grocery stores carry Arborio rice in the rice or Italian foods section, and it’s worth seeking out the real thing rather than trying to substitute.
Gather your other basics including butter, onion, garlic, broth, white wine, and Parmesan cheese. The basic ingredients are simple and most people have them on hand already. Vegetable or chicken broth both work great, and if you don’t want to use wine, you can substitute with extra broth or even apple juice or white grape juice. Having everything measured and ready before you start makes the process smoother. Chop your onion and mince your garlic ahead of time so you’re not scrambling once the cooking begins. This prep work takes maybe five minutes but makes everything flow so much easier once you start the actual cooking process.
Starting with the aromatic base
The first step involves cooking butter, garlic, and onion together in the microwave. Put three tablespoons of butter, one minced garlic clove, and one chopped onion into your microwave-safe dish. Microwave this mixture on high for about three minutes, stopping halfway through to give it a stir. This initial cooking softens the onion and releases all those aromatic compounds from the garlic, creating a base that adds depth to the finished dish. The butter melts and coats everything, starting the process of building rich taste into the rice. Don’t skip this step even though it might seem tempting to throw everything in at once, because these aromatics need that head start to properly develop their taste.
While the butter and aromatics are cooking, heat your broth separately in the microwave until it’s hot but not boiling, which takes about two minutes. Using warm broth instead of cold helps the rice cook more evenly and reduces the total cooking time. Some recipes skip this step, but spending an extra two minutes to warm the broth really does make a difference in the final texture. Once your onion mixture is done and your broth is heated, you’re ready to add the rice and start the main cooking phase. The kitchen should smell amazing at this point, with that classic combination of butter, garlic, and onion that makes everyone start asking when dinner will be ready.
Adding rice and the first cooking phase
Stir one and a half cups of Arborio rice into the butter and onion mixture, making sure every grain gets coated with the buttery base. This coating is important because it helps the rice cook evenly and prevents it from turning mushy. Pour in one and a half cups of the heated broth and stir everything together. Cover the dish tightly with its lid or with microwave-safe plastic wrap, leaving just a small vent for steam to escape. Microwave on high for six minutes. During this time, the rice starts absorbing the liquid and beginning to soften. The starch on the outside of each grain begins to dissolve into the liquid, which is what eventually creates that creamy texture everyone loves about risotto.
After the six minutes are up, carefully remove the dish from the microwave because it will be very hot. Give everything a good stir, scraping the bottom and sides to make sure nothing is sticking. At this point, the rice will still be pretty firm and there should be liquid visible in the dish. This is exactly what you want to see. The cooking process happens in stages, allowing the rice to gradually absorb liquid and release its starch. Resist the urge to add more liquid if it looks a little soupy, because the rice still has more cooking time ahead. Replace the cover and get ready for the next cooking phase, which is where the magic really starts to happen.
The wine addition and second cooking stage
Now it’s time to add three-quarters of a cup of white wine to the partially cooked rice. The wine adds a subtle tangy note that brightens up the whole dish and balances the richness from the butter and cheese. If you’re not a wine drinker or don’t want to open a bottle just for this, substituting with more broth works fine, or you can try apple juice or white grape juice as suggested earlier. Stir the wine into the rice thoroughly, making sure it’s distributed evenly throughout the dish. The alcohol will cook off during the next phase, leaving just the pleasant acidity and depth that wine brings to Italian dishes like this one.
Cover the dish again and microwave on high for 10 minutes. This longer cooking time allows most of the remaining liquid to be absorbed by the rice while continuing to break down the starch. About halfway through, if you’re feeling ambitious, you can stop and give it a quick stir, but honestly it’s not necessary. The beauty of this method is that it doesn’t require constant attention. When the timer goes off, the rice should be tender with just a tiny bit of firmness in the center of each grain, and most of the liquid should have been absorbed. If it still looks too soupy, give it another minute or two in the microwave. If it seems too dry, you can stir in a splash of broth or water.
Finishing with cheese makes it creamy
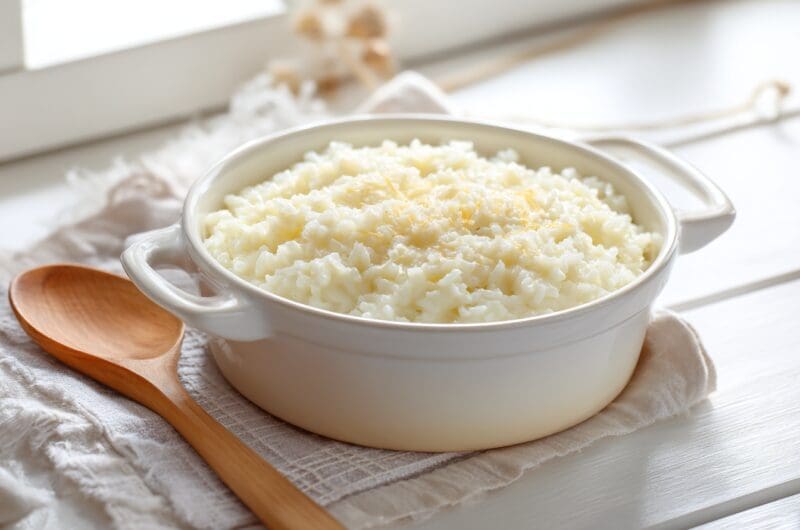
The final step involves stirring in a quarter cup of grated Parmesan cheese while the risotto is still hot. The residual heat melts the cheese and helps it blend smoothly into the rice, adding both creaminess and a salty, nutty taste that ties everything together. Use freshly grated Parmesan if possible because it melts better and tastes so much better than the pre-grated stuff in the green can. Real Parmigiano-Reggiano makes a noticeable difference, but any decent Parmesan will work. Stir vigorously for about 30 seconds to really incorporate the cheese throughout the dish. The risotto should look glossy and creamy at this point, with a consistency that’s loose enough to spread slowly on a plate but thick enough to hold its shape.
Let the finished risotto sit for a minute or two before serving, which gives it time to settle and reach the perfect consistency. The final texture should be creamy and slightly fluid, not stiff or dry. If it seems a little thick after sitting, stir in a tablespoon or two of warm broth to loosen it up. Some people like their risotto on the thicker side while others prefer it more soupy, so adjust to your personal preference. The cheese adds so much richness that you might want to taste it before adding any salt, because Parmesan is already pretty salty. A crack of black pepper on top before serving adds a nice touch, and some fresh herbs like parsley or basil make it look fancy if you’re serving guests.
Making single servings for solo dinners
Cooking for one doesn’t mean you should miss out on good food, and microwave risotto scales down beautifully for single servings. Using an oversized mug, around 20 to 24 ounces, you can make a perfect portion for one person in less than 10 minutes. The larger mug size is critical because the liquid will boil up and you need that extra space to prevent overflow. Start with half a tablespoon of butter and a tablespoon of chopped onion, microwaving on high for 90 seconds with a stir halfway through. This creates your aromatic base just like in the larger recipe, scaled down to single-serve proportions. The whole process feels less daunting when you’re making just enough for yourself.
Add a quarter cup of Arborio rice, half a cup of broth, and a pinch each of garlic powder and black pepper to the mug. Microwave at 50 percent power for two minutes, let it rest for two minutes, then microwave again at 50 percent for another two minutes. This gentler cooking at reduced power helps prevent the small portion from cooking too quickly and getting gummy. Stir in a tablespoon of wine and some chopped mushrooms, then cook at 50 percent power for two more minutes. The single serving method requires a little more attention to power levels because the small amount can overcook easily, but it’s still way faster and easier than making a full pot. Finish with Parmesan cheese and you’ve got a restaurant-quality meal made in a mug.
Adding vegetables and proteins for complete meals
Basic risotto is delicious, but adding vegetables or protein turns it into a complete one-dish meal. Mushrooms are a classic addition and work perfectly in microwave risotto. Chop up some button mushrooms or baby bellas and stir them in during the second cooking phase after adding the wine. They’ll cook right along with the rice and add an earthy depth to the dish. Other vegetables like peas, asparagus, or spinach can be stirred in during the last few minutes of cooking. Frozen peas are especially convenient because they don’t need any prep and they thaw and heat through in just a minute or two. Adding vegetables not only makes the meal more substantial but also adds color and nutrients without much extra effort.
For protein, cooked chicken, shrimp, or even leftover roasted vegetables work great stirred into finished risotto. Since these ingredients are already cooked, just dice them up and mix them in at the very end when you add the cheese, letting the residual heat warm them through. This makes risotto an excellent way to use up leftovers from other meals. Got half a rotisserie chicken sitting in the fridge? Shred some meat and stir it into your risotto. Leftover grilled vegetables from last night’s dinner? Chop them up and add them in. The creamy rice acts as a blank canvas that works with almost any addition, making it one of those versatile recipes that never gets boring because you can change it up every time.
Troubleshooting common microwave issues
Microwaves vary significantly in power, which means cooking times might need adjustment based on your specific appliance. If your risotto comes out too firm after following the recipe times, add a few tablespoons of broth and microwave for another minute or two. On the flip side, if everything seems too soupy and the rice is already tender, just let it sit uncovered for a few minutes to allow some steam to escape and the mixture to thicken up. The rice should be tender with just a slight firmness in the center, what Italians call “al dente.” If your microwave runs hot, try reducing the power to 80 percent instead of using full power for the longer cooking phases. This gentler heat prevents the edges from overcooking while the center catches up.
Sometimes the risotto can turn out gummy or sticky instead of creamy, which usually means it cooked too fast or got stirred too much. The texture issues often come from using the wrong type of rice or from overcooking. Make sure you’re using actual Arborio rice and not regular long-grain rice, because the starch content is totally different. If your first attempt doesn’t turn out perfect, don’t give up. Microwave cooking has a learning curve, and once you figure out how your specific microwave handles this recipe, it becomes incredibly reliable. Keep notes about what worked and what didn’t so you can adjust next time. Most people nail it by the second or third try once they understand how their microwave behaves.
Microwave risotto proves that fancy restaurant dishes don’t need fancy techniques or tons of time. With just a microwave-safe dish, some basic ingredients, and about 20 minutes of mostly hands-off time, anyone can make creamy, delicious risotto at home. The method is forgiving enough for beginners but produces results good enough to impress guests, making it one of those rare recipes that truly simplifies without sacrificing quality. Next time a craving for something comforting and special hits, skip the stovetop stirring and let your microwave do the heavy lifting instead.
Basic Microwave Risotto
Course: Side DishCuisine: Italian4
servings5
minutes19
minutes368
kcalCreamy, restaurant-quality risotto made entirely in the microwave with minimal stirring and maximum convenience.
Ingredients
3 tablespoons butter
1 clove garlic, minced
1 onion, chopped
1½ cups vegetable or chicken broth
1 cup uncooked Arborio rice
¾ cup white wine (or substitute apple juice or additional broth)
¼ cup grated Parmesan cheese
Salt and black pepper to taste
Fresh herbs for garnish (optional)
Directions
- Combine the butter, minced garlic, and chopped onion in a 3-quart microwave-safe casserole dish. Place the dish in the microwave and cook on high power for 3 minutes, stopping to stir halfway through. The butter should be melted and the onion should start to soften and become fragrant.
- While the onion mixture cooks, place the broth in a separate microwave-safe container. Heat the broth in the microwave until hot but not boiling, approximately 2 minutes. Having warm broth helps the rice cook more evenly and reduces total cooking time.
- Add the Arborio rice to the casserole dish with the butter, garlic, and onion mixture, stirring to coat all the grains with the buttery base. Pour in the heated broth and stir everything together thoroughly. Cover the dish tightly with a lid or microwave-safe plastic wrap, leaving a small vent for steam to escape, then microwave on high for 6 minutes.
- Carefully remove the hot dish from the microwave and stir well, scraping the bottom and sides. The rice will still be firm and liquid should be visible. Stir in the white wine until well distributed throughout the rice. Cover the dish again and microwave on high power for 10 minutes more. Most of the liquid should be absorbed when done.
- Remove the dish from the microwave and check the texture. The rice should be tender with just a slight firmness in the center of each grain. If it seems too firm, add a splash of broth and microwave for another 1-2 minutes. If too soupy, let it sit uncovered for a few minutes to thicken.
- Stir the grated Parmesan cheese into the hot risotto vigorously for about 30 seconds until it melts and becomes creamy throughout. The residual heat will melt the cheese and help create that signature glossy, creamy texture. Taste and adjust seasoning with salt and pepper as needed, keeping in mind that Parmesan is already quite salty.
- Let the risotto rest for 1-2 minutes before serving to allow it to reach the perfect consistency. It should be creamy and slightly fluid, spreading slowly on the plate but thick enough to hold its shape. If it seems too thick after sitting, stir in a tablespoon or two of warm broth to loosen it up.
- Serve immediately while hot, garnishing with fresh herbs like parsley or basil if desired. A crack of black pepper on top adds a nice finishing touch. Risotto is best enjoyed fresh but reheats reasonably well in the microwave with a splash of added liquid.
Notes
- Microwave wattages vary, so cooking times may need adjustment. If your microwave runs hot, try reducing power to 80 percent for the longer cooking phases.
- Arborio rice is essential for proper texture and cannot be substituted with regular long-grain rice. The high starch content creates the creamy consistency.
- Use a dish that’s larger than you think necessary, at least 3 quarts, to prevent overflow as the liquid bubbles during cooking.
- Freshly grated Parmesan cheese melts better and tastes significantly better than pre-grated versions in containers.
- Risotto can be customized with additions like mushrooms, peas, asparagus, cooked chicken, or shrimp stirred in during the final stages.
Frequently asked questions about microwave risotto
Q: Can I use regular rice instead of Arborio rice for microwave risotto?
A: No, regular long-grain rice won’t work for risotto because it doesn’t have the high starch content that Arborio rice has. The starch released from Arborio rice during cooking is what creates the signature creamy texture of risotto. Using regular rice will result in a dish that’s more like plain cooked rice rather than creamy risotto. Arborio rice is widely available in most grocery stores and is worth seeking out for authentic results.
Q: How do I prevent my microwave risotto from overflowing?
A: Use a much larger dish than you think you need, at least 3 quarts for a standard recipe. The liquid bubbles up significantly during cooking and needs extra space. Also make sure to leave a small vent when covering the dish rather than sealing it completely tight. If your dish is too small, the liquid will boil over and create a mess in your microwave.
Q: Can I make risotto ahead of time and reheat it?
A: Yes, microwave risotto reheats surprisingly well. Store leftovers in an airtight container in the refrigerator for up to three days. When reheating, add a few tablespoons of broth or water to the risotto and microwave in short intervals, stirring between each, until heated through. The added liquid helps restore some of the creamy texture that gets lost during refrigeration.
Q: Why did my risotto turn out gummy instead of creamy?
A: Gummy risotto usually results from cooking too long or at too high a temperature, which causes the rice to overcook and release too much starch. It can also happen if you stir the rice too vigorously or too frequently. Try reducing your microwave power to 80 percent for the longer cooking phases, and avoid stirring more than the recipe directs. Each microwave is different, so you may need to adjust times based on your specific appliance.