
There’s a reason roast chicken has been the default Sunday dinner for generations. It’s not trendy. It’s not complicated. And somehow, no matter how many times you make it, nobody at the table sighs and says, “Roast chicken again?” It just works. A whole bird, some butter, a hot oven, and about two hours of your time — and you’ve got dinner tonight, leftovers for Monday, and the bones for soup on Tuesday. No single recipe gives you more mileage for your money.
But here’s the thing: most people roast chicken the same boring way every time. Salt, pepper, maybe some olive oil, and hope for the best. The result is fine. Edible. Forgettable. What separates a fine roast chicken from one that makes people go quiet at the table — the kind where everyone’s pulling at the crispy skin before you even finish carving — comes down to one move: getting herb butter under the skin, not just on top of it.
I’m going to walk you through exactly how to do this, plus the small details that actually matter (and the ones that don’t). This is the roast chicken I come back to over and over, and I think you will too.
Why Butter Under the Skin Changes Everything
When you rub butter or oil on the outside of a chicken, it helps the skin brown. That’s about it. But when you work seasoned butter under the skin and directly onto the meat, you’re doing two things at once. First, the butter bastes the breast and thigh meat from the inside as it melts, keeping things juicy. Second, the herbs and garlic in that butter are protected from the direct heat of the oven — so they infuse the meat with flavor instead of burning to a bitter crisp on the surface. Garlic especially burns fast when it’s exposed to high oven heat, and burned garlic tastes awful. Tuck it under the skin and you avoid that problem entirely.
The herb butter itself is simple. Softened unsalted butter, fresh rosemary, fresh thyme, a few sage leaves, a clove or two of minced garlic, some lemon zest, and a drizzle of honey if you want a touch of sweetness. Chop the herbs finely, mash everything together with a fork, and you’re done. You can make this herb butter up to 24 hours ahead and keep it in the fridge — actually, I recommend it, because it gives the flavors time to meld.
The Spoon Trick for Loosening the Skin
Getting butter under chicken skin without ripping it is the part that trips people up. Here’s the trick: use an upside-down dessert spoon. The rounded back of the spoon hugs the curves of the breast meat, and you can slide it gently between the skin and the flesh, working it back and forth until the skin is loosened over both breasts and down toward the thighs. Go slow. Start at the neck end of the breast where there’s usually a natural opening. Once the skin is loosened, use your fingers or the spoon to push the butter mixture underneath and spread it around evenly. Aim for about two-thirds of the butter under the skin and the remaining third rubbed on the outside for browning.
Setting Up the Pan (This Part Matters More Than You Think)
Don’t just drop the chicken straight onto the bottom of a roasting pan. It’ll sit in its own juices and the underside will steam instead of roast. Instead, make a bed of roughly chopped onions, a few smashed garlic cloves, and some carrot chunks in the bottom of the pan. The chicken sits on top of this little vegetable raft, which lifts it up and lets hot air circulate underneath. Those vegetables also caramelize in the drippings and become the base for an incredibly flavorful pan sauce or gravy. Ina Garten adds fennel to her vegetable bed along with onions and carrots, which is a nice option if you have some sitting in the fridge. Toss the vegetables with a little olive oil, salt, and a handful of thyme sprigs before arranging them.
A cast iron skillet works great here if your bird fits. Otherwise, any oven-safe roasting pan will do — even one of those big disposable aluminum pans from the grocery store works in a pinch.
The Dry Skin Secret
If you want crispy skin — and of course you want crispy skin — you need to start with dry skin. Pat the chicken VERY dry with paper towels. All over. Including the cavity. Moisture is the enemy of crispiness. If you’re really committed, place your buttered and seasoned chicken uncovered in the fridge for a few hours before roasting. The cold, dry air of the refrigerator pulls moisture from the skin surface, and when it hits the hot oven, you get shatteringly crisp results. This is the same principle behind air-drying a duck before roasting, and it works beautifully with chicken too.
Temperature and Timing
There are two schools of thought here, and both work. The first: roast at a consistent 425°F for the entire cook time. At that temperature, a 4 to 4.5 pound chicken takes roughly 1 hour and 15 minutes to 1 hour and 30 minutes. The rule of thumb is about 15 minutes per pound. The second approach — and the one I slightly prefer — is to start hot at 425°F for the first 10 minutes to get the skin going, then drop the oven to 350°F for the rest. This gives you a burst of browning power up front, then a gentler cook that’s more forgiving if your timing isn’t exact.
Either way, the only number that truly matters is the internal temperature: 165°F in the thickest part of the thigh, away from the bone. Get a digital instant-read thermometer if you don’t have one. They cost $12 at Walmart and they’ll save you from ever serving raw or overcooked chicken again.
Baste twice during roasting — once at the 30-minute mark and again about 30 minutes before it’s done. Spoon the pan juices right over the top. It adds a layer of flavor and helps with even browning.
Truss Those Legs (Seriously)
I know trussing sounds fussy. It takes 20 seconds. Tie the drumstick ends together with a piece of kitchen string — any cotton twine works. Tuck the wing tips underneath the body so they don’t burn. That’s it. Trussing keeps the cavity more enclosed, which does two things: it helps the legs and thighs cook more evenly, and it slows down the rate at which the breast heats up. Since breast meat dries out faster than dark meat, anything you can do to equalize the cooking between white and dark meat is a good idea. If you skip trussing, check the temperature 10 to 15 minutes earlier because the bird will cook faster.
The Rest Period Isn’t Optional
When the chicken comes out of the oven, put it on a cutting board and walk away for 15 minutes. Do not cover it with foil — covering traps steam and turns that gorgeous crispy skin soft and soggy. During those 15 minutes, the juices redistribute throughout the meat. If you carve too early, all those juices pour out onto your cutting board instead of staying in the chicken, and you end up with drier meat than you should. Fifteen minutes. Set a timer. Use that time to make a quick pan sauce from the drippings.
What to Serve Alongside
Roast chicken goes with almost anything, but some pairings are better than others. My go-to is Parmesan smashed potatoes and roasted carrots — the potatoes get crispy edges and the carrots caramelize alongside the chicken. Green beans sautéed in butter with garlic and toasted almonds are another strong option. For something lighter, a simple arugula salad with lemon juice, olive oil, and shaved Parmesan cuts through the richness beautifully. Couscous or herby rice pilaf if you want something more filling.
Getting Three Meals From One Chicken
This is where a whole roast chicken really earns its keep. Night one, you eat the chicken for dinner. Night two, the leftover meat goes into chicken noodle soup, chicken salad sandwiches, white chicken chili, or tossed into a stir-fry. Night three (or whenever you get around to it), take the stripped carcass, toss it in a big pot with onion, celery, carrots, a few peppercorns, and enough water to cover everything. Let it simmer low and slow for a couple of hours. The bones, cartilage, and connective tissue break down and release collagen, giving you a rich, full-bodied homemade stock that makes boxed broth taste like flavored water. Add a splash of apple cider vinegar to the pot — it helps break down the bones and extract more nutrients. Freeze the stock in quart-size containers and you’ve got liquid gold for risottos, gravies, and sauces for months.
Buying a whole chicken and using every part is consistently cheaper than buying chicken parts separately. At most grocery stores, a whole bird runs $1.50 to $2.00 per pound — compare that to boneless skinless breasts at $3.50 or more. You’re getting more flavor, more meals, and spending less. That’s hard to beat.
Herb Butter Roast Chicken
Course: DinnerCuisine: American4
servings20
minutes1
hour30
minutes620
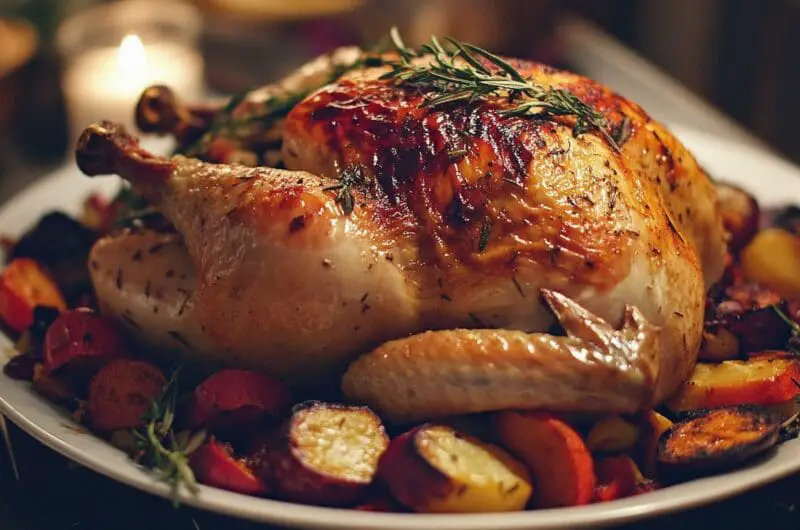
kcalA golden, crispy-skinned roast chicken loaded with garlic-herb butter worked under the skin, roasted on a bed of vegetables that become the base for an incredible pan sauce.
Ingredients
1 whole chicken (4 to 4.5 pounds), giblets removed
4 tablespoons unsalted butter, softened
2 cloves garlic, finely minced
1 tablespoon fresh rosemary, finely chopped
1 tablespoon fresh thyme leaves
1 teaspoon fresh sage, finely chopped
Zest of 1 lemon
1 large yellow onion, roughly chopped, plus 4 smashed garlic cloves and 2 carrots cut into chunks (for the pan bed)
Kosher salt, black pepper, and 1 tablespoon olive oil
Directions
- Preheat your oven to 425°F and position the rack in the lower third of the oven. Take the chicken out of the fridge and let it sit at room temperature for about 30 minutes while you prep everything else. This helps it cook more evenly.
- Make the herb butter by combining the softened butter, minced garlic, rosemary, thyme, sage, and lemon zest in a small bowl. Mash it together with a fork until everything is evenly distributed. Season with a pinch of salt and pepper.
- Pat the chicken very dry with paper towels — all over the outside and inside the cavity. Using the back of a dessert spoon, gently loosen the skin over the breasts and thighs by sliding it between the skin and the meat. Go slowly to avoid tearing.
- Push about two-thirds of the herb butter under the loosened skin, spreading it as evenly as you can over the breast and thigh meat. Rub the remaining butter all over the outside of the chicken. Season generously with kosher salt and pepper on all sides, including inside the cavity.
- Tie the drumstick ends together with kitchen string and tuck the wing tips under the body. This keeps the bird compact and helps it cook evenly. Don’t skip this — it takes 20 seconds and makes a real difference.
- Toss the chopped onion, smashed garlic cloves, and carrot chunks with olive oil, salt, and pepper. Spread them in the bottom of a roasting pan or cast iron skillet. Place the chicken breast-side up on top of the vegetables.
- Roast at 425°F for 10 minutes, then reduce the oven temperature to 350°F and continue roasting for about 1 hour and 15 minutes. Baste the chicken with pan juices at the 30-minute mark and again at the 1-hour mark. The chicken is done when an instant-read thermometer inserted into the thickest part of the thigh reads 165°F.
- Transfer the chicken to a cutting board and let it rest uncovered for 15 minutes — do not cover with foil, or you’ll lose the crispy skin. While the chicken rests, strain the pan drippings and vegetables through a fine mesh strainer, pressing on the solids. Serve the drippings as a simple jus alongside the carved chicken.
Notes
- For extra crispy skin, season and butter the chicken, then leave it uncovered in the fridge for 2 to 4 hours (or overnight) before roasting. The cold air dries out the skin surface.
- Leftover chicken keeps in sealed containers in the fridge for 4 to 5 days, or freeze carved pieces for up to 3 months.
- Save the carcass for homemade stock — toss it in a pot with onion, celery, carrots, peppercorns, and a splash of apple cider vinegar. Cover with water and simmer for 2 to 3 hours.
Frequently Asked Questions
Q: Can I use dried herbs instead of fresh for the butter?
A: You can, but fresh herbs make a noticeable difference here. Dried herbs are more concentrated, so use about one-third the amount called for. That said, the fresh rosemary and thyme are what really make the butter taste special — they’re worth picking up if you can. Most grocery stores sell small clamshell packages of fresh herbs for a couple of dollars.
Q: What if I don’t have kitchen string for trussing?
A: Unwaxed, unflavored dental floss works in a pinch. You can also just tuck the legs into the skin flap near the tail opening if your chicken has enough loose skin. The main goal is keeping the cavity somewhat closed so the breast doesn’t cook too fast compared to the thighs. Even a rough tuck is better than leaving the legs splayed wide open.
Q: My chicken skin always comes out soft and rubbery. What am I doing wrong?
A: Two likely causes. First, you’re not drying the skin well enough before roasting — you really need to blot it aggressively with paper towels. Second, you might be covering the chicken with foil during or after roasting. Steam is the enemy of crispy skin. Roast uncovered the entire time and rest uncovered on a cutting board. Also make sure your oven is fully preheated before the chicken goes in.
Q: How do I know when the chicken is done if I don’t have a meat thermometer?
A: You can pierce the thickest part of the thigh with a knife and check if the juices run clear — no pink. But honestly, an instant-read thermometer is the single most useful tool you can buy for cooking meat. They’re cheap, they’re fast, and they take the guesswork out completely. You’re looking for 165°F in the thigh, measured away from the bone.